Manage report schedules
The Reporting Server provides report-specific schedules to assist you in managing the processing and distribution of reports. All schedules specify a type of recurrence, which can be monthly, weekly, or daily.
This section explains how to add, edit, delete, and manage report schedules, as well as how to run the schedules on demand and enable or disable schedules in Bold Reports® On-Premise.
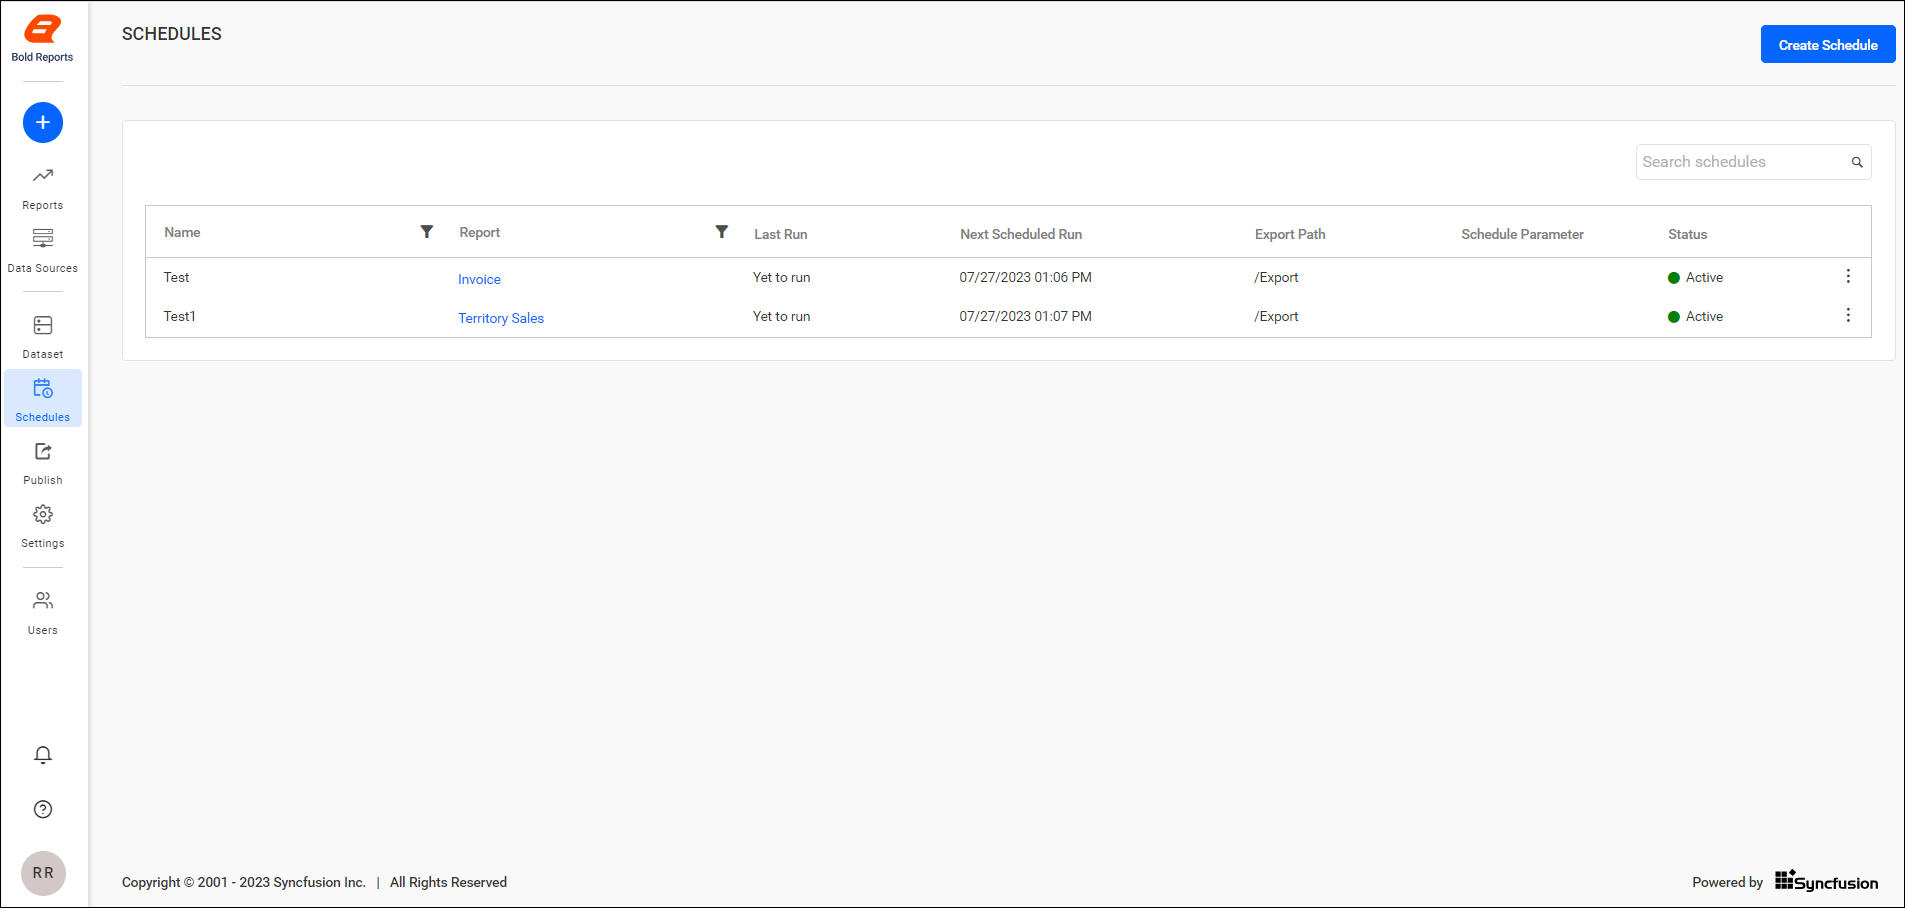
The schedules page displays the schedules that are accessible to the user based on their permissions.
Add schedule
Schedules can be created only if the user has the Create All Schedules permission. Schedules can be created in three ways:
- Add a schedule from the
+icon in the left side menu. - Add a schedule from the context menu of the respective reports.
- Add a schedule from the schedule listing page.
Add a schedule from the Create button menu
-
Click on the
+icon in the left side menu and chooseScheduleto create a new schedule.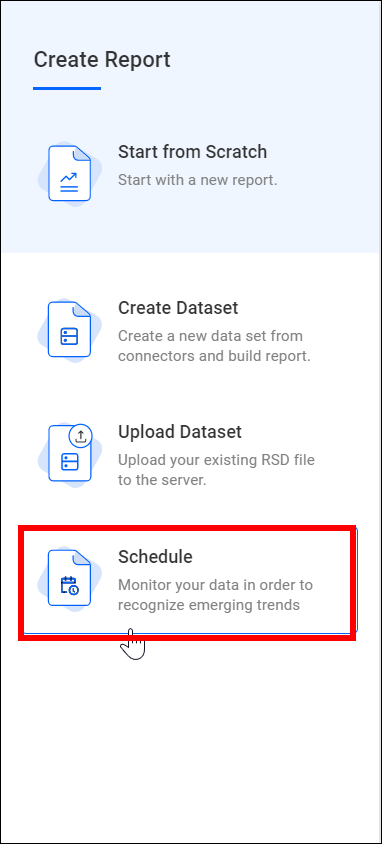
-
Choose the required category from the Category dropdown. Once a category is selected, the corresponding reports under that category will be displayed in the Report dropdown menu.
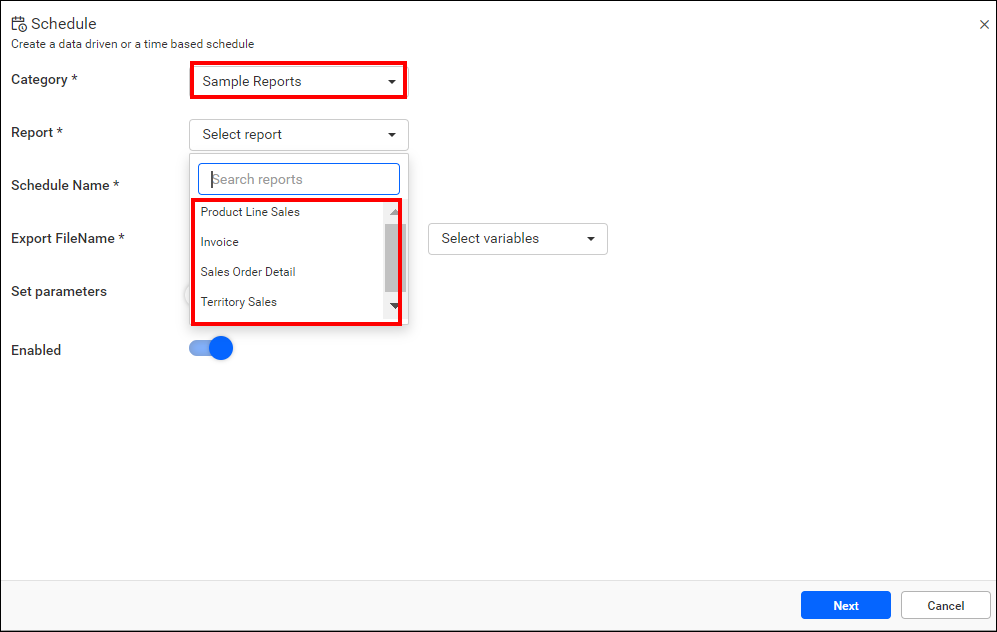
-
Select the desired report from the dropdown menu.
Add a schedule from the context menu of the respective reports
-
Click the
Actionsbutton in the reports grid context menu, then select Create Schedule to schedule the corresponding report.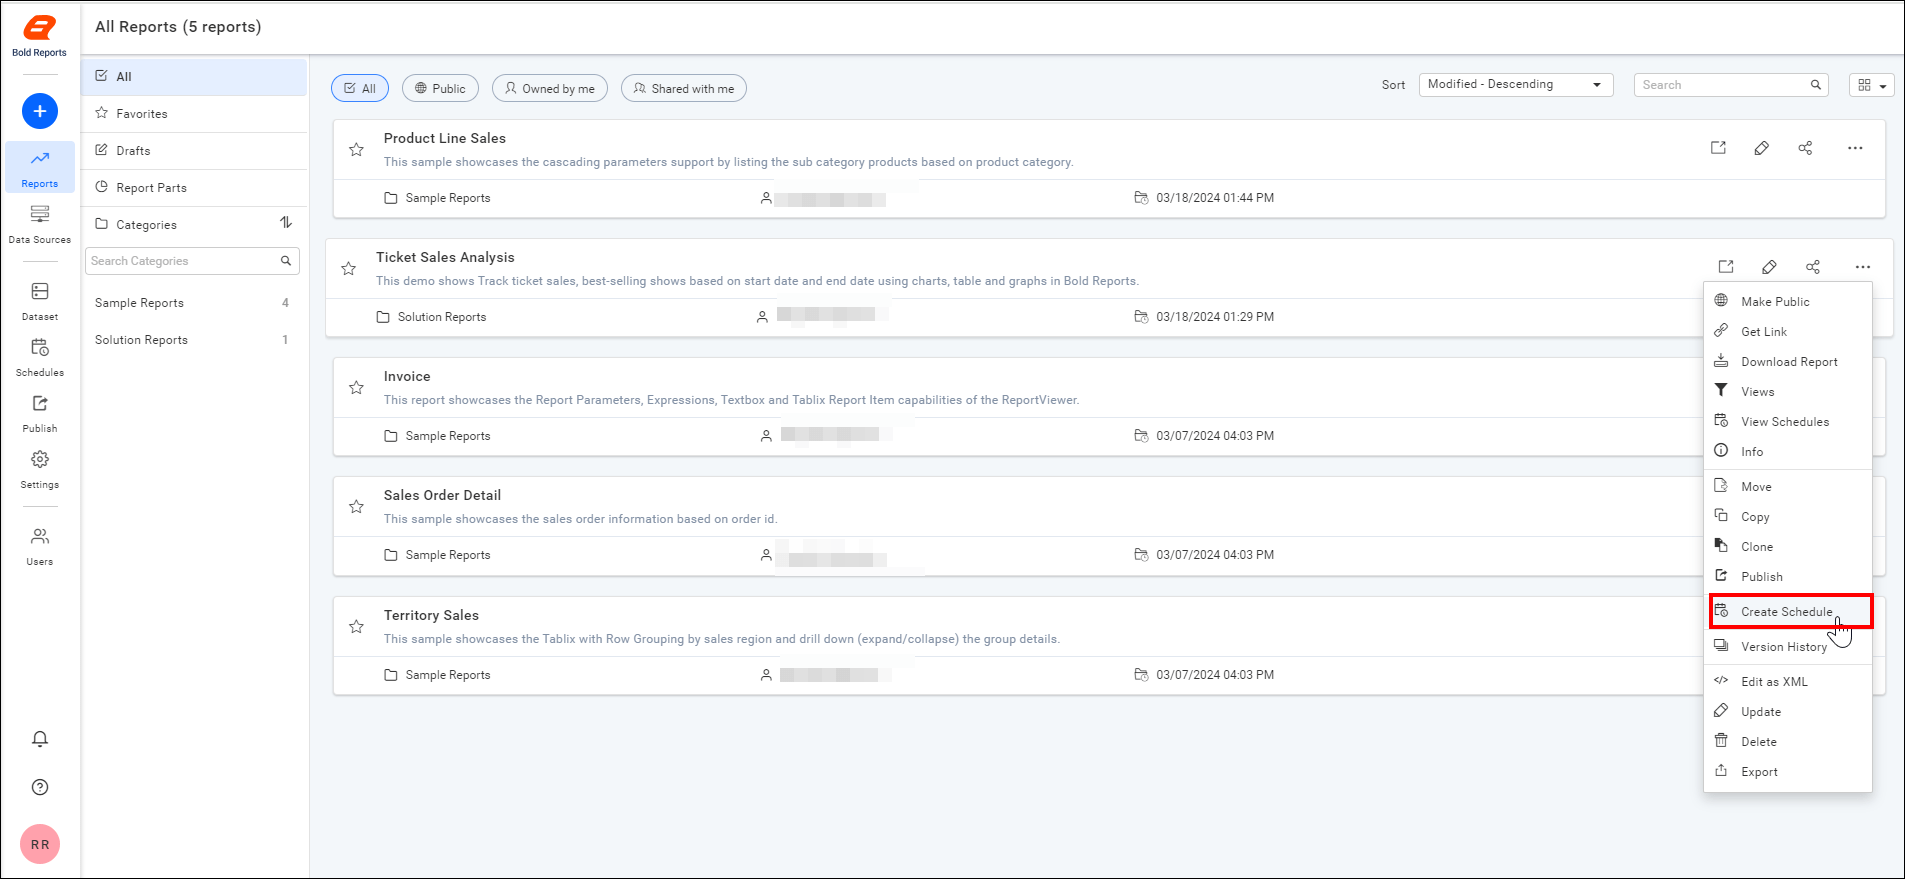
-
Once the dialog box opens, the category and report values are preselected by default.
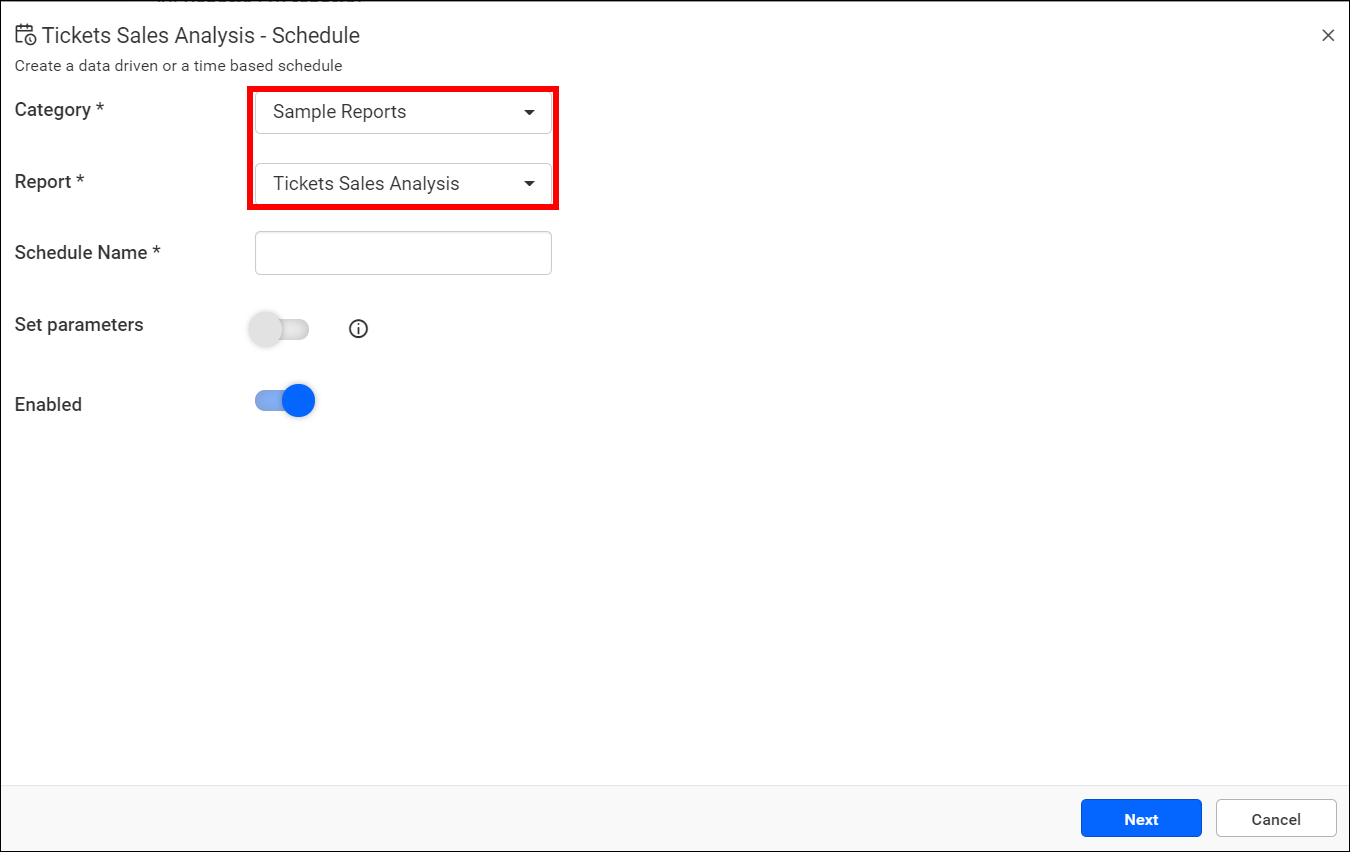
Categories or Reports can be changed from the schedule dialog box.
-
After adding schedule details, click
Nextin the schedule dialog.
Add a schedule from the schedule listing page
-
Click
Schedulesin the left side panel of the Report Server, and then click theCreate Schedulebutton.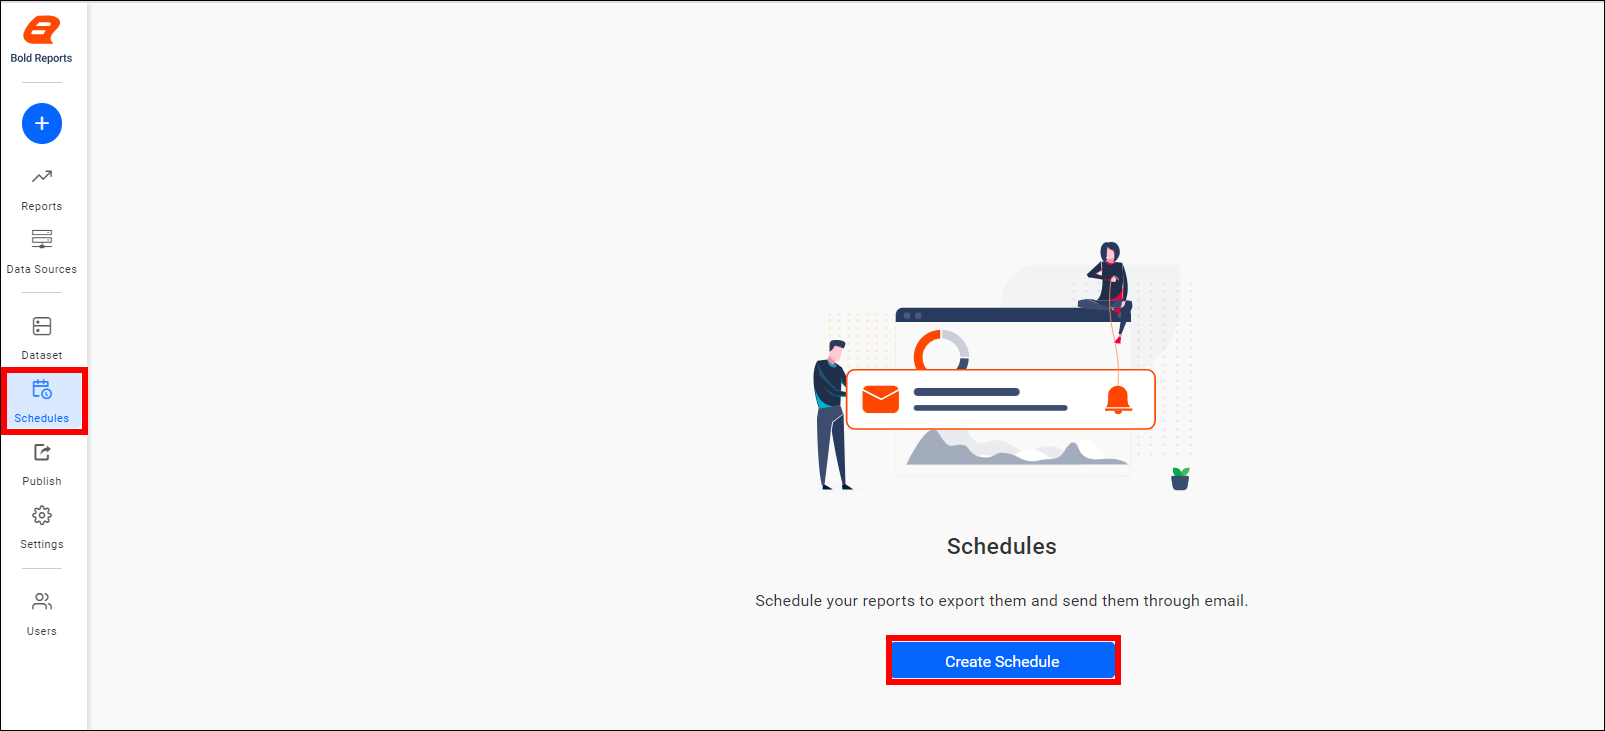
-
Select the required category from the
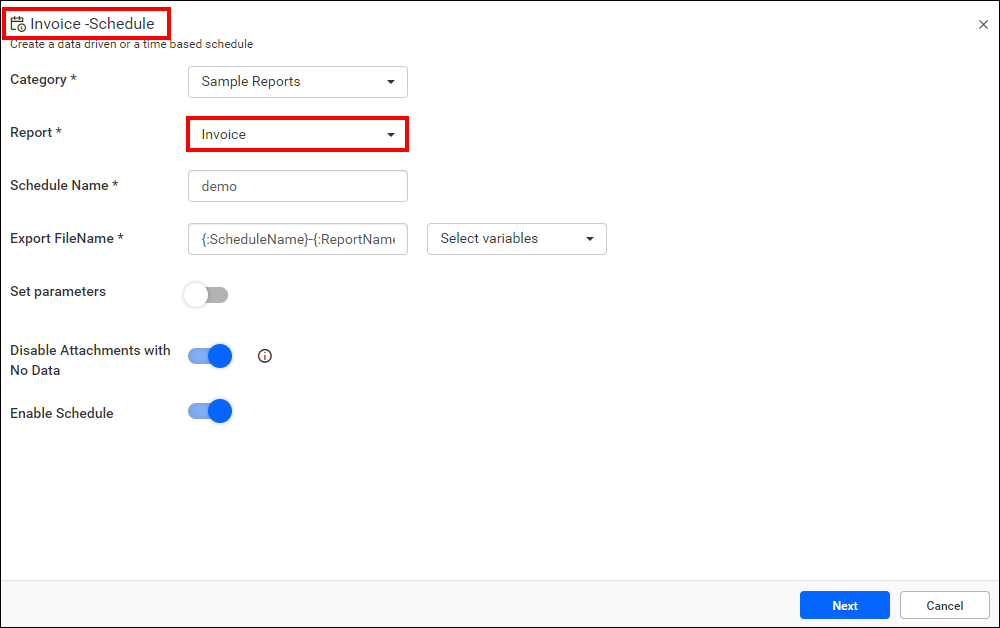
Categorydropdown. After selecting the category, the corresponding reports under that selected category will be displayed in theReportdropdown, -
Select the required report from the dropdown.
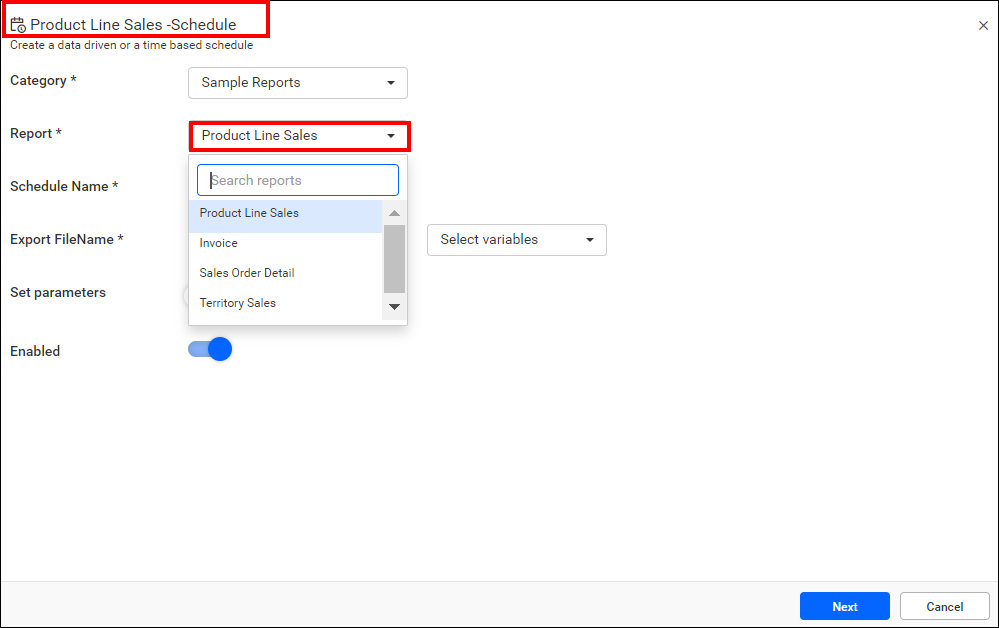
-
Select the export name from the dropdown options, which include Schedule Name, Report Name, Timestamp and Date Format.
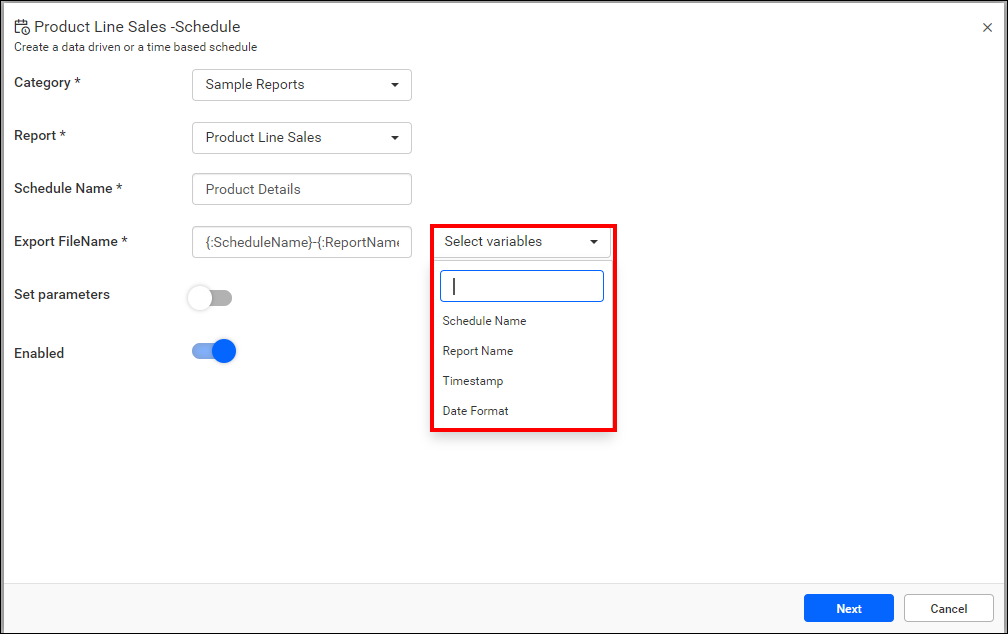
Export FileName predefined variables
- Schedule Name : The name assigned to the specific schedule.
- Report Name : The name of the report that is scheduled.
- Timestamp : A unique identifier generated based on the exact date and time the report was scheduled.
- Date Format : The format in which the date will be displayed in the report.
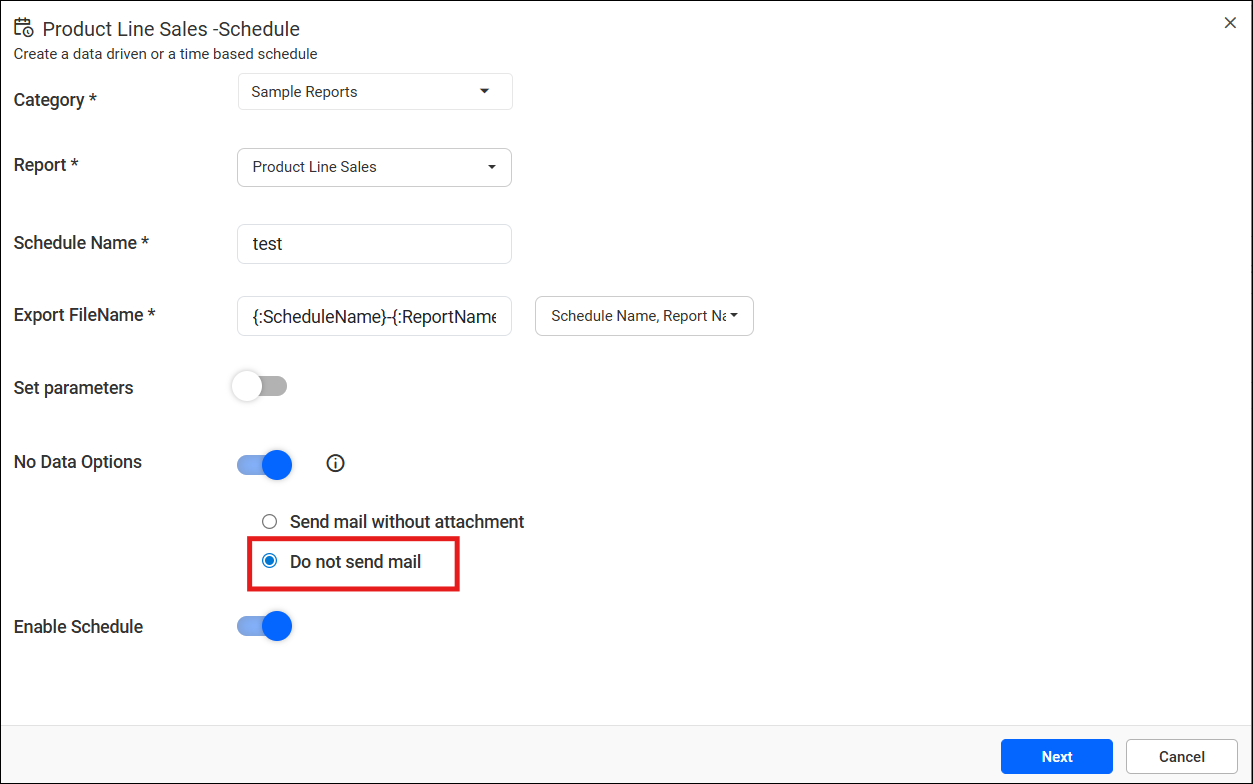
No Data Options
When No Data Options is enabled, scheduled reports with no data will follow the selected behavior:
-
When Send mail without attachment option is selected, the system sends an email notification without attaching the report if the report has no data.
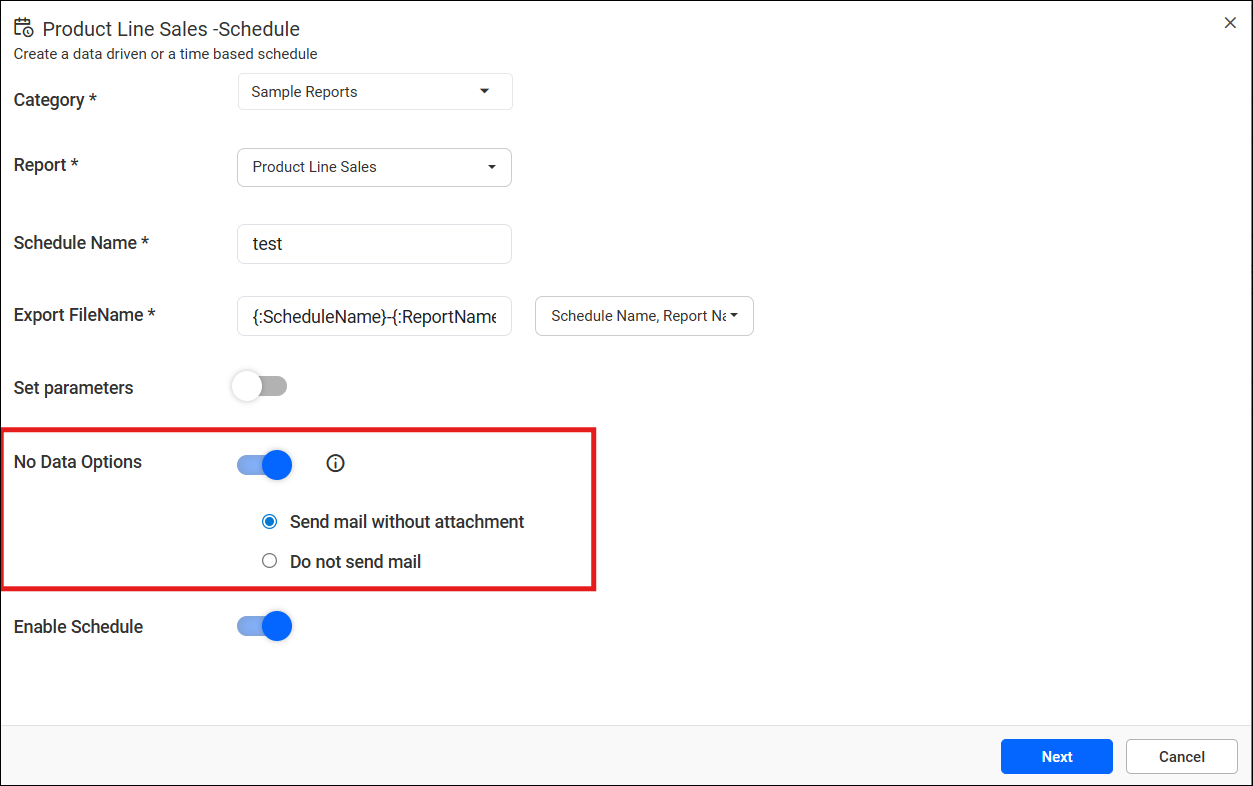
-
When Do not send mail option is selected, no email will be sent if the scheduled report contains no data.
Configure Report Parameters
-
The parameters available for the report will be displayed in the scheduler dialog.

-
Select the parameter values to schedule and export the reports with these filter.
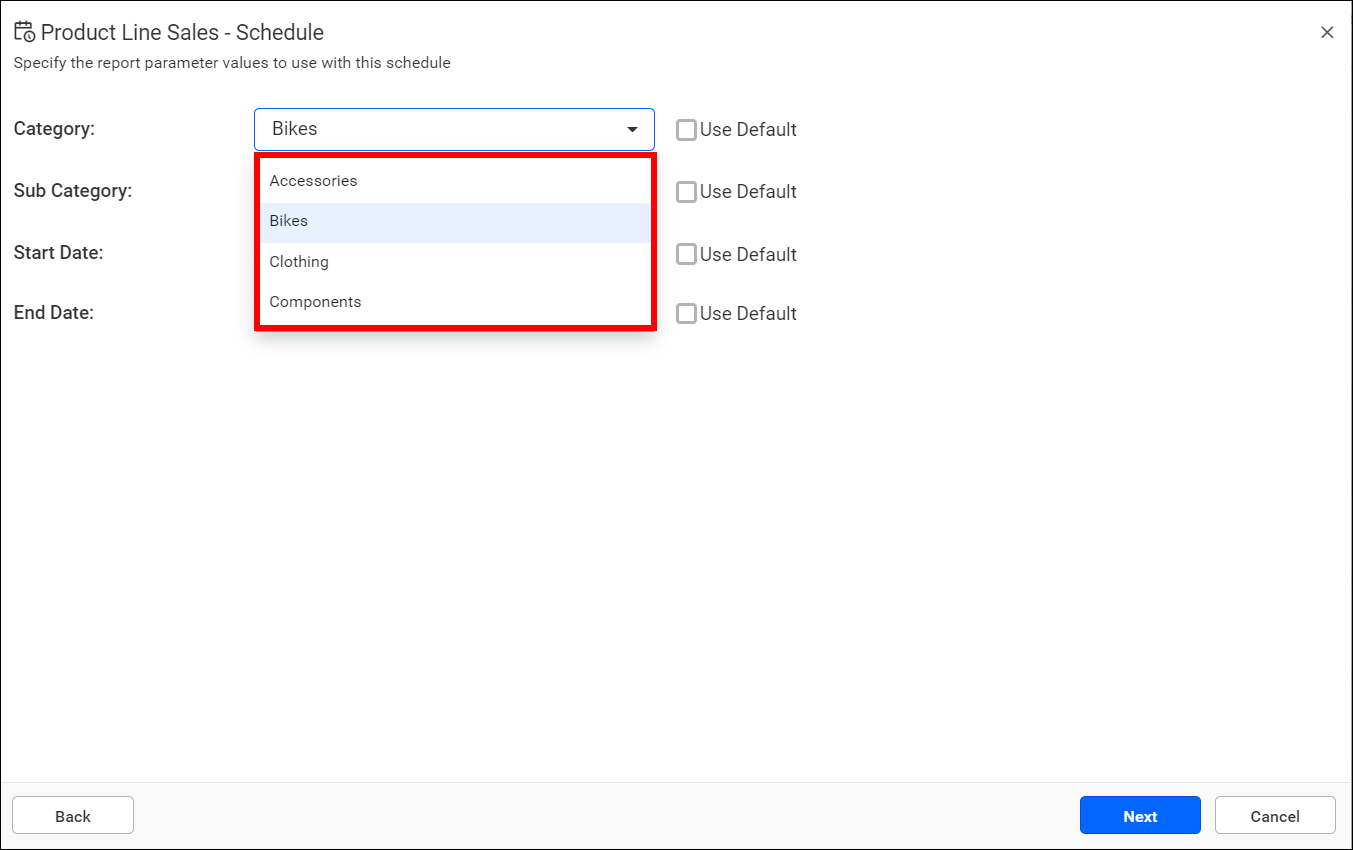
Note: To modify the parameter values, enable the
Set Parametersoption in the schedule dialog box.
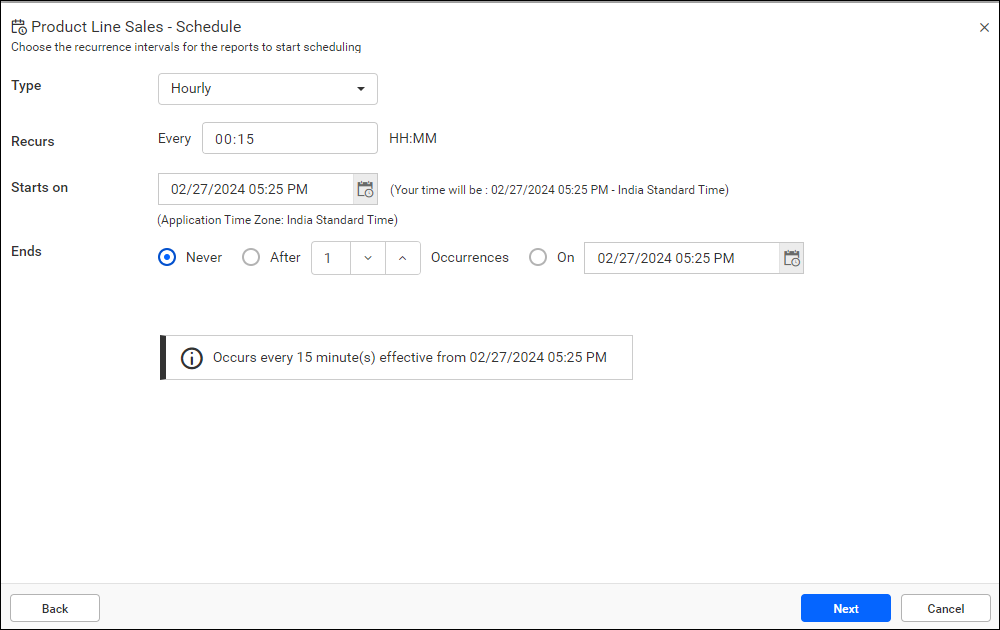
Configure Recurrence Intervals
-
Select the recurrence type, recurrence interval, start date and end date in the `Add Schedule’ dialog box.
-
Reports can be scheduled to run hourly, daily, weekly, monthly, or yearly.
-
The application’s time zone will be displayed below the date picker. The start time of the schedule will be converted to the client’s time zone and displayed on the right side for the user’s convenience.
Compress files to export
-
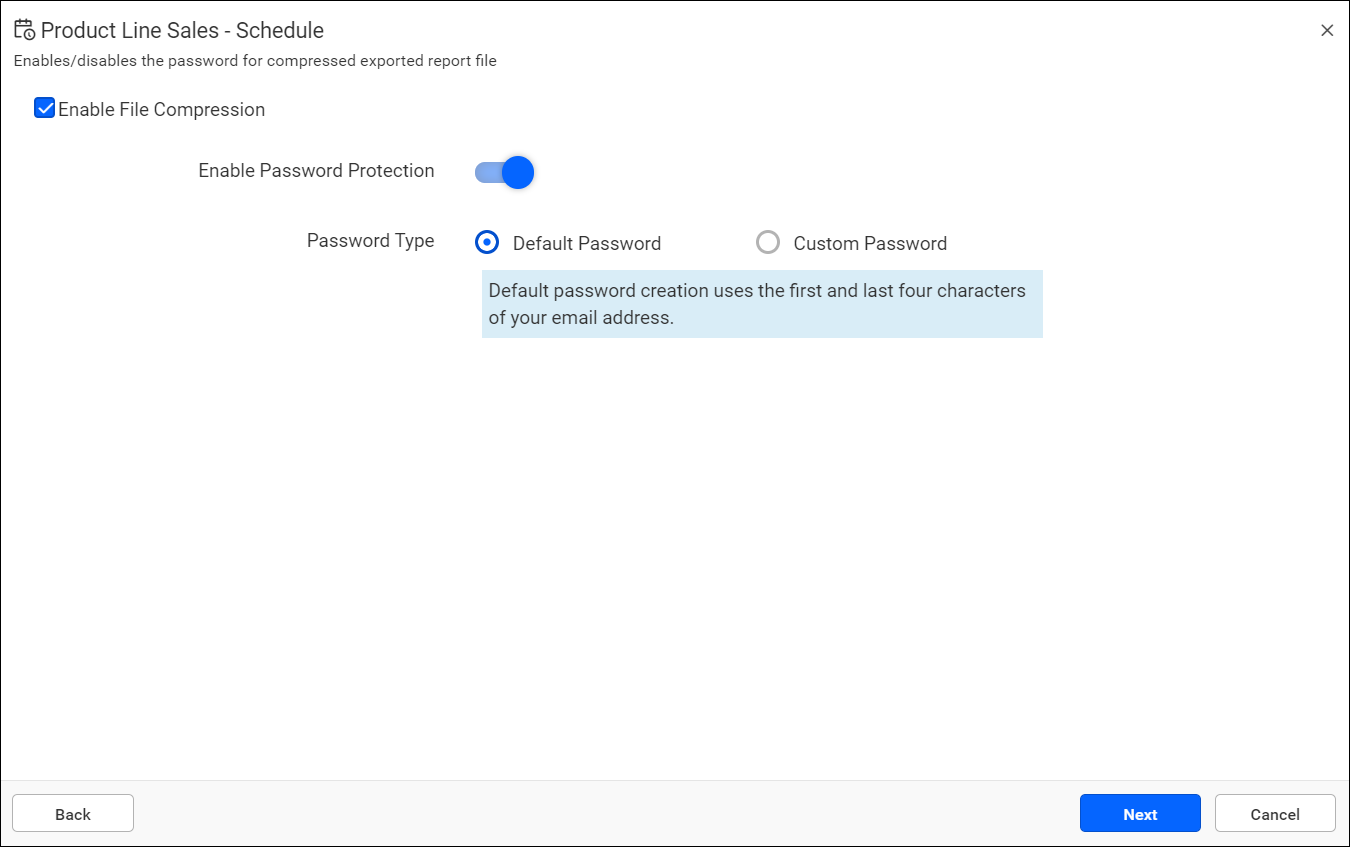
You can compress the exported reports into a zip file by selecting the Enable File Compression option in the schedule dialog box. This is not mandatory, and you can decompress it at any time by simply unchecking that option.
-
Exported reports can be made more secure with password protection by enabling the Enable Password Protection option in the schedule dialog box. The Default Password option is selected by default.
For the default password, the password will be generated as a combination of the first and last four characters of the email.
-
You can customise the password protection rules for exporting reports by choosing the Custom Password option.
-
However, the username or first name is mandatory in the password condition.

For instance, let’s consider a sample user with the following details:
First Name : John
Last Name : Michael
Email: [email protected]
With this sample user, the possible password combinations and their unlock passwords are explained below.
| Password Rule | Unlock Password |
|---|---|
|
First four characters of Email + Last four characters of First Name |
johnJohn |
|
First four characters of First Name + First four characters of Last Name |
JohnMich |
|
First four characters of Email + Last four characters of Last Name |
johnhael |
Customize Mail template
-
The mail template defines the text that is sent via email to the Report Server user.
-
Initially, the default template will be displayed in the mail template. If the custom password is enabled, the user can add a password hint to the mail template if necessary.
-
You can also customize the email template to your preference.
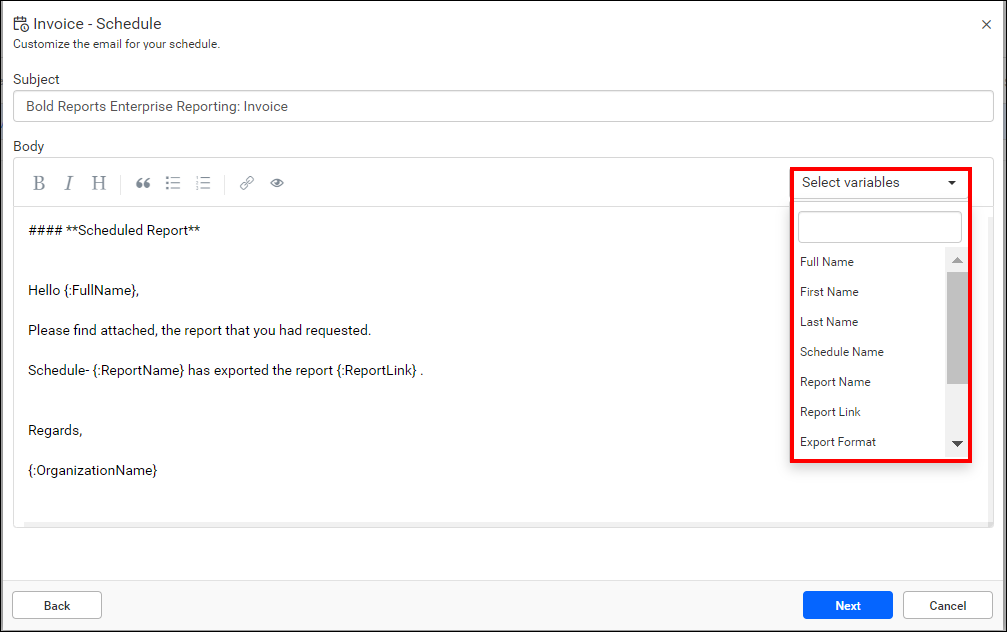
Mail template predefined variables
When you select a variable, the corresponding user information is automatically retrieved from the server and inserted into the mail template.
- {Full Name}: The recipient’s full name
- {First Name}: The recipient’s first name
- {Last Name}: The recipient’s last name
- {Schedule Name}: The name of the schedule
- {Report Name}: The name of the scheduled report
- {Report Link}: The link to the scheduled report
- {Export Format}: The chosen export file format for the schedule
- {Date}: Specifies the date when the schedule is triggered
- {Organization Name}: The Organization name, retrieved from the site settings
- {Category Name}: The category name associated with the selected report
- {Expression}: Use dynamic expressions to customize content. Refer the Expression documentation for guidance on framing expressions.
Expressions utilizing Dataset Fields are not supported in the scheduled email template
- {Report Image}: Provides support for inserting the report into the email body as an image.
Configure the export types
- Reports can be exported in PDF, Word, Excel, HTML, PPT, CSV, and XML formats.
Email attachment
-
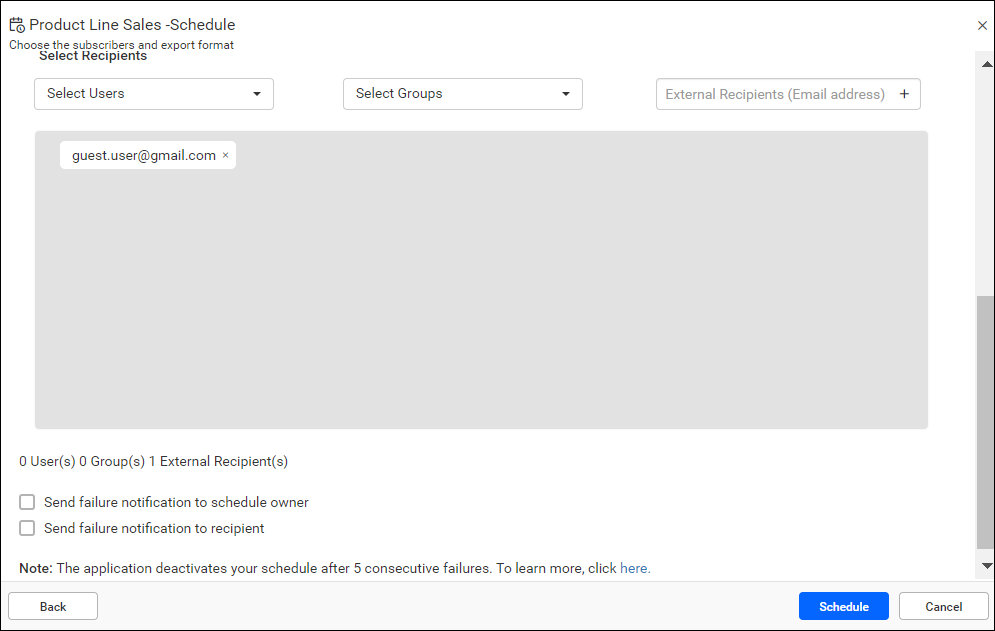
Exported reports can be sent to individual users or groups by selecting the Email attachment option.
-
Additionally, the exported reports can be sent to external recipients by providing their Email addresses. You can add multiple external recipients at once by separating the emails with a comma(,). For example: [[email protected],[email protected]].
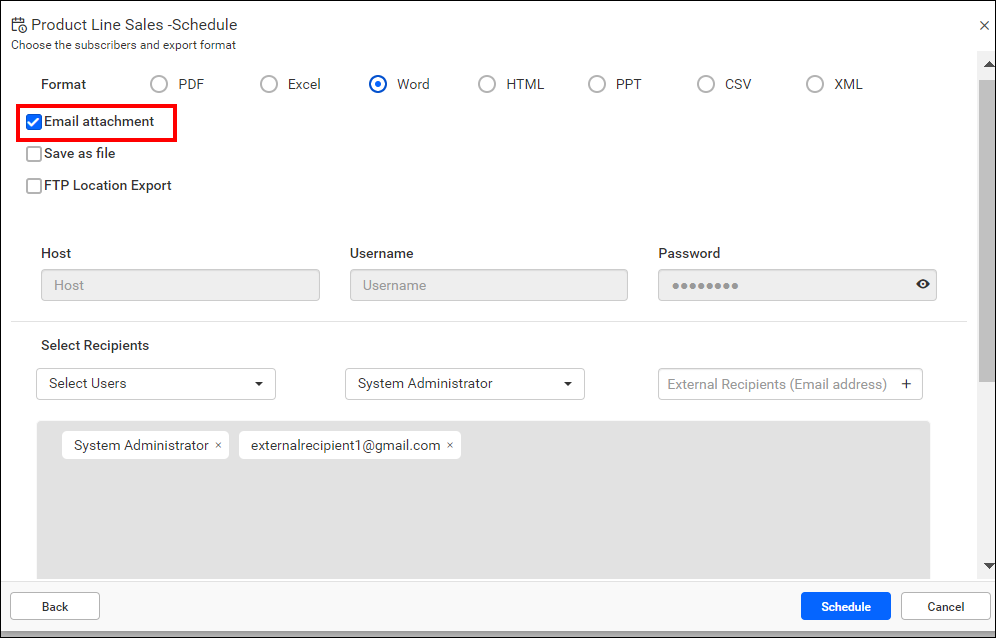
Note: Email attachment is selected by default.
Save as file
- Exported reports can also be saved to any location by selecting the Save as file option.
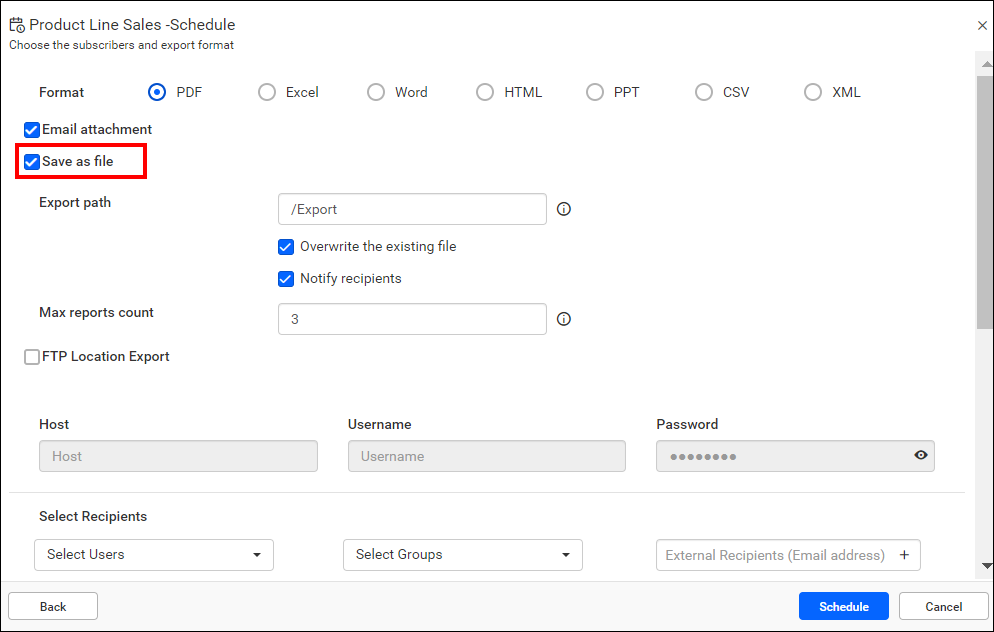
Local Export
-
To save the exported report, you need to specify the Export Path and Max reports count.
Export Path - The location to save the exported report. By default, the folder path will be \Export, and the default root path location will be C:\BoldServices\app_data\reporting\Jobs.
-
Edit the default folder path location to specify the required folder path in the Export path.
-
You must specify the required root path, which can be updated in the Schedule Report Settings export path.
Max Reports Count - Specify the maximum number of exported reports to be saved at this location.
Overwrite the Existing File - Enabling this option will overwrite existing files in the export folder.
Notify Recipients - Enabling this option will send notifications to the recipients.
-
Export to FTP or SFTP Location
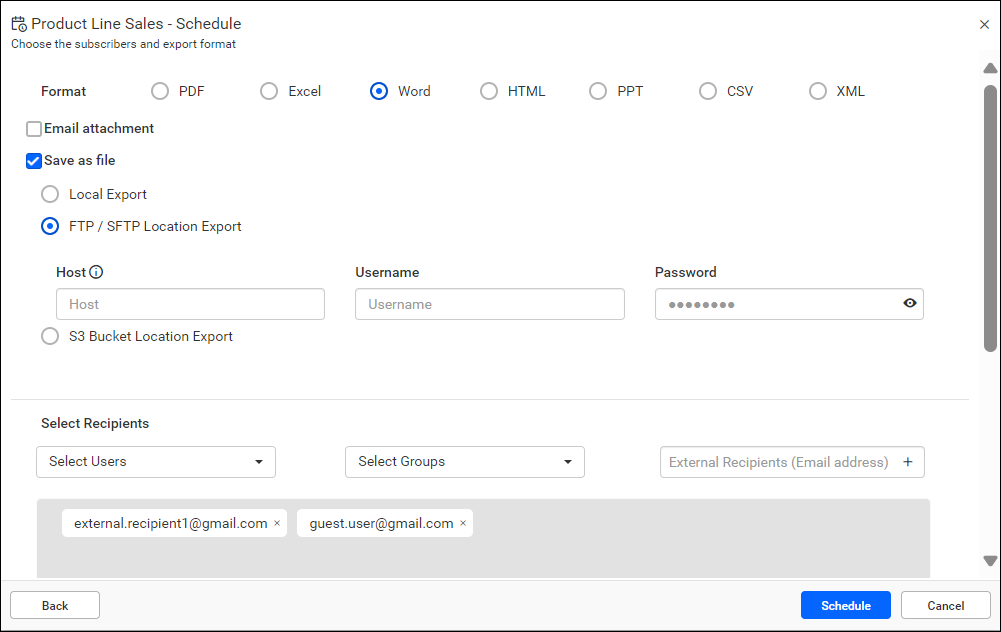
-
To save the exported file at a network location, you must provide the path in UNC(Universal Naming Convention). For example,
ftp://192.168.203.23/Exportorsftp://192.168.203.23/ExportRoot directory path:
ftp://192.168.203.23Relative path:
/Export-
The root directory path can be specified in Shedule Report Settings, while the relative path can be specified when creating the schedules.
-
If the Export folder does not exist, the folder will be created automatically while running the schedules.
Write permission is required for the root directory path folder.
-
-
When clicking the Schedule, the report will be scheduled for the selected recurrence.
Read, Write, Delete permissions for that Specific Schedule will be granted to the user who created the schedule.
S3 Bucket Location Export
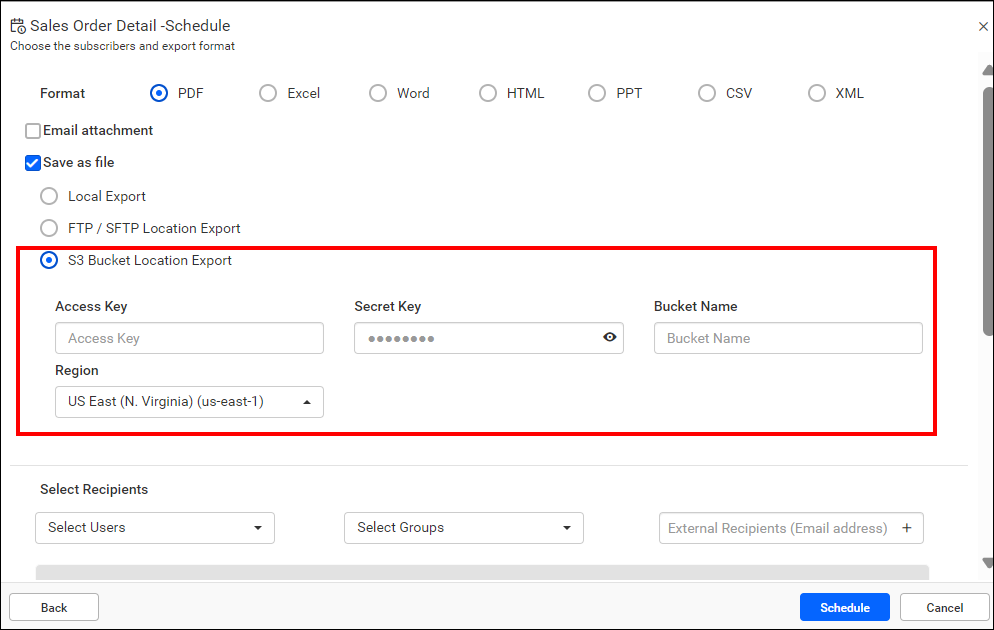
S3 Bucket Location Export allows you to configure and export reports directly to an Amazon S3 bucket by providing the necessary bucket details and credentials.
The default export location can be set in the schedule report settings file, and you can modify the location here as needed.
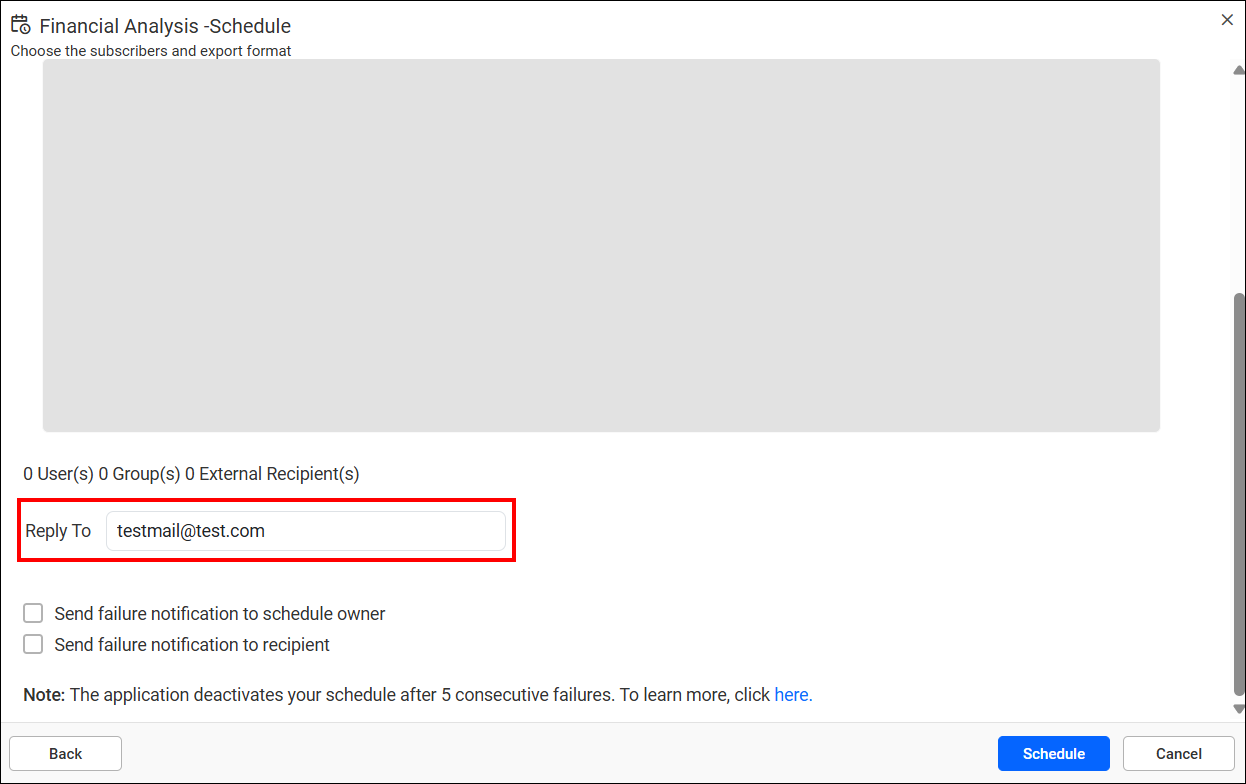
Reply to Email
When an email attachment is selected, the reply to email option becomes enabled. The user can specify a Reply-To email address, and when the scheduled email is received, replies will be directed to the configured address instead of the sender’s email.
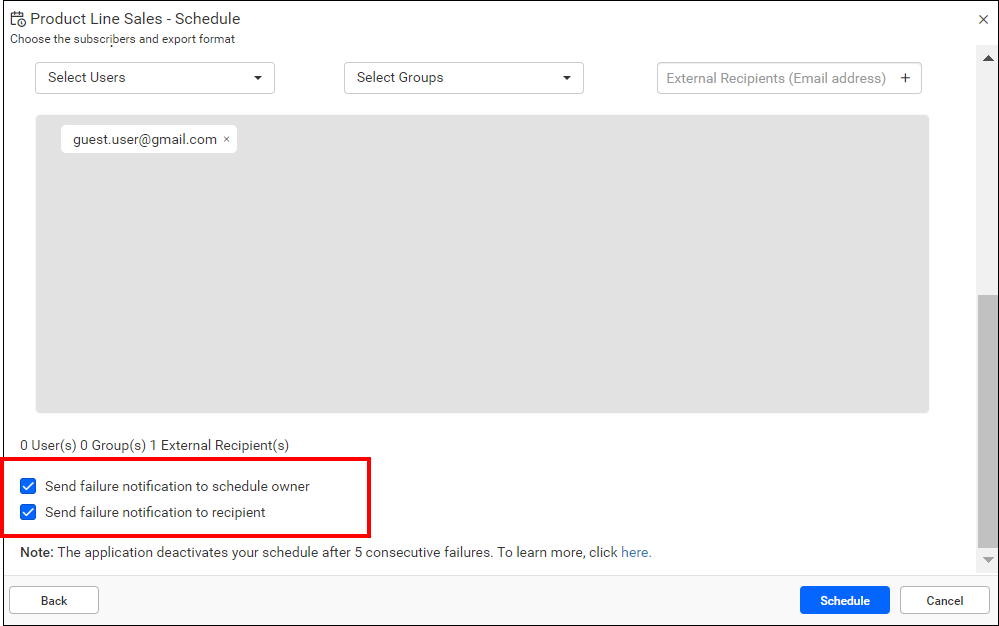
Sending Schedule failure notification to the owner and recipients
Supports sending notifications of schedule failure to both the schedule owner and recipients. In the event of a schedule export failure, an email containing a failure error message can be sent to both the owner and recipients.
Note: When scheduling emails, attachment size limits can cause failures if the total email size exceeds the allowed threshold. Please refer to the KB for the email service and its sending limits.
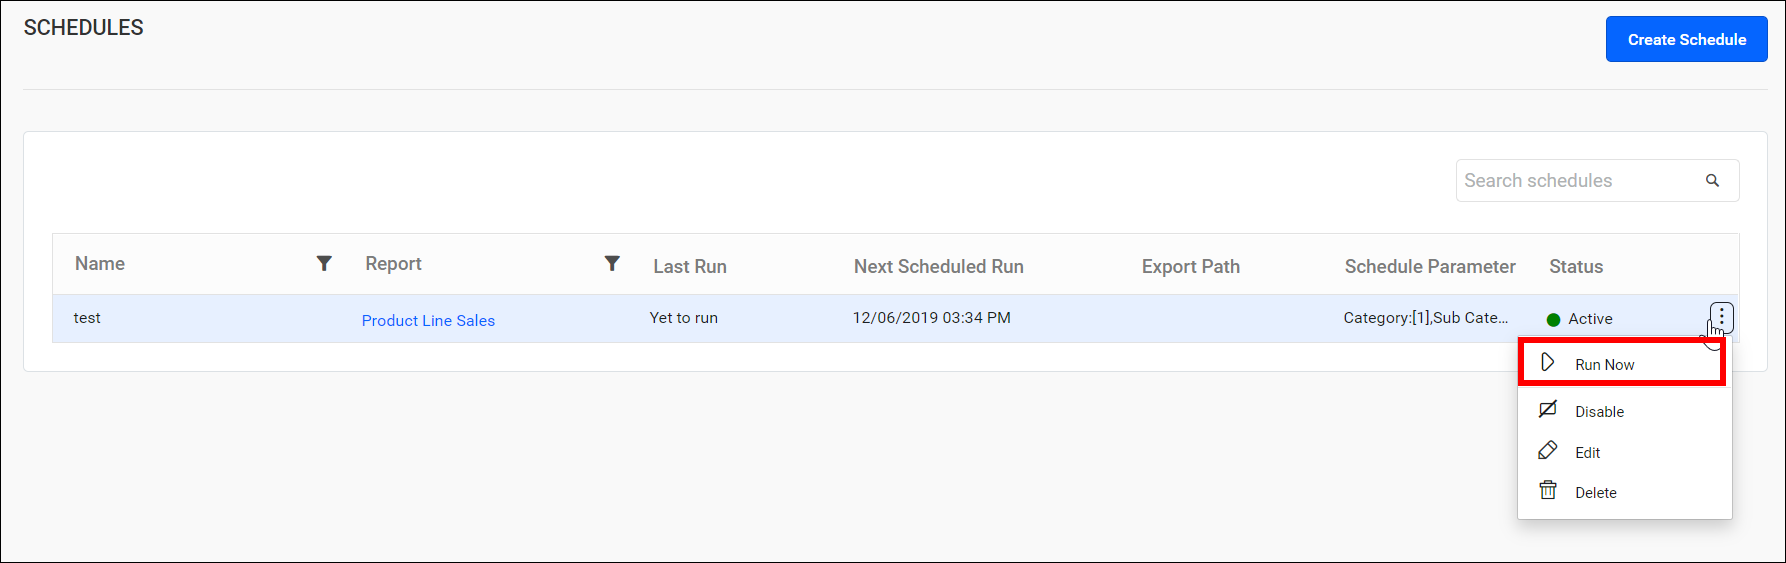
Run now
Schedules can be run on demand using the Run Now option in the schedule grid context menu. The report is exported in the specified format and sent to the recipients along with a link to the report in Bold Reports® via email.
Run History
You can view the run history of a schedule by selecting the Run History option from the schedule grid’s context menu.
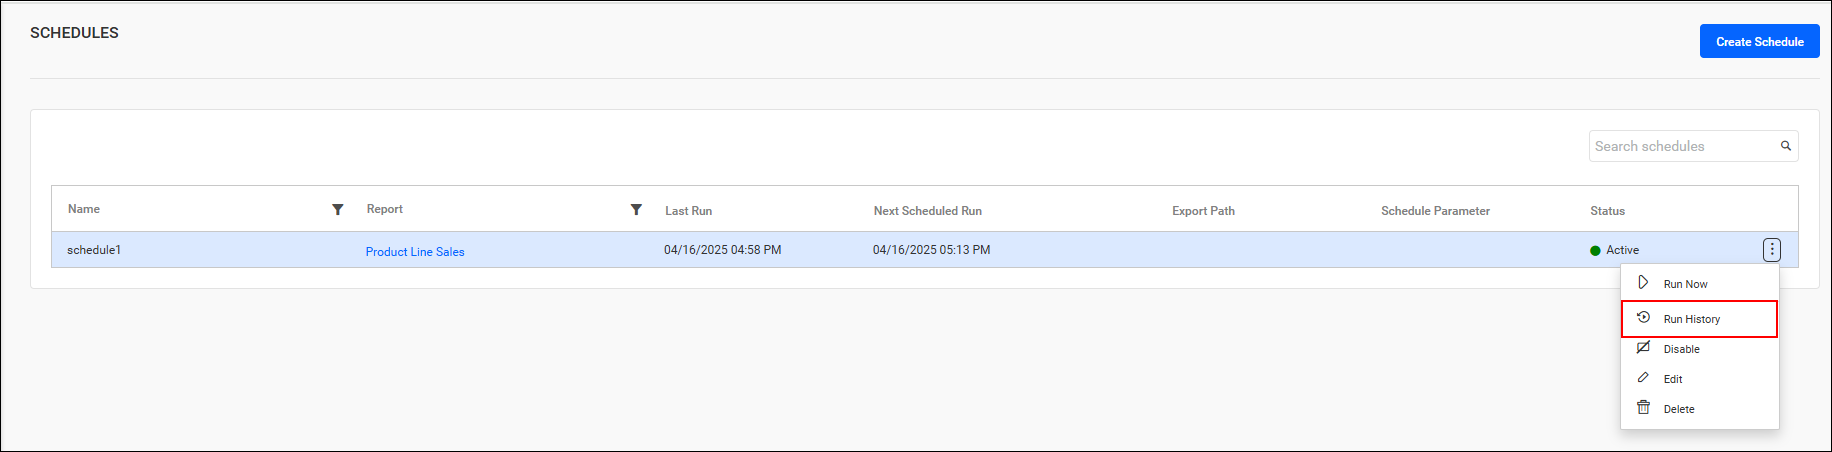
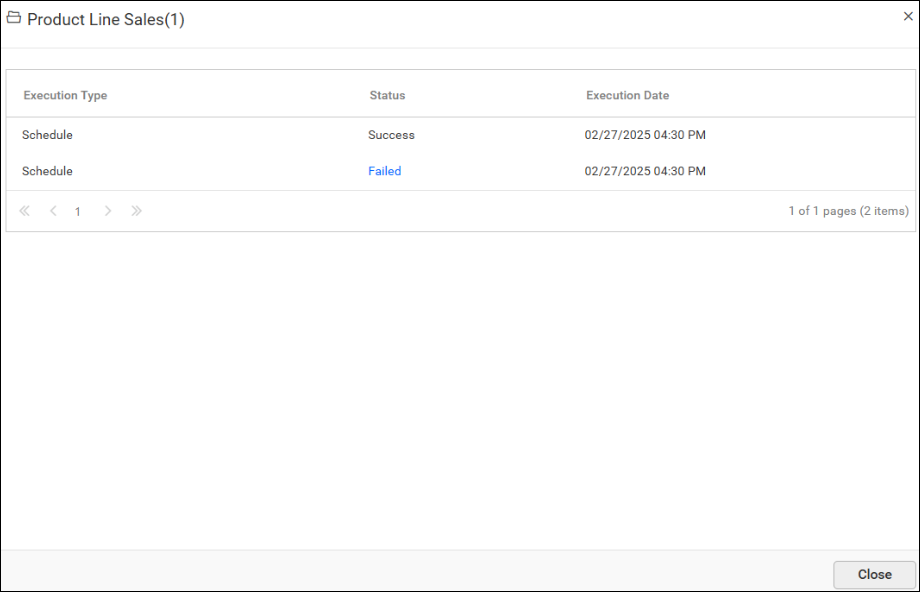
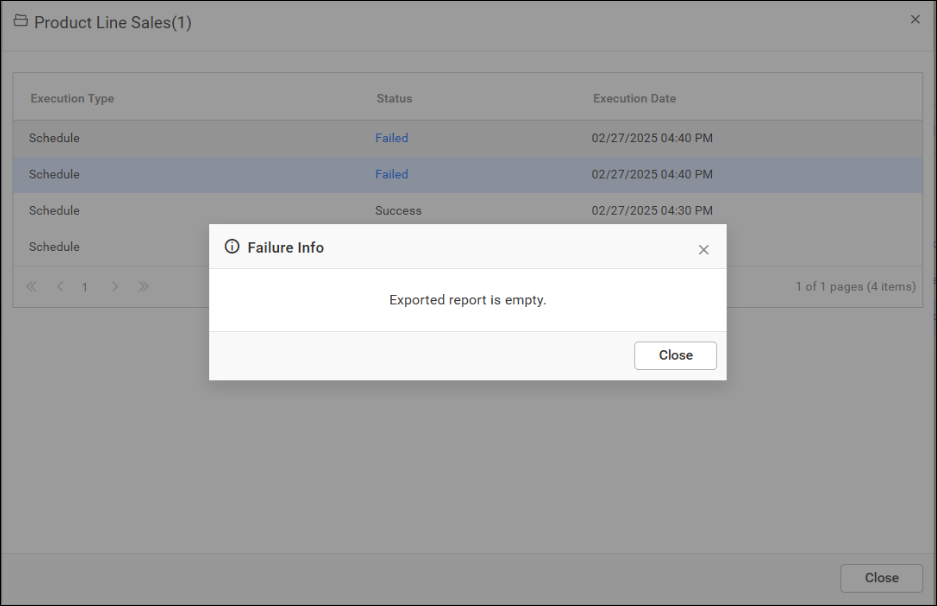
You can also view failure information by clicking the failed link in the Run History dialog.
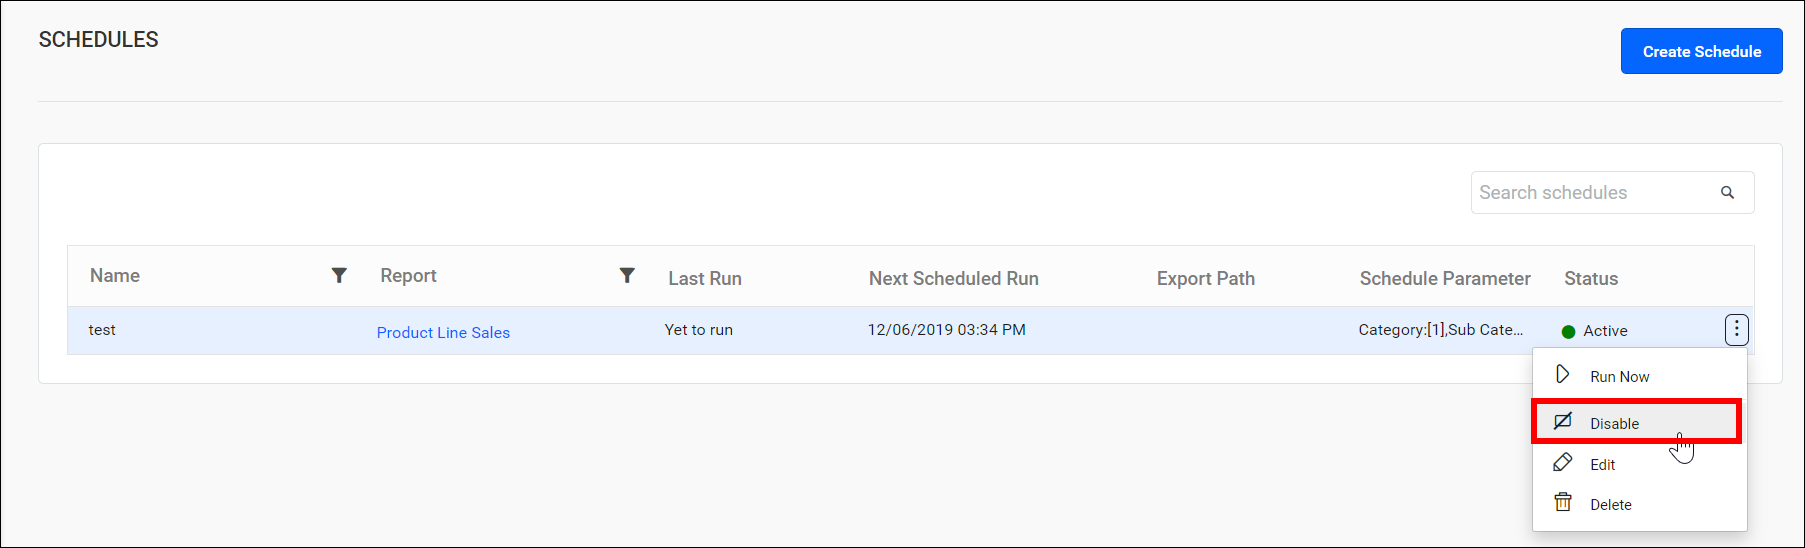
Enable or disable schedule
Schedules can be disabled at any time, which will ignore any future occurrences. When enabled, they will get the next occurrence and run accordingly.
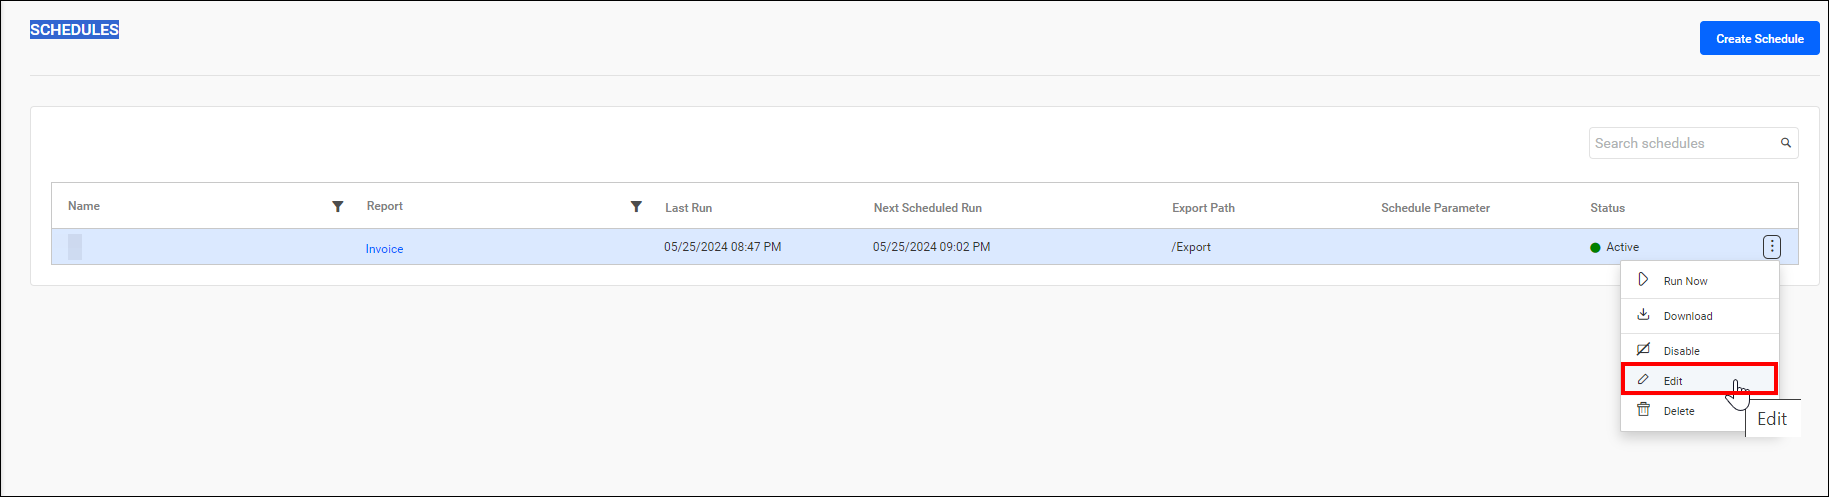
Edit schedule
The category, report, name, recurrence type, recurrence interval, start and end dates, export format, and recipients can be changed in the Edit Schedule dialog box.
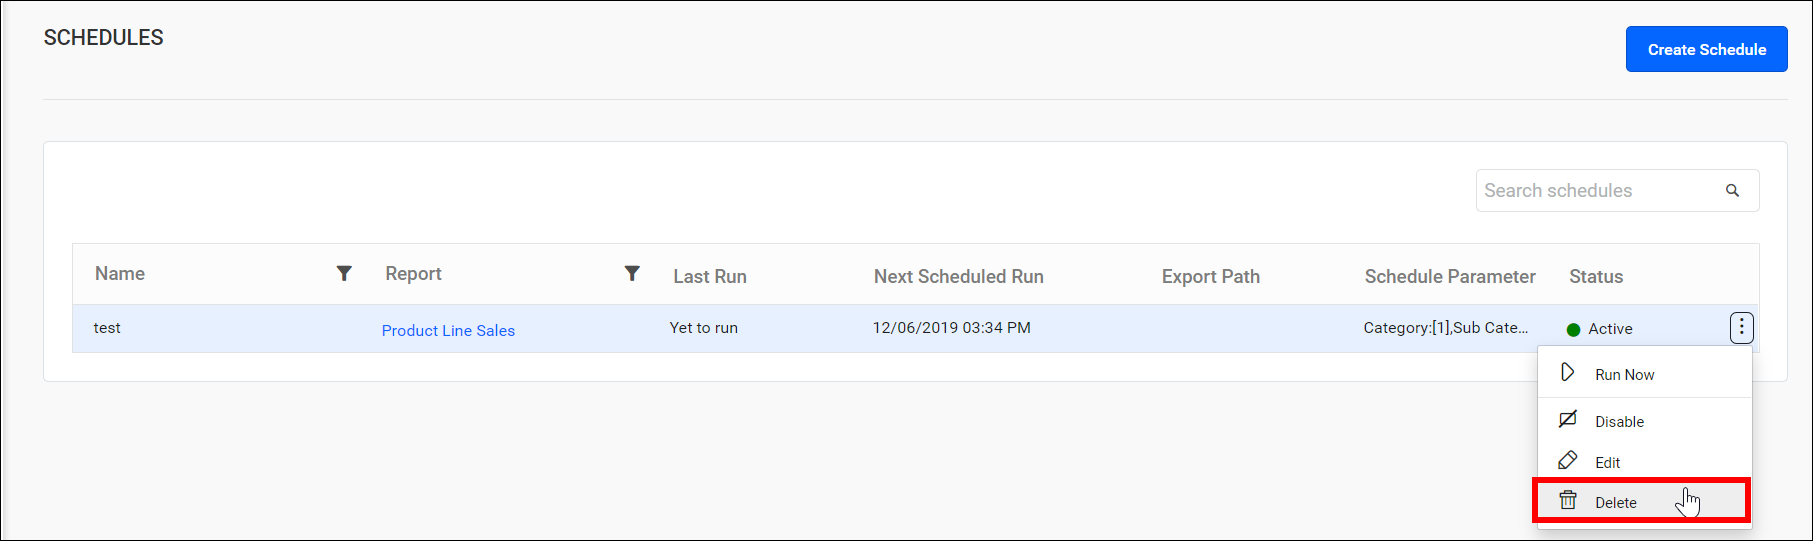
Delete schedules
Schedules can be deleted from the Report Server when they are no longer required.
Click the Actions button in the schedules grid context menu and select Delete to delete the schedule.
REST API reference
The following table lists the available APIs related to schedules in Bold Reports® On-Premise.
| Action | HTTP Method | Endpoint | Description |
|---|---|---|---|
| AddSchedule | POST | /api/site/{tenant-name}/v1.0/reports/schedule | Adds a schedule to the server. Schedule details should be provided as input. |
| UpdateSchedule | PUT | /api/site/{tenant-name}/v1.0/reports/schedule/{scheduleid} | Updates a schedule. Schedule ID should be provided in the path parameter, and the schedule details should be provided as input. |
| RunScheduleReport | GET | /api/site/{tenant-name}/v1.0/schedules/{scheduleId}/run | Runs a scheduled report. Should provide a schedule ID in the path parameter. |
| GetScheduleItemDetail | GET | /api/site/{tenant-name}/v1.0/reports/schedule/{scheduleId} | Returns the respective schedule details. Should pass Schedule ID in the path parameter. |
| GetScheduleItems | GET | /api/site/{tenant-name}/v1.0/reports/schedule/items | Returns the list of scheduled items. |
| GetSchedules | GET | /api/site/{tenant-name}/v1.0/items | Returns the list of schedules for the current user. ItemType should be Schedule. |
| IsScheduleNameExists | POST | /api/site/{tenant-name}/v1.0/items/is-name-exists | Returns an item's existence, whether the given schedule name already exists or not on the server. Schedule name and ItemType as Schedule should be passed in the request body. |
| GetScheduleDetail | GET | /api/site/{tenant-name}/v1.0/items/{id} | Returns the specified schedule details from the server. Schedule item ID should be passed as a path parameter. |
| DeleteSchedule | DELETE | /api/site/{tenant-name}/v1.0/items/{id} | Deletes the specified schedule from the server. Schedule item ID should be passed as a path parameter. |