Bold Reports® Installation and Deployment on CentOS (v6.1 or later)
Deployment prerequisites
-
Install Nginx.
-
Install the
GDIPluspackage using the following command:sudo dnf install https://dl.fedoraproject.org/pub/epel/epel-release-latest-8.noarch.rpm sudo yum install epel-release sudo yum install libgdiplus -
If you want to install the ETL application with Bold Reports®, follow these steps. Otherwise, skip this step and proceed with step 4.
-
Check for and install
Python 3.9by executing the following command:sudo dnf groupinstall 'development tools' && sudo dnf install wget openssl-devel bzip2-devel libffi-devel && sudo curl https://www.python.org/ftp/python/3.9.2/Python-3.9.2.tgz -O && sudo tar -xvf Python-3.9.2.tgz && cd Python-3.9.2 && sudo ./configure --enable-optimizations && sudo make install -
Install
python pipand the following pip packages by running the following command.sudo yum -y install python3-pip && python3.9 -m pip install duckdb===1.1.2 dlt===0.5.4 pymysql pyodbc pg8000 poetry pandas===2.2.2 "dlt[parquet]" "dlt[filesystem]"
-
-
Add the
openssl confpath to the environment if it does not exist.export OPENSSL_CONF=/etc/ssl/
Configuring the Bold Reports® application
-
Register and download the Bold Reports® Linux package from here.
-
Download the Bold Reports® Linux package by running the following command:
sudo wget {Bold Reports Linux package link} -
Extract the zip file by running the following command:
sudo unzip {Bold Reports Linux package zip file} -
Change the directory to
BoldReports_EnterpriseReporting-Linuxby running the following command:cd BoldReports_EnterpriseReporting-Linux -
Execute the following command to deploy Bold Reports® on your Linux machine.
sudo bash install-boldreports.sh -i {new} -u {user} -h {host URL} -n {true or false}-
i: Installation type : Specifies either it is a new or upgrade installation.
-
u: Specify the user or group that manages the service. Please ensure that this user exists on your Linux server.
-
h: Domain or IP address of the machine with HTTP protocol.
-
n: Setting this to
truewill automatically configure the Bold Reports® with the Nginx front-end server.
IMPORTANT: If you have any existing applications running on that Linux machine using Nginx, set “-n” value to false and configure Nginx manually.
Example for a new installation,
sudo bash install-boldreports.sh -i new -u www-data -h http://linux.example.com -n true -
Once the installation is complete, open the host URL in the browser and continue with the application startup.
Manually configure Nginx
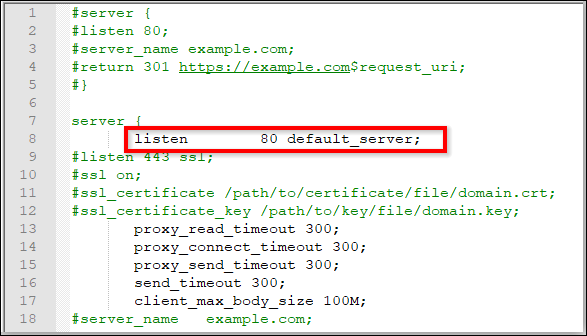
To configure Nginx as a reverse proxy to forward requests to the Bold Reports® app, modify /etc/nginx/nginx.conf. Open it in a text editor and add the following code:
       #server {
       #listen 80;
       #server_name example.com;
       #return 301 https://example.com$request_uri;
       #}

         server {
       listen        80 default_server;

       #server_name   example.com;

       #listen 443 ssl;
       #ssl on;
       #ssl_certificate /path/to/certificate/file/domain.crt;
       #ssl_certificate_key /path/to/key/file/domain.key;

       proxy_read_timeout 300;
       proxy_connect_timeout 300;
       proxy_send_timeout 300;
       send_timeout 300;
       client_max_body_size 200M;

       location / {
      root /var/www/bold-services/application/idp/web/wwwroot;
        proxy_pass http://localhost:6500/;
        proxy_http_version 1.1;
        proxy_set_header Upgrade $http_upgrade;
        proxy_set_header Connection keep-alive;
        proxy_set_header Host $host;
        proxy_cache_bypass $http_upgrade;
        proxy_set_header X-Forwarded-For $proxy_add_x_forwarded_for;
        proxy_set_header X-Forwarded-Proto $scheme;
        fastcgi_buffers 16 16k;
        fastcgi_buffer_size 32k;
    }
    location /api {
        proxy_pass         http://localhost:6501/api;
        proxy_http_version 1.1;
        proxy_set_header   Upgrade $http_upgrade;
        proxy_set_header   Connection keep-alive;
        proxy_set_header   Host $host;
        proxy_cache_bypass $http_upgrade;
        proxy_set_header   X-Forwarded-For $proxy_add_x_forwarded_for;
        proxy_set_header   X-Forwarded-Proto $scheme;
    }
    location /ums {
        root               /var/www/bold-services/application/idp/ums/wwwroot;
        proxy_pass         http://localhost:6502/ums;
        proxy_http_version 1.1;
        proxy_set_header   Upgrade $http_upgrade;
        proxy_set_header   Connection keep-alive;
        proxy_set_header   Host $host;
        proxy_cache_bypass $http_upgrade;
        proxy_set_header   X-Forwarded-For $proxy_add_x_forwarded_for;
        proxy_set_header   X-Forwarded-Proto $scheme;
    }
    location /ums/signalr/progresshub {
        proxy_pass         http://localhost:6502/ums/signalr/progresshub;
        proxy_http_version 1.1;
        proxy_set_header   Upgrade $http_upgrade;
        proxy_set_header   Connection "upgrade";
        proxy_set_header   Host $host;
        proxy_cache_bypass $http_upgrade;
        proxy_set_header   X-Forwarded-For $proxy_add_x_forwarded_for;
        proxy_set_header   X-Forwarded-Proto $scheme;
    }
    location /reporting {
    root /var/www/bold-services/application/reporting/web/wwwroot;
        proxy_pass         http://localhost:6550/reporting;
        proxy_http_version 1.1;
        proxy_set_header   Upgrade $http_upgrade;
        proxy_set_header   Connection keep-alive;
        proxy_set_header   Host $host;
        proxy_cache_bypass $http_upgrade;
        proxy_set_header   X-Forwarded-For $proxy_add_x_forwarded_for;
        proxy_set_header   X-Forwarded-Proto $scheme;
    }
    location /reporting/messageHub {
        proxy_pass         http://localhost:6550/reporting/messageHub;
        proxy_http_version 1.1;
        proxy_set_header   Upgrade $http_upgrade;
        proxy_set_header   Connection "upgrade";
        proxy_set_header   Host $host;
        proxy_cache_bypass $http_upgrade;
        proxy_set_header   X-Forwarded-For $proxy_add_x_forwarded_for;
        proxy_set_header   X-Forwarded-Proto $scheme;
    }
    location /reporting/api {
        proxy_pass         http://localhost:6551/reporting/api;
        proxy_http_version 1.1;
        proxy_set_header   Upgrade $http_upgrade;
        proxy_set_header   Connection keep-alive;
        proxy_set_header   Host $host;
        proxy_cache_bypass $http_upgrade;
        proxy_set_header   X-Forwarded-For $proxy_add_x_forwarded_for;
        proxy_set_header   X-Forwarded-Proto $scheme;
    }
    location /reporting/jobs {
        proxy_pass         http://localhost:6552/reporting/jobs;
        proxy_http_version 1.1;
        proxy_set_header   Upgrade $http_upgrade;
        proxy_set_header   Connection keep-alive;
        proxy_set_header   Host $host;
        proxy_cache_bypass $http_upgrade;
        proxy_set_header   X-Forwarded-For $proxy_add_x_forwarded_for;
        proxy_set_header   X-Forwarded-Proto $scheme;
    }
    location /reporting/reportservice {
        root               /var/www/bold-services/application/reporting/reportservice;
        proxy_pass         http://localhost:6553;
        proxy_http_version 1.1;
        proxy_set_header   Upgrade $http_upgrade;
        proxy_set_header   Connection keep-alive;
        proxy_set_header   Host $host;
        proxy_cache_bypass $http_upgrade;
        proxy_set_header   X-Forwarded-For $proxy_add_x_forwarded_for;
        proxy_set_header   X-Forwarded-Proto $scheme;
    }
    location /reporting/viewer {
        proxy_pass         http://localhost:6554/reporting/viewer;
        proxy_http_version 1.1;
        proxy_set_header   Upgrade $http_upgrade;
        proxy_set_header   Connection keep-alive;
        proxy_set_header   Host $host;
        proxy_cache_bypass $http_upgrade;
        proxy_set_header   X-Forwarded-For $proxy_add_x_forwarded_for;
        proxy_set_header   X-Forwarded-Proto $scheme;
    }
    location /etlservice/ {
        root               /var/www/bold-services/application/etl/etlservice/wwwroot;
        proxy_pass         http://localhost:6509/;
        proxy_http_version 1.1;
        proxy_set_header   Upgrade $http_upgrade;
        proxy_set_header   Connection "upgrade";
        proxy_set_header   Host $http_host;
        proxy_cache_bypass $http_upgrade;
        proxy_set_header   X-Forwarded-For $proxy_add_x_forwarded_for;
        proxy_set_header   X-Forwarded-Proto $scheme;
    }
    location /etlservice/_framework/blazor.server.js {
        root               /var/www/bold-services/application/etl/etlservice/wwwroot;
        proxy_pass         http://localhost:6509/_framework/blazor.server.js;
        proxy_http_version 1.1;
        proxy_set_header   Upgrade $http_upgrade;
        proxy_set_header   Connection "upgrade";
        proxy_set_header   Host $http_host;
        proxy_cache_bypass $http_upgrade;
        proxy_set_header   X-Forwarded-For $proxy_add_x_forwarded_for;
        proxy_set_header   X-Forwarded-Proto $scheme;
   }
}
Once the Nginx configuration is established, run sudo nginx -t to verify the syntax of the configuration files. If the configuration file test is successful, force Nginx to pick up the changes by running the sudo nginx -s reload.
Configure SSL
If you have an SSL certificate for your domain and need to configure the site with your SSL certificate, follow these steps, or you can skip this.
-
Navigate to
/etc/nginx/conf.d. Open theboldreports-nginx-config.conffile in a text editor. -
Uncomment the following marked lines in the Nginx config file.

-
Comment on the following marked line in the Nginx config file.
-
Replace
example.comwith your domain name. -
Define the path of the SSL certificate:
ssl_certificate /etc/ssl/domain.crt. -
Specify the directory where the SSL certificate key is located:
ssl_certificate_key /etc/ssl/domain.key. -
Save and run
sudo nginx -tto verify the syntax of the configuration file. If the configuration file test is successful, force Nginx to pick up the changes by runningsudo nginx -s reload.
NOTE: If you are configuring the application with SSL, you need to update the URLs in the product.json with
HTTPSlocated in the/var/www/bold-services/application/app_data/configuration.