Upgrading the Bold Reports® Linux package to the Latest Version
This section explains how to upgrade the Bold Reports® Linux package from any version to the latest version.
-
Register and download the latest Bold Reports® Linux package from the getting started guide.
-
Install the
pvtool by executing the following command:sudo apt-get install pv -
Install the python 3.9 or later by executing the following command:
Ubuntu Version:22.04 :
sudo apt-get install -y python3Ubuntu Version:20.04 :
sudo apt update && sudo apt install wget software-properties-common && sudo add-apt-repository ppa:deadsnakes/ppa && sudo apt update && sudo apt install python3.9 -
Install pip dependency packages for ETL service by running the following command:
sudo apt-get install python3-pip && sudo python3 -m pip install --upgrade pip && sudo pip install duckdb===1.1.2 dlt===0.4.12 pymysql pyodbc pg8000 poetry pandas===2.2.2 numpy===1.26.4 "dlt[parquet]" "dlt[filesystem]" -
Download the latest Bold Reports® Linux package by running the following command.
sudo wget {Bold Reports Linux package link} -
Extract the zip file.
sudo unzip {Bold Reports Linux package zip file} -
Change the directory to
BoldReports_EnterpriseReporting-Linuxby running the following command:cd BoldReports_EnterpriseReporting-Linux -
Execute the following command to deploy Bold Reports® on your Linux machine:
sudo bash install-boldreports.sh -i {upgrade} -u {user} -h {host URL}-
i: Installation type : Specifies whether it is a new or upgraded installation.
-
u: Specify the user or group that manages the service.
-
h: Domain or IP address of the machine with the HTTP protocol.
-
Example for upgrading the installation:
sudo bash install-boldreports.sh -i upgrade -u www-data -h http://linux.example.com-
Refer to the optional client libraries installation guide and install the optional client libraries after the installation is completed.
-
Now, you can open the host URL in the browser and use the latest features of Bold Reports®.
NOTE: The Bold Reports® Linux package backup file will be available in the following location: /var/www/
Upgrade breaking changes v3.x to latest
The below breaking changes are applicable only for upgrading the Bold Reports® application from version v3.x to latest version.
Automatic Nginx configuration:
-
If you preferred automatic Nginx configuration during the initial installation, the below prompt message will be displayed, and you can proceed with the installation by choosing Yes.

-
If you are choosing No, then please follow the below manual Nginx configuration step.
Manual Nginx configuration:
-
If you have manually configured Nginx during the initial installation, the below message will be displayed.

-
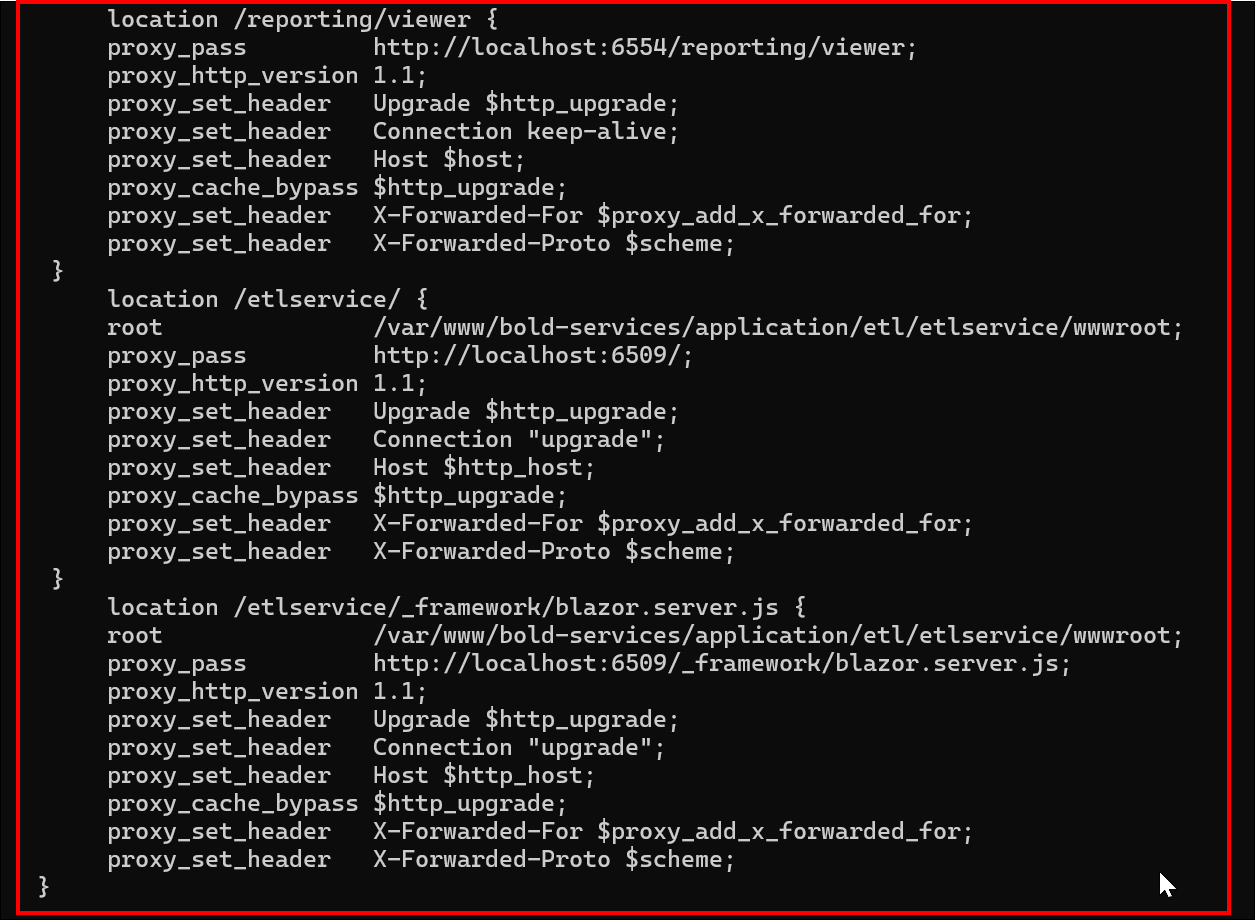
For manual Nginx configuration, modify the default Nginx configuration file in location
/etc/nginx/sites-available. Open it in a text editor and add the following code, like the below image.location /reporting/viewer { proxy_pass http://localhost:6554/reporting/viewer; proxy_http_version 1.1; proxy_set_header Upgrade $http_upgrade; proxy_set_header Connection keep-alive; proxy_set_header Host $host; proxy_cache_bypass $http_upgrade; proxy_set_header X-Forwarded-For $proxy_add_x_forwarded_for; proxy_set_header X-Forwarded-Proto $scheme; } location /etlservice/ { root /var/www/bold-services/application/etl/etlservice/wwwroot; proxy_pass http://localhost:6509/; proxy_http_version 1.1; proxy_set_header Upgrade $http_upgrade; proxy_set_header Connection "upgrade"; proxy_set_header Host $http_host; proxy_cache_bypass $http_upgrade; proxy_set_header X-Forwarded-For $proxy_add_x_forwarded_for; proxy_set_header X-Forwarded-Proto $scheme; } location /etlservice/_framework/blazor.server.js { root /var/www/bold-services/application/etl/etlservice/wwwroot; proxy_pass http://localhost:6509/_framework/blazor.server.js; proxy_http_version 1.1; proxy_set_header Upgrade $http_upgrade; proxy_set_header Connection "upgrade"; proxy_set_header Host $http_host; proxy_cache_bypass $http_upgrade; proxy_set_header X-Forwarded-For $proxy_add_x_forwarded_for; proxy_set_header X-Forwarded-Proto $scheme; }
Nginx configuration file code:
Once the Nginx configuration is updated, run sudo nginx -t to verify the syntax of the configuration files. If the configuration file test is successful, force Nginx to pick up the changes by running the sudo nginx -s reload.
Upgrade breaking changes v5.x to latest
The below breaking changes are applicable only for upgrading the Bold Reports® application from version v5.x to the latest version.
Automatic Nginx configuration:
-
If you preferred automatic Nginx configuration during the initial installation, the below prompt message will be displayed, and you can proceed with the installation by choosing
Yes.
-
If you choose
No, please follow the manual Nginx configuration steps below.
Manual Nginx configuration:
-
If you have manually configured Nginx during the initial installation, the following message will be displayed.

-
For manual Nginx configuration, modify the default Nginx configuration file located at
/etc/nginx/sites-available. Open it in a text editor and add the following code, as shown in the image below:location /etlservice/ { root /var/www/bold-services/application/etl/etlservice/wwwroot; proxy_pass http://localhost:6509/; proxy_http_version 1.1; proxy_set_header Upgrade $http_upgrade; proxy_set_header Connection "upgrade"; proxy_set_header Host $http_host; proxy_cache_bypass $http_upgrade; proxy_set_header X-Forwarded-For $proxy_add_x_forwarded_for; proxy_set_header X-Forwarded-Proto $scheme; } location /etlservice/_framework/blazor.server.js { root /var/www/bold-services/application/etl/etlservice/wwwroot; proxy_pass http://localhost:6509/_framework/blazor.server.js; proxy_http_version 1.1; proxy_set_header Upgrade $http_upgrade; proxy_set_header Connection "upgrade"; proxy_set_header Host $http_host; proxy_cache_bypass $http_upgrade; proxy_set_header X-Forwarded-For $proxy_add_x_forwarded_for; proxy_set_header X-Forwarded-Proto $scheme; }
Nginx configuration file code:

Once the Nginx configuration is updated, run sudo nginx -t to verify the syntax of the configuration files. If the configuration file test is successful, force Nginx to pick up the changes by running sudo nginx -s reload.