Destination
To set the destination credentials navigate to the settings tab in the Bold Data Hub. Bold Data Hub supports below destinations,
- Bold IMDB Datastore
- PostgreSQL
- Apache Doris
- SQL server
- MySQL
- Google BigQuery
- Snow Flake
- Oracle
- ClickHouse
- Firebolt
- Teradata
- SAP HANA Cloud
- IBMDB2
- Azure Synapse
- Amazon RedShift
- MinIO
- Star Rocks
We can configure multiple data store destinations with the same server type and load data into them. This is common in scenarios where we might have multiple databases of the same type (for example, multiple MySQL or PostgreSQL databases) for different environments like development, testing, staging, or production, or for different segments of business operations.
Note: Currently data source creation is not supported for the following.
- Teradata
- SAP HANA Cloud
- IBMDB2
- Firebolt
- MinIO
Step 1 : Click on the settings.

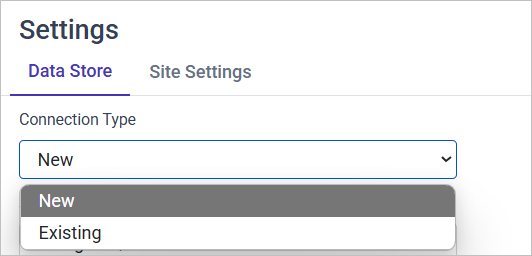
Step 2: Choose the Connection Type.
-
New: Choose this option if you are creating a new connection to a destination for which you have not previously created credentials.
-
Existing: Select this option if you are updating or modifying the credentials or settings of a connection that you have already set up.
Step 3: Choose the destination where you want to move the data.

Step 4: Enter the credentials for the respective destination.
Step 5: Click on Save to save the credentials from the Bold Reports® Data Store. If all the given credentials are valid, the “Datastore settings are saved successfully” message will appear near the save button.
Bold IMDB Datastore
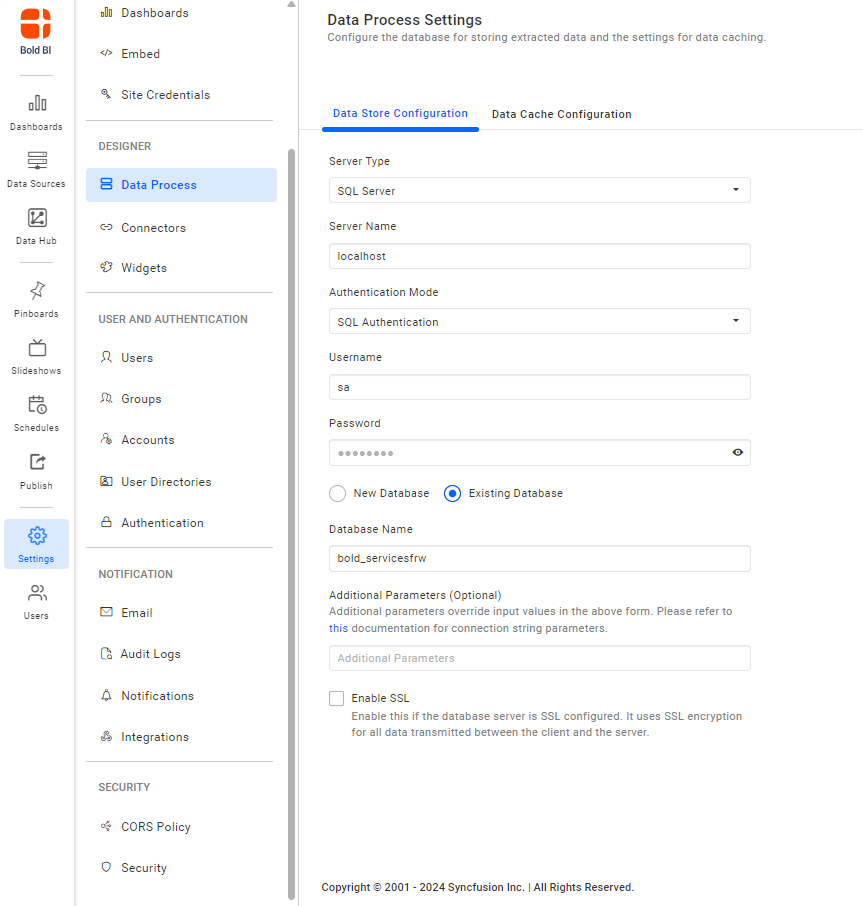
The Bold IMDB Datastore fetches the destination credentials from the BOLD Reports® Data Store configuration.
The data will be moved based on the credentials given in the Bold Reports® data store.
PostgreSQL
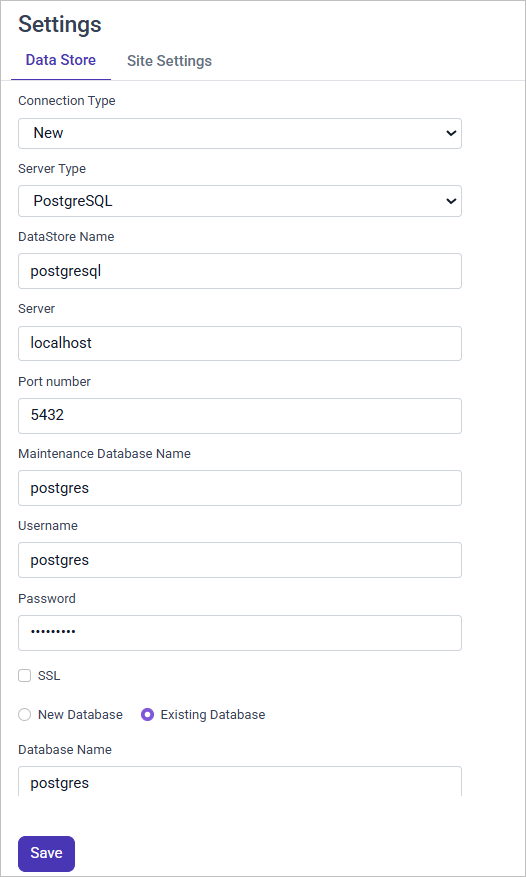
Enter the following credentials for PostgreSQL:
- Server name/Host name
- Port number (default port number is 5432)
- Maintenance Database : The maintenance DB is a default database for users and applications to connect to. On PostgreSQL 8.1 and above, the maintenance DB is normally called
postgres. - Username
- Password
- Check the SSL (Secure Sockets Layer) checkbox if needed.
- Database name : If the data wants to be moved to an existing database in the server click on the existing database radio buttons and give database name in the textbox or click on new database to create a new one and enter the database name in the textbox
Apache Doris
Enter the credentials for the Apache Doris.
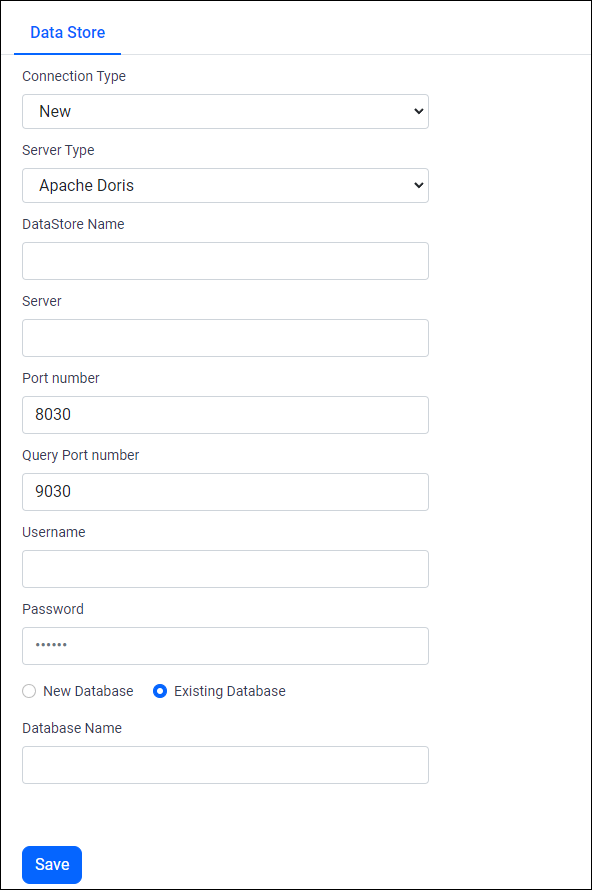
Click on Save to save the credentials. If all the given credentials are valid, the “Datastore settings are saved successfully” message will appear near the save button.
SQL Server
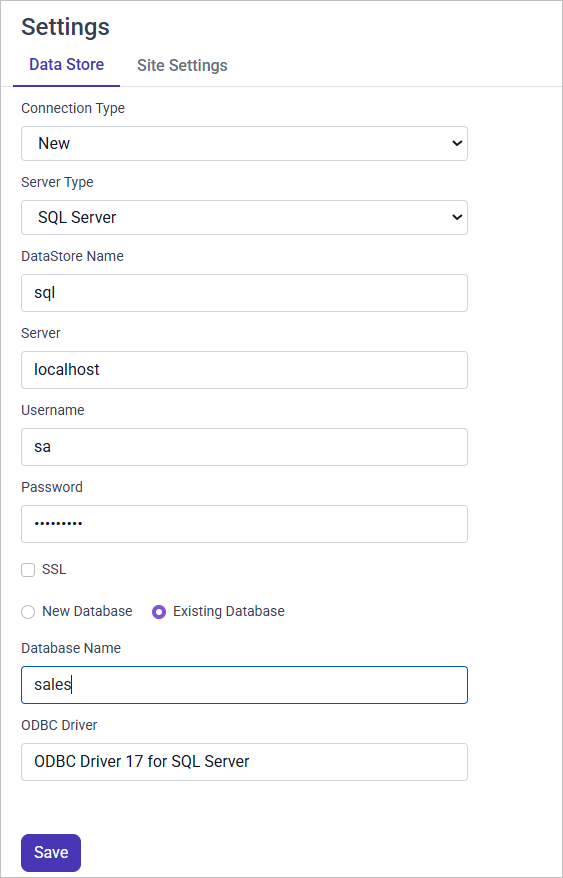
Enter the following credentials for SQL Server:
- Server name/Host name
- Username
- Password
- Check the SSL (Secure Sockets Layer) checkbox if needed.
- Database name : If the data wants to be moved to an existing database in the server click on the existing database radio buttons and give database name in the textbox or click on new database to create a new one and enter the database name in the textbox
MySQL
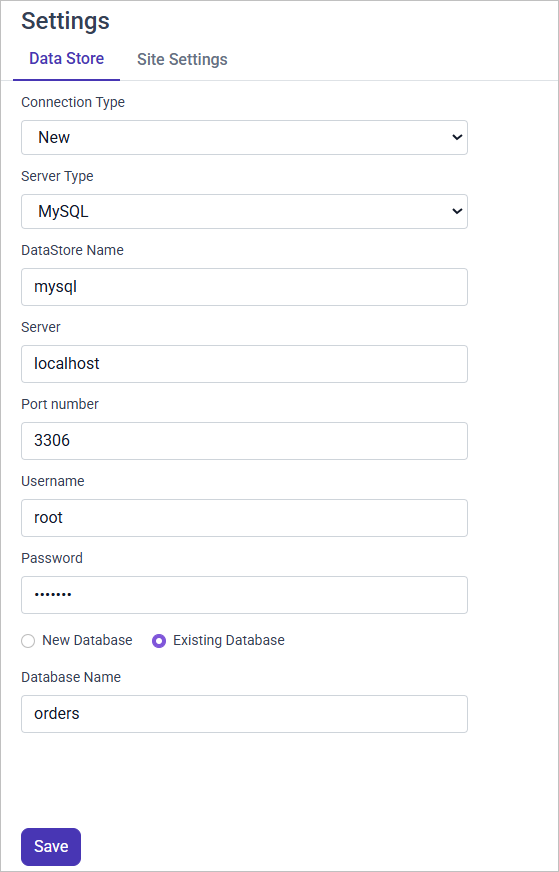
Enter the following credentials for MySQL:
- Server name/Host name
- Port number (default port number is 3306)
- Username
- Password
- Check the SSL (Secure Sockets Layer) checkbox if needed.
- Database name : If the data wants to be moved to an existing database in the server click on the existing database radio buttons and give database name in the textbox or click on new database to create a new one and enter the database name in the textbox
Snow Flake
Enter the credentials for Snow Flake,
- Server: Enter the server name .
Example:
account.snowflakecomputing.com - Username : Enter your Snowflake username.
- Password : Input your Snowflake password.
- Warehouse: Enter your Snowflake warehouse name.
- Database : Enter your Snowflake database name.
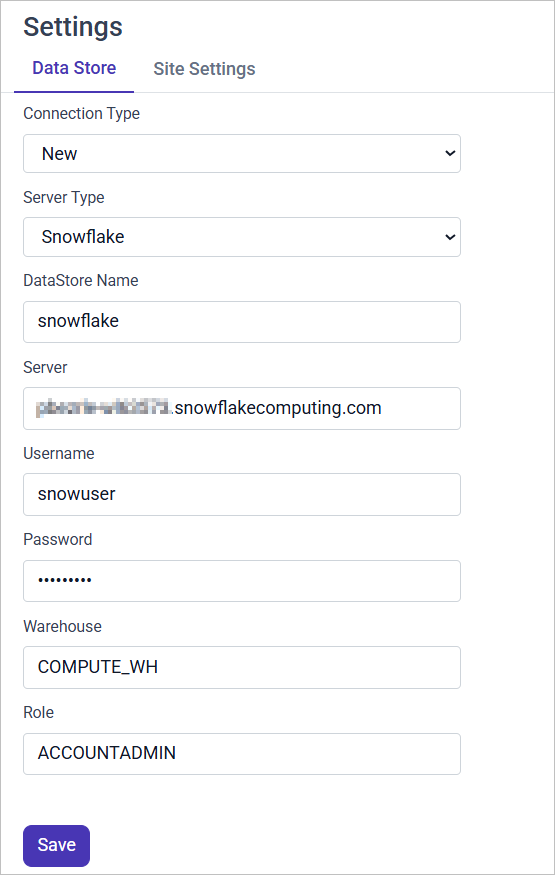
Click on Save to save the credentials. If all the given credentials are valid, the “Datastore settings are saved successfully” message will appear near the save button.
Oracle
Enter the credentials for Oracle,
- Host: Enter the hostname or IP address of the Oracle database server.
- Port: Enter the port number Oracle is listening on (default is 1521).
- Service Instance Name: Provide the Oracle service name.
- Username: Input your Oracle database username.
- Password: Input your Oracle database password.
- Database: Input your Oracle database name (Database name should be same as user name)
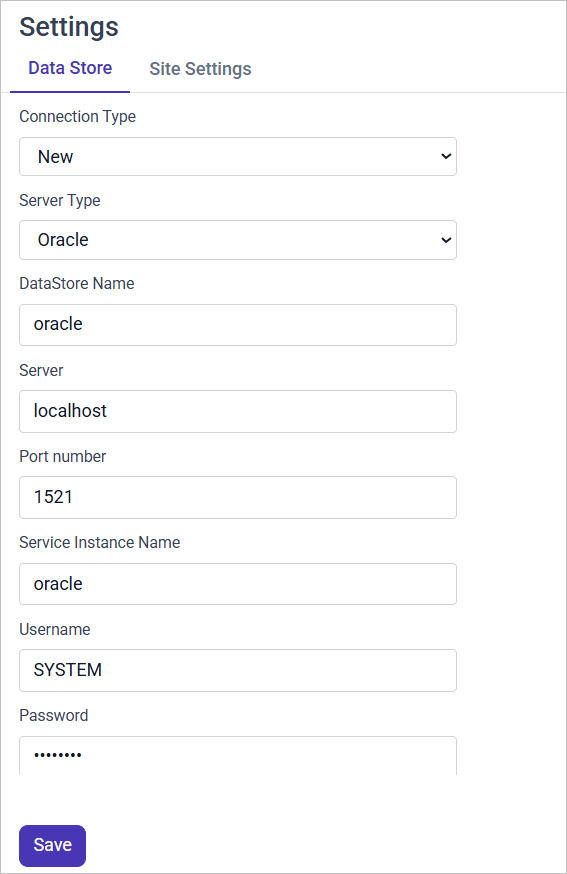
Click on Save to save the credentials. If all the given credentials are valid, the “Datastore settings are saved successfully” message will appear near the save button.
Google BigQuery
Enter the credentials for Google BigQuery:
- Project ID : Enter the Google BigQuery project ID.
- File Path : Upload the Google BigQuery service account JSON file.
Click Here to Know how to get the Google BigQuery service account JSON file.
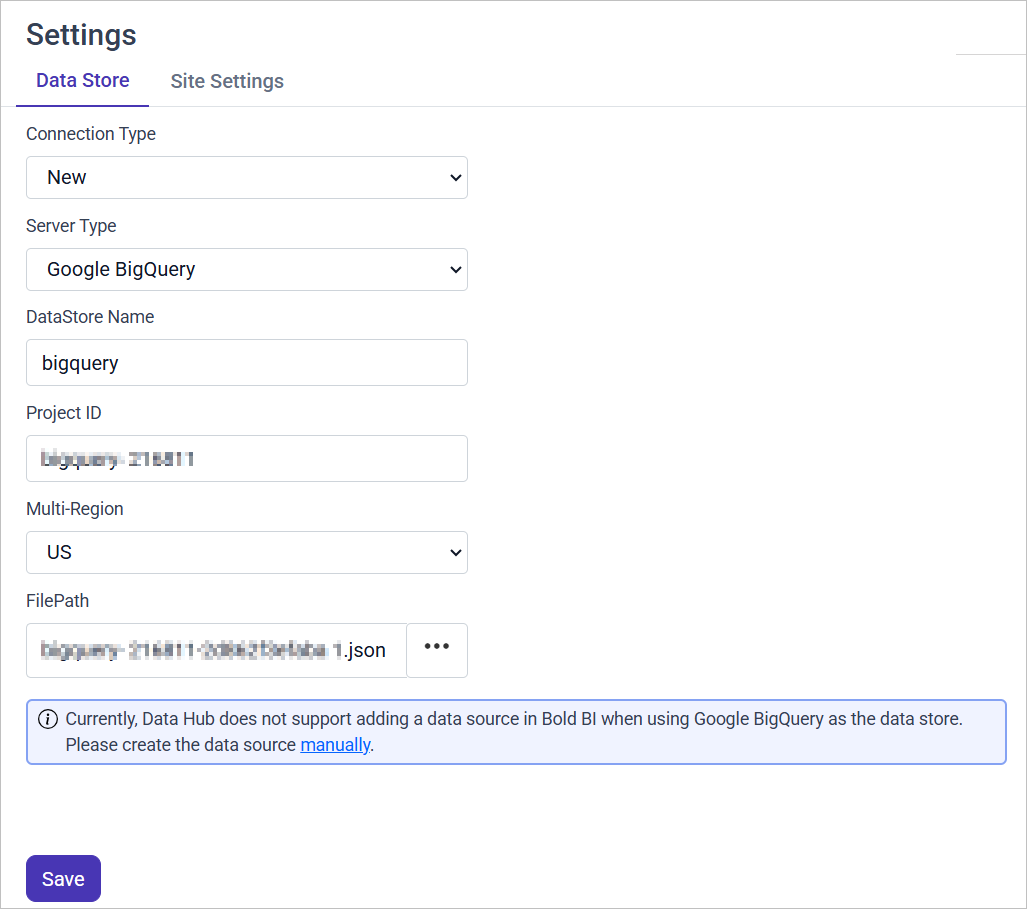
Click on Save to save the credentials. If all the given credentials are valid, the “Datastore settings are saved successfully” message will appear near the save button.
Steps to download the Service Account JSON file:
- Log in to or create a Google Cloud account
- Sign up for or log in to the Google Cloud Platform in your web browser.
- Create a new Google Cloud project
- After arriving at the Google Cloud console welcome page, click the project selector in the top left, then click the New Project button, and finally click the Create button after naming the project whatever you would like.
- Create a service account and grant BigQuery permissions
You will then need to create a service account. After clicking the Go to Create service account button on the linked docs page, select the project you created and name the service account whatever you would like. 6. Click the Continue button and grant the following roles, so that we can create schemas and load data: · BigQuery Data Editor · BigQuery Job User · BigQuery Read Session User You don’t need to grant users access to this service account now, so click the Done button. 7. Download the service account JSON In the service accounts table page that you’re redirected to after clicking Done as instructed above, select the three dots under the Actions column for the service account you created and select Manage keys. This will take you to a page where you can click the Add key button, then the Create new key button, and finally the Create button, keeping the preselected JSON option.
A JSON file that includes your service account private key will then be downloaded.
Note: Currently Bold Data Hub does not support creating a data source in Bold Reports® when using Google Bigquery as the data store.
ClickHouse
Enter the credentials for ClickHouse:
- Select the server type as Clickhouse.
- Fill in your Clickhouse credentials as follows:
- Datastore Name: Enter a meaningful name; this is how the Clickhouse credentials will be stored in Bold Data Hub.
- Server: Enter the server name.
Example: service.region.clickhouse.cloud or private ip 5. Secure Connection: Enter your connection type as Insecure (HTTP) or Secure (HTTPS) 6. Http Port number: Enter your Http and Tcp port number. 7. Username: Enter your Clickhouse username. 8. Password: Input your Clickhouse password. 9. Database: Enter your Clickhouse database name.
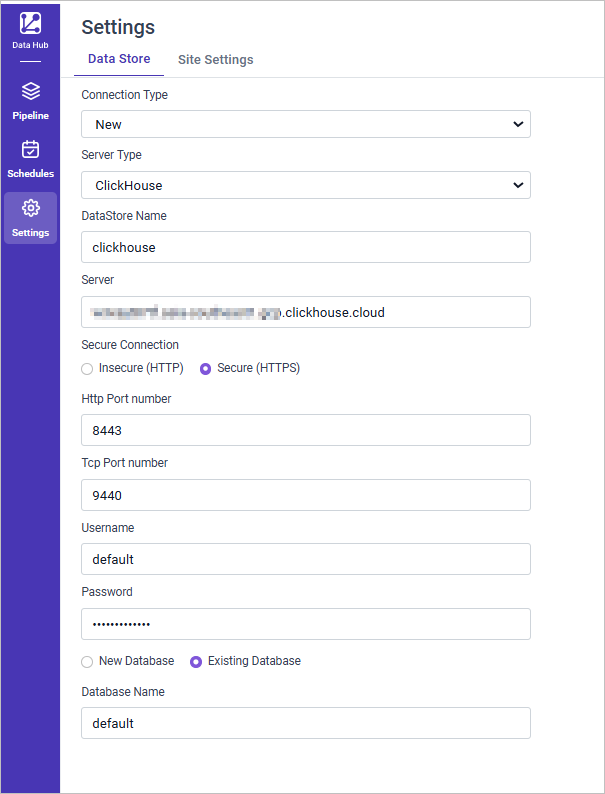
Click on Save to save the credentials.
If all the given credentials are valid, the “Datastore settings are saved successfully” message will appear near the save button.
For More Details please visit Link
Firebolt
Enter the credentials for Firebolt:
- Select the server type as Firebolt.
- Fill in your Firebolt credentials as follows:
- Datastore Name: Enter a meaningful name; this is how the Firebolt credentials will be stored in Bold Data Hub.
- Account: Enter the Account Name.
Example: account-1 5. Enter your Client ID and Client Secret. 6. Enter your Engine Name. 7. Database: Enter your Clickhouse database name.
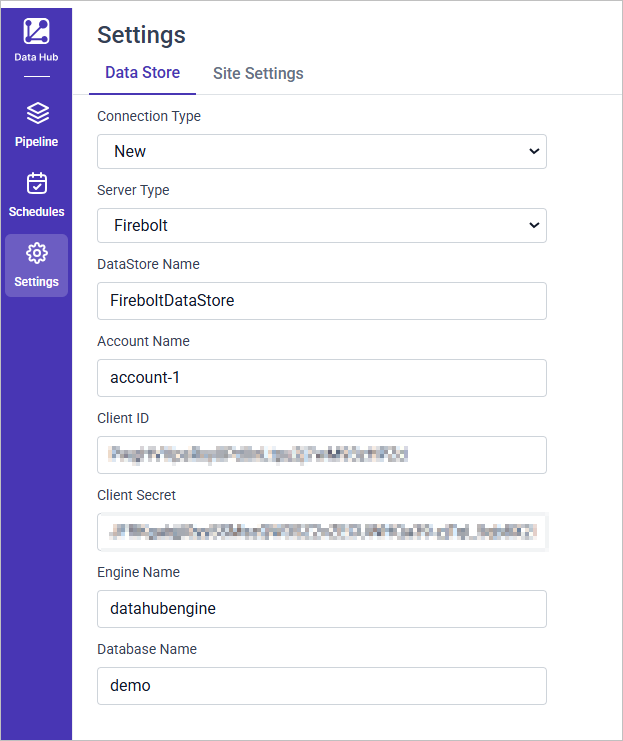
Click on Save to save the credentials.
If all the given credentials are valid, the “Datastore settings are saved successfully” message will appear near the save button.
Teradata
Enter the credentials for Teradata:
- Select the server type as Teradata.
- Fill in your Teradata credentials as follows:
- Datastore Name: Enter a meaningful name; this is how the Teradata credentials will be stored in Bold Data Hub.
- Server: Enter the Server Name.
Example: teradataenv-u043k14.env.clearscape.teradata.com 5. Username: Enter your Teradata username. 6. Password: Input your Teradata password. 7. Database: Enter your Teradata database name.
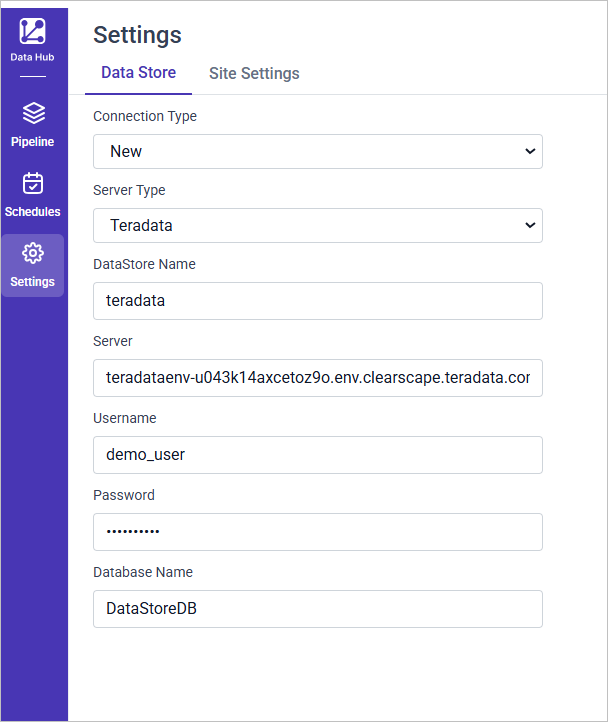
Click on Save to save the credentials.
If all the given credentials are valid, the “Datastore settings are saved successfully” message will appear near the save button.
SAP HANA Cloud
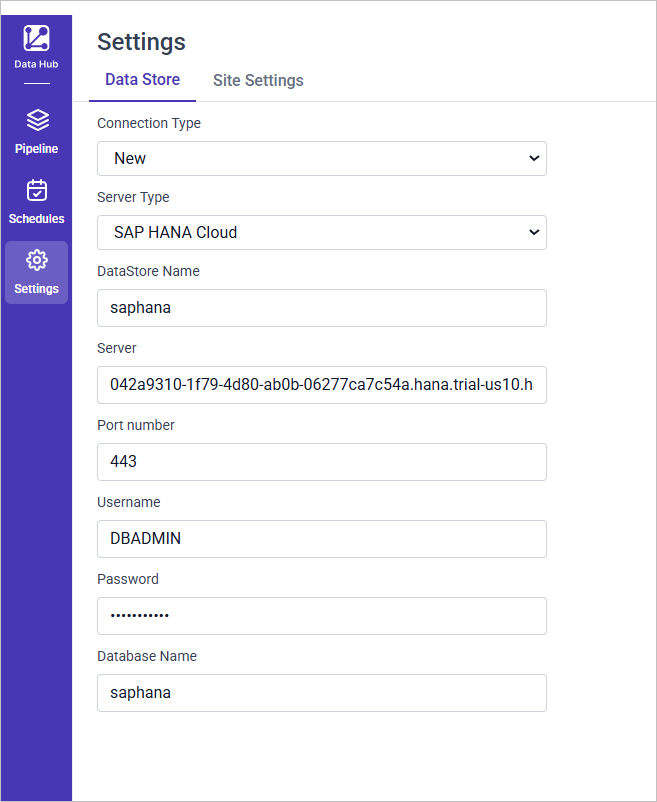
Enter the credentials for SAP HANA Cloud:
- Select the server type as SAP HANA Cloud.
- Fill in your SAP HANA credentials as follows:
- Datastore Name: Enter a meaningful name; this is how the SAP HANA credentials will be stored in Bold Data Hub.
- Server: Enter the Server Name.
Example: 042a9310-1f79-4d80-ab0b-06277ca7c54a.hana.trial-us10.hanacloud.ondemand.com 5. Username: Enter your SAP HANA username. 6. Password: Input your SAP HANA password. 7. Database: Enter your SAP HANA database name.
Click on Save to save the credentials.
If all the given credentials are valid, the “Datastore settings are saved successfully” message will appear near the save button.
IBMDB2
Enter the credentials for IBMDB2:
- Select the server type as IBMDB2.
- Fill in your IBMDB2 credentials as follows:
- Datastore Name: Enter a meaningful name; this is how the IBMDB2 credentials will be stored in Bold Data Hub.
- Server: Enter the Server Name.
- Username: Enter your IBMDB2 username.
- Password: Input your IBMDB2 password.
- Database: Enter your IBMDB2 database name.
- Enter the IBM client library path

Click on Save to save the credentials.
Azure Synapse
Enter the credentials for Azure Synapse:
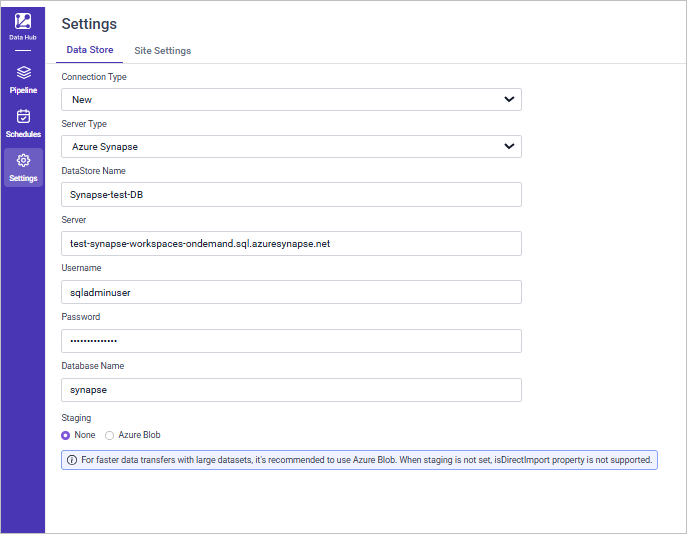
- Select the server type as Azure Synapse.
- Fill in your Azure Synapse credentials as follows:
- Datastore Name: Enter a meaningful name; this is how the Azure Synapse credentials will be stored in Bold Data Hub.
- Server: Enter the Server Name.
- Username: Enter your Azure Synapse username.
- Password: Input your Azure Synapse password.
- Database: Enter your Azure Synapse database name.
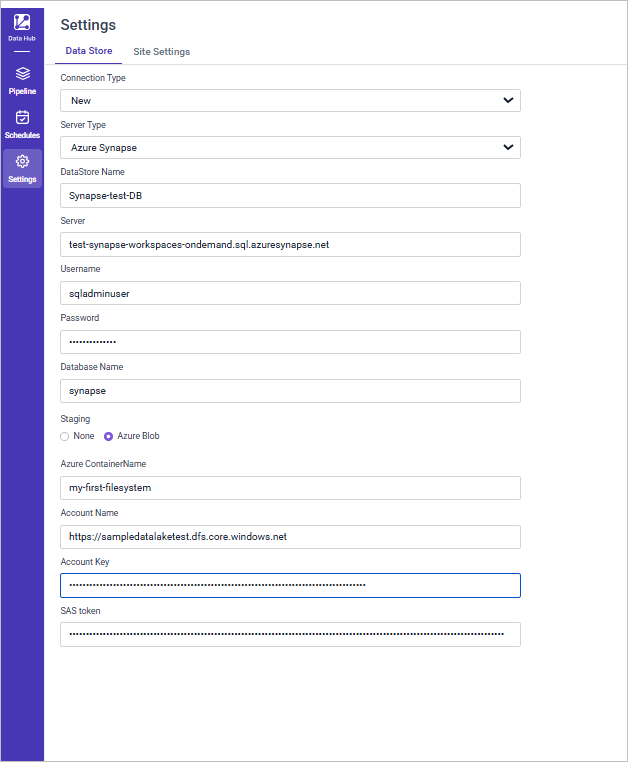
- Enter the staging type preferred.
For faster data transfers with large datasets, it’s recommended to use Azure Blob. When staging is not set, isDirectImport property is not supported.
- When using staging enter the Azure ContainerName, Account Name, Account Key, SAS token
Click on Save to save the credentials.
Amazon RedShift
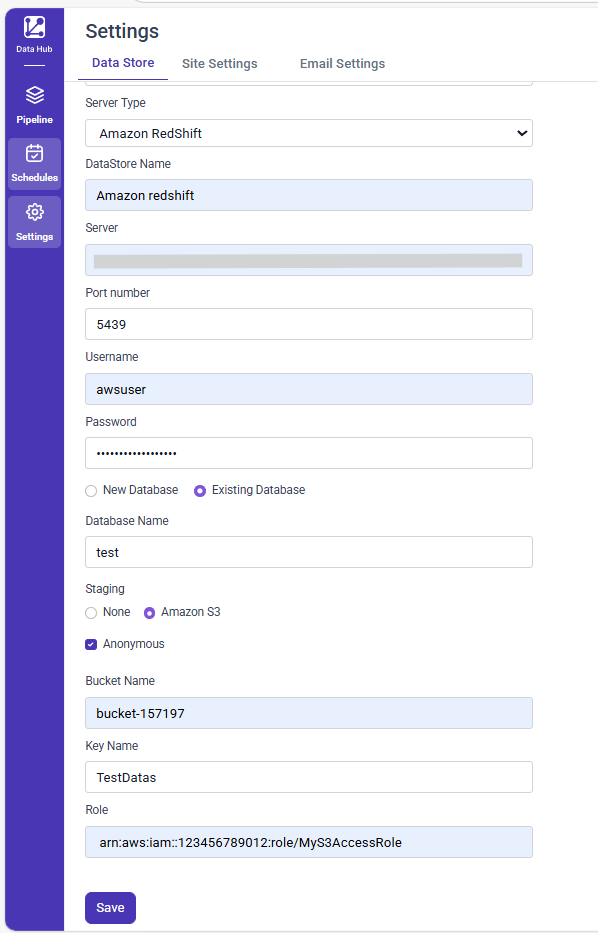
Enter the credentials for Amazon RedShift:
- Select the server type as Azure RedShift.
- Fill in your Azure RedShift credentials as follows:
- Datastore Name: Enter a meaningful name; this is how the Amazon RedShift credentials will be stored in Bold Data Hub.
- Server: Enter the Server Name.
- Username: Enter your Amazon RedShift username.
- Password: Input your Amazon RedShift password.
- Database: Enter your Amazon RedShift database name.
- Enter the staging type preferred.
For faster data transfers with large datasets, it’s recommended to use s3 blob. When staging is not set, isDirectImport property is not supported.
- Use S3 blob staging for faster data transfers with large dataset
- If Anonymous Access is selected, enter Bucket Name, Key Name, Region, and Role only.
- If Anonymous Access is not selected, enter Bucket Name, Key Name, Region, Access Key ID, Secret Access Key, and Role (if needed).
- Click Save to store the credentials and complete the setup.
Click on Save to save the credentials.
MinIO
Enter the credentials for MinIO:
- Select the server type as MinIO.
- Fill in your MinIO credentials as follows:
- Datastore Name: Enter a meaningful name; this is how the MinIO credentials will be stored in Bold Data Hub.
- Server: Enter the Server Name.
- Port Number: Specify the port where MinIO is hosted.
- Access Key: Provide your MinIO access key.
- Secret Key: Enter the secret key associated with your MinIO access.
- Bucket Name: Provide the MinIO bucket name where the data will be stored.
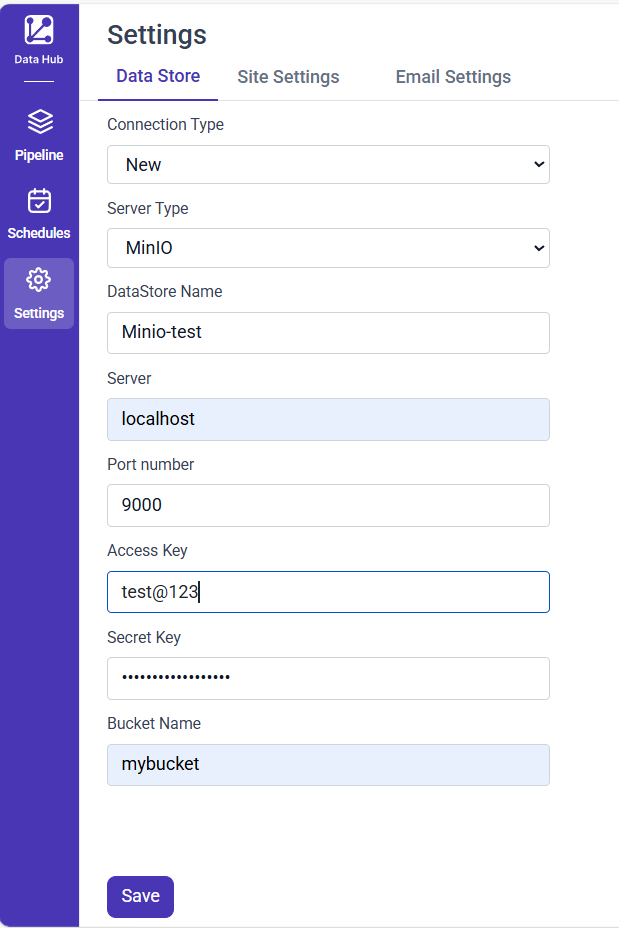
Click on Save to save the credentials.
Star Rocks
Enter the credentials for StarRocks:
- Select the server type as StarRocks.
- Fill in your StarRocks connection details as follows:
- Datastore Name: Enter a meaningful name; this is how the StarRocks credentials will be stored in Bold Data Hub.
- Server: Enter the Server Name.
- Port Number: Specify the port where StarRocks is hosted.
- Enter the user name.
- Enter the password.
- Enter the database Name.
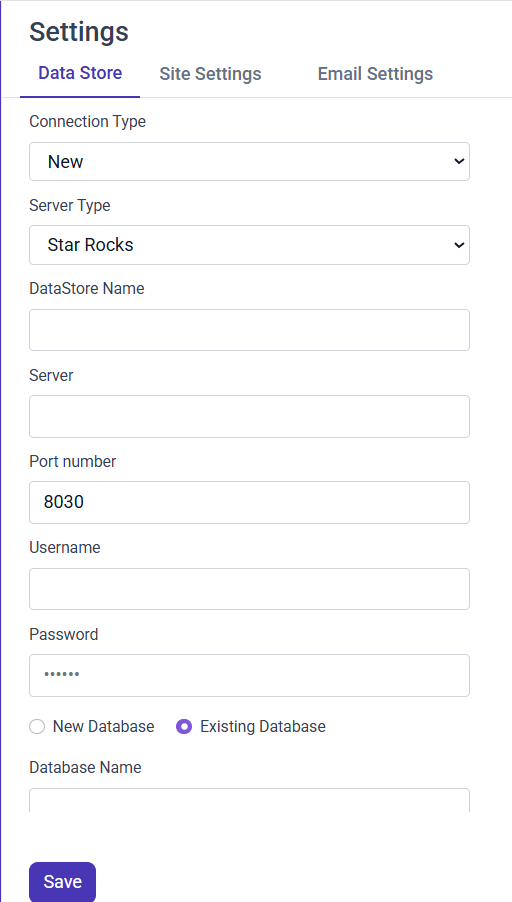
Click on Save to save the credentials.