Set up a high availability environment in Windows using Shared Folder for Bold Reports®
You can run Bold Reports® in a high availability environment on Windows IIS by using a shared folder. The setup configures shared storage, enables centralized IIS settings, and uses Network Load Balancing (NLB) to distribute traffic across multiple servers.
Deployment prerequisites
A Bold Reports® high availability setup on Windows needs three virtual machines, IIS, a File Server, shared storage, and NLB.
- Three virtual machines running the same version of Windows Server with Server Manager support (Windows Server 2012 or later).
- VM1 is used for storing app_data and configuring the Network Load Balancer cluster.
Note: Because VM1 contains the NLB cluster and app_data, it should remain in an active state at all times.
- VM2 and VM3 are used for deploying and running Bold Reports®.
- IIS Server and the File Server must be installed on all
VMs. - Shared storage must be configured and accessible from all
VMs(e.g.,C:\IISSharedContent). - Network Load Balancing (NLB) must be set up between the VM2 and VM3 from VM1.
Installation Steps:
Set up the Bold Reports® high availability environment in the following order: install Windows features, set up NLB, configure the shared folder, and then install Bold Reports®.
Step 1: Install IIS, NLB and File Server Features:
Install the Web Server (IIS), File Server, and Network Load Balancing features on each VM before you deploy Bold Reports®.
-
Open Server Manager on each VM.
-
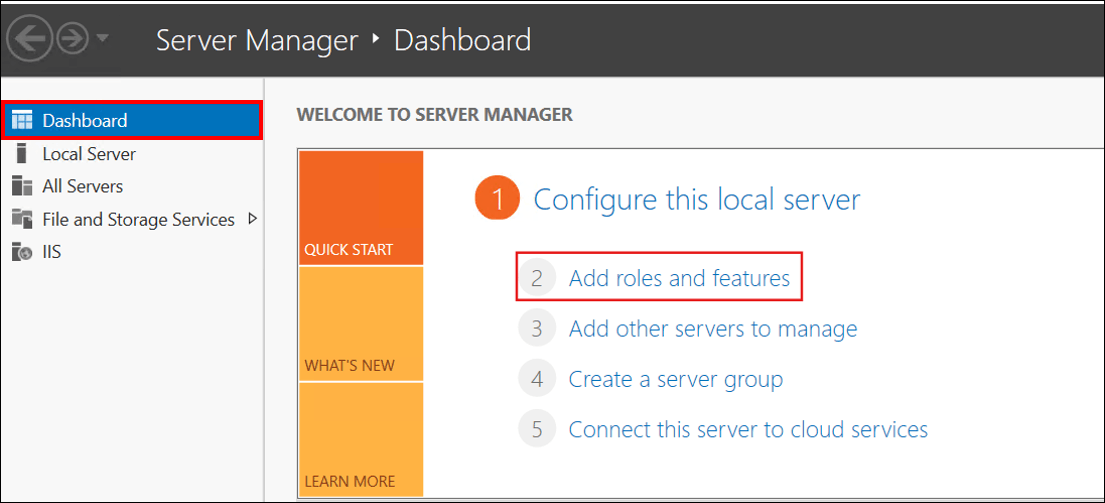
Navigate to Dashboard and click Add roles and features.
-
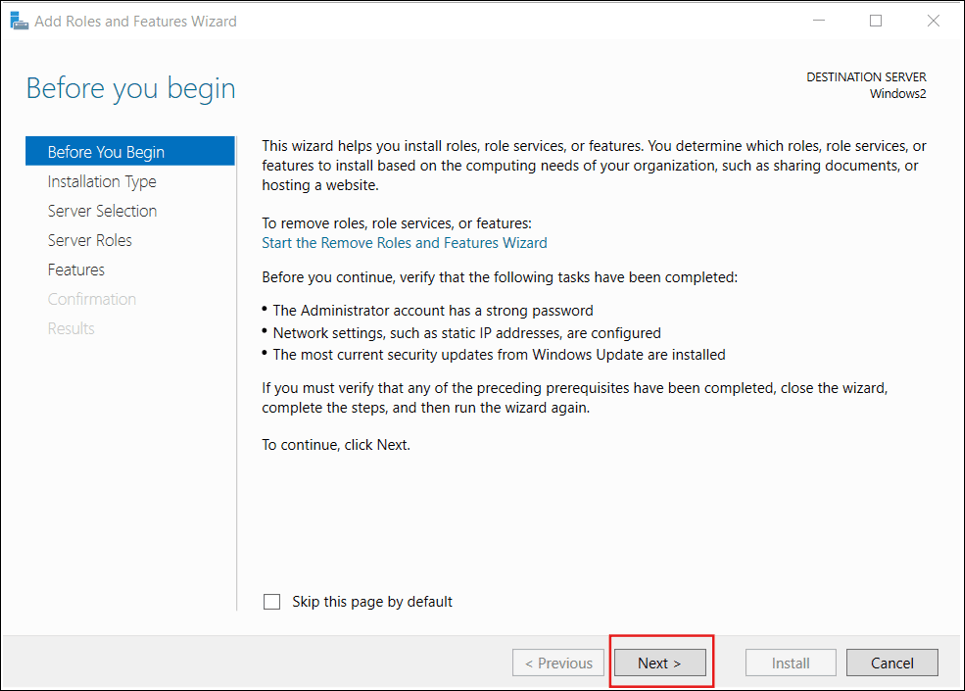
In the Add Roles and Features Wizard, navigate to the Before you begin page and select Next.
-
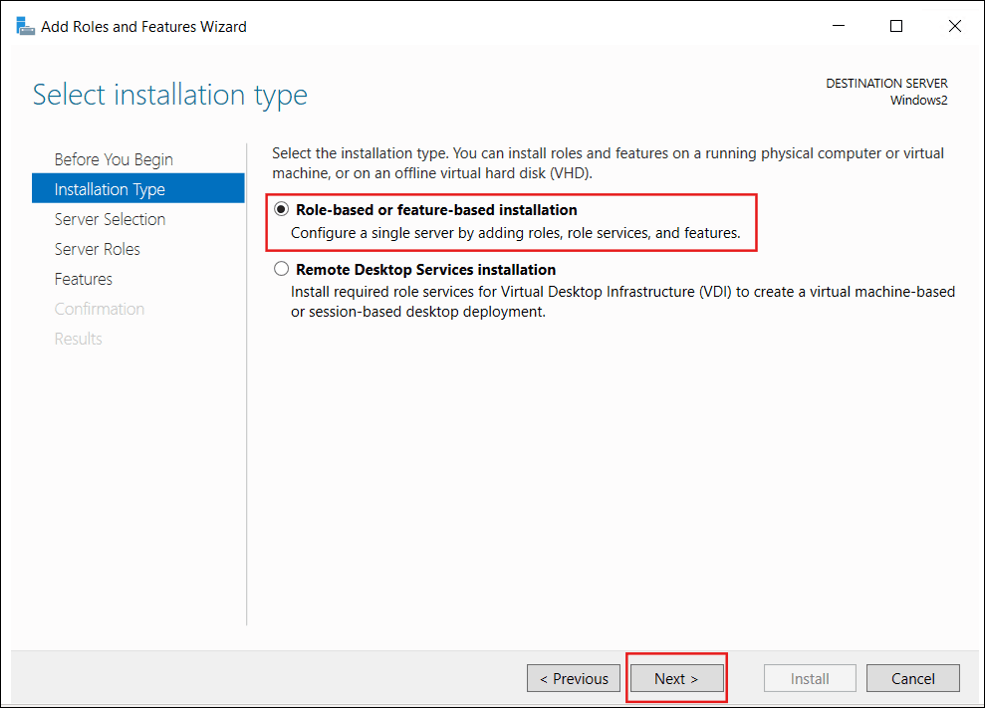
On the Select installation type page, choose Role-based or feature-based installation, and then click Next.
-
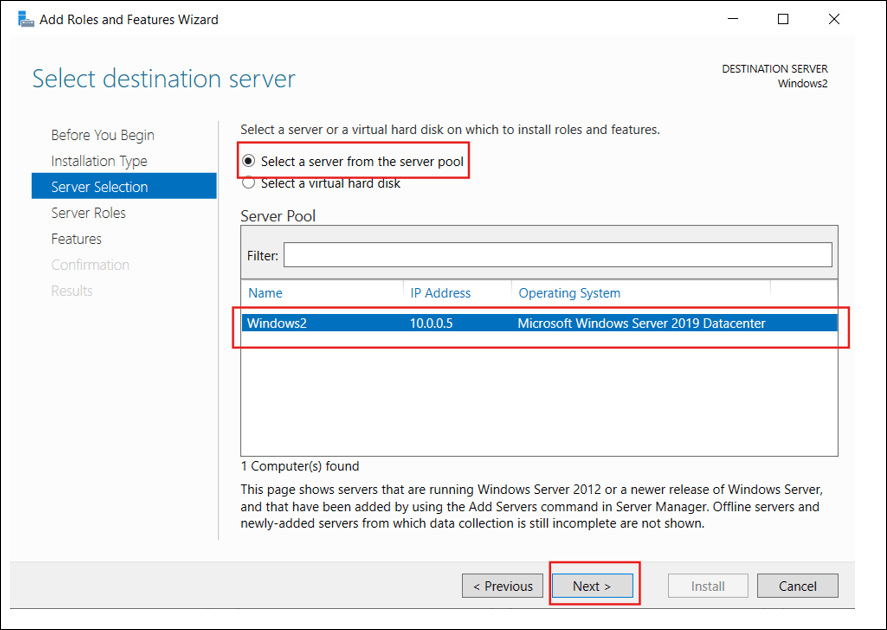
On the Select destination server page, choose Select a server from the server pool, select your server, and then click Next.
-
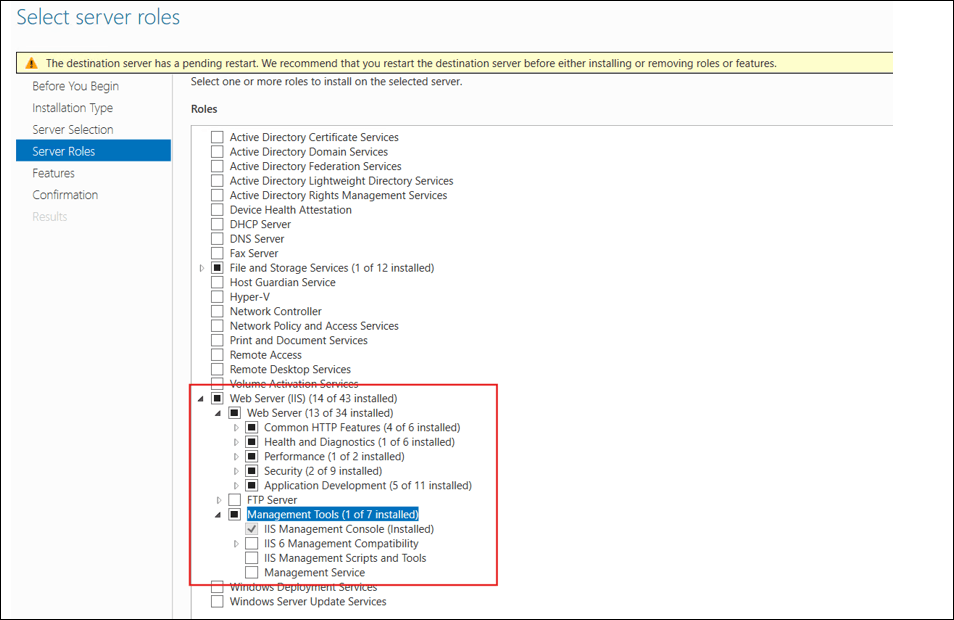
On the Select server roles page, select Web Server (IIS), make sure the roles shown in the screenshot are checked and enabled correctly, and then click Next.
-
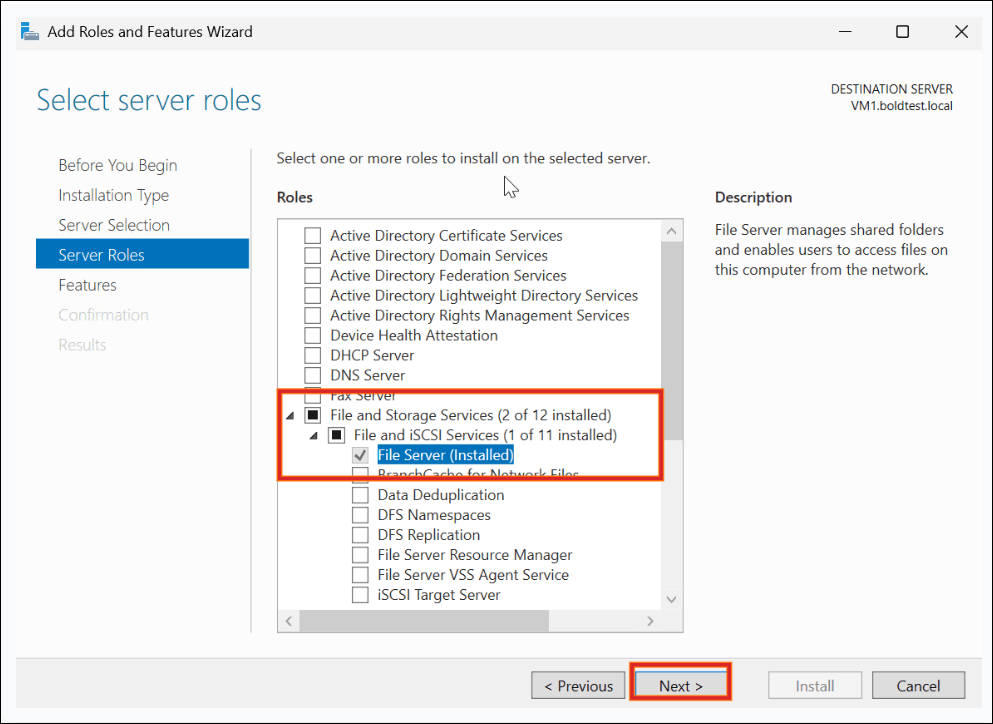
On the Server Roles page, select File Server and click Next.
-
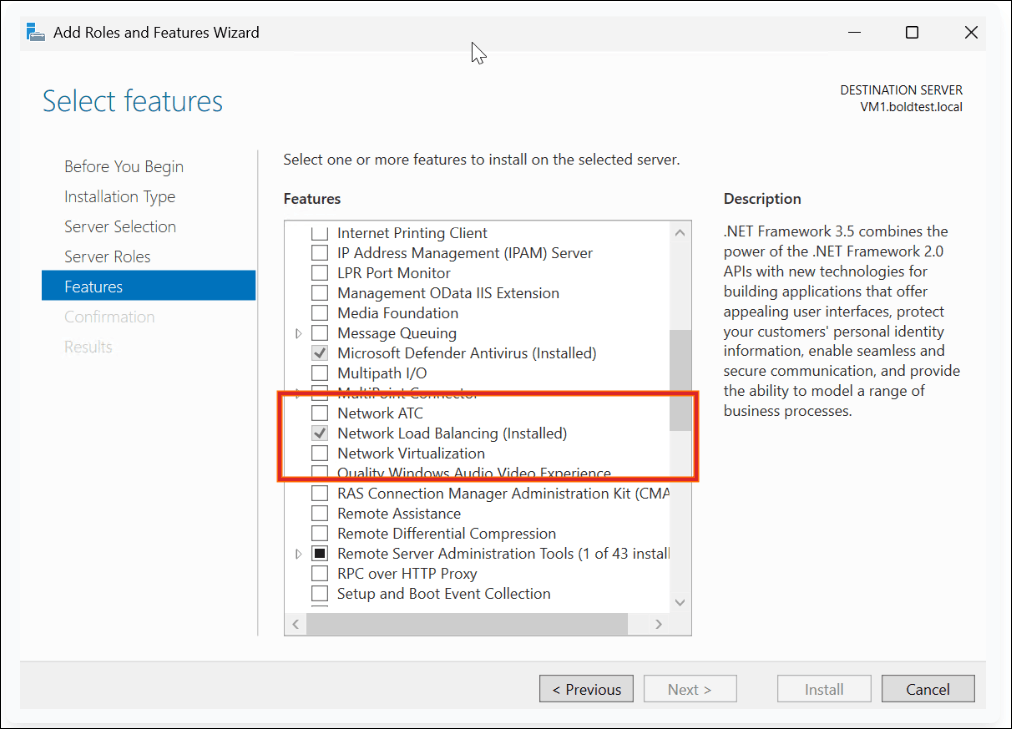
On the Features page, select the Network Load Balancing feature.
-
On the Confirmation page, click Install.
Step 2: Network Load Balancer Setup
Create an NLB cluster from VM1 and add VM2 and VM3 as hosts so traffic to Bold Reports® is distributed across both servers.
-
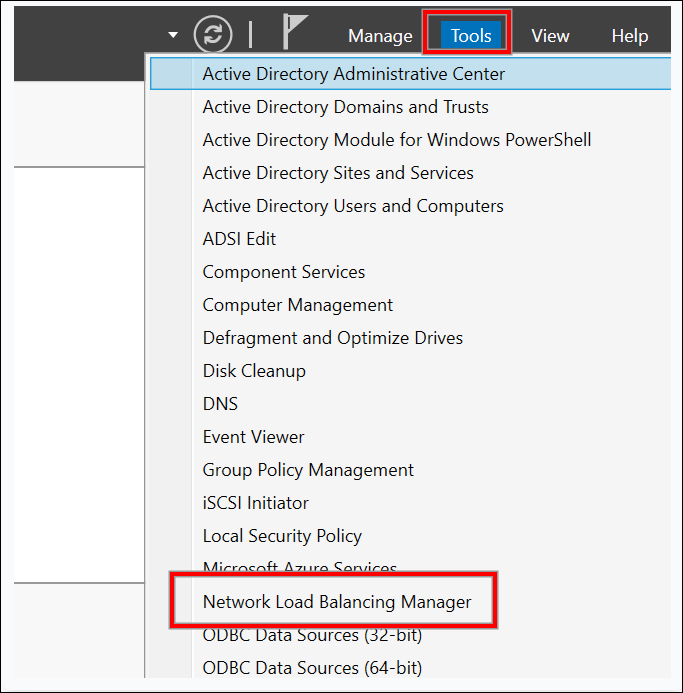
From VM1’s Server Manager console, click Tools and select Network Load Balancing Manager.
-
Right-click Network Load Balancing Clusters and select New.
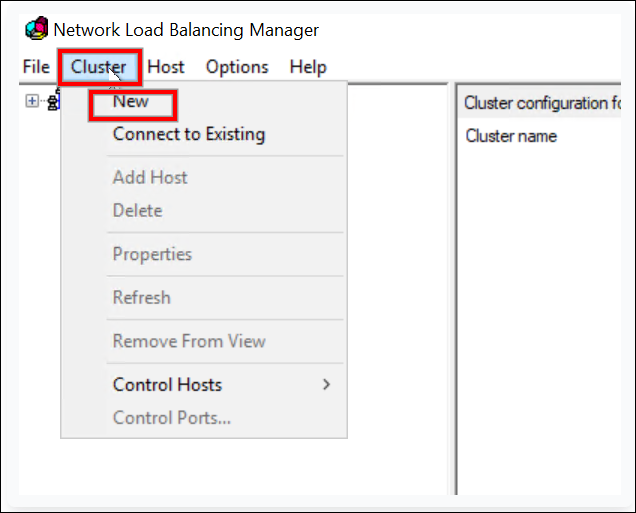
-
In the New Cluster window, type the IP address or name of VM2 in the Host field, and then click Connect. Verify that the Interface name is listed, and then continue to the next step.
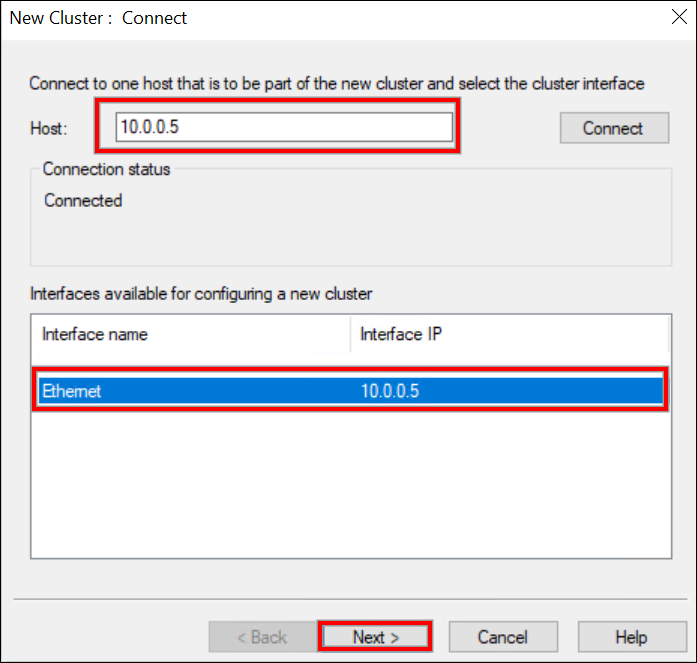
-
On the Host Parameters page, adjust the Priority value as needed. Make sure the Default status is set to Started. When ready, click Next.
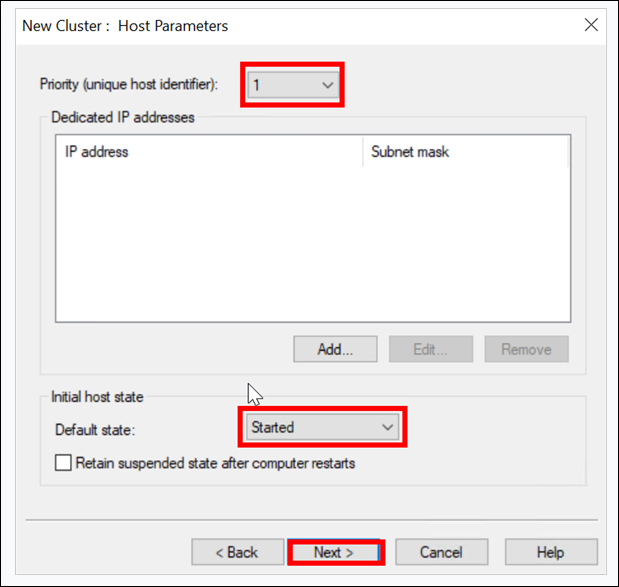
-
On the Cluster IP Addresses page, click Add to add a new Cluster IP address.
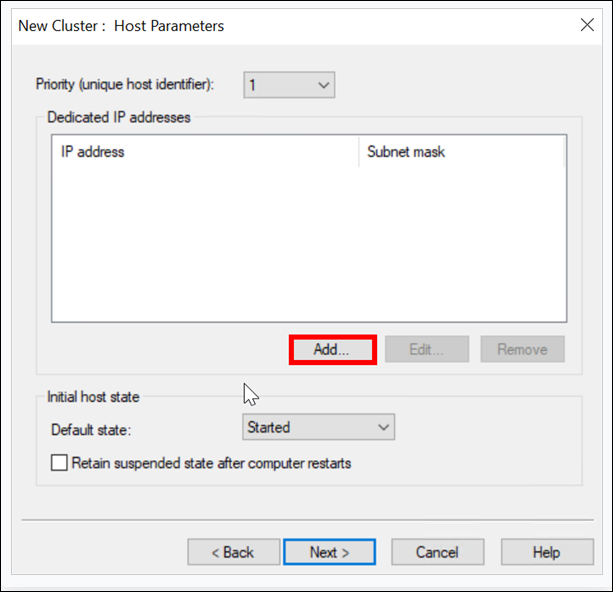
-
Specify a Cluster IP Address and click OK.
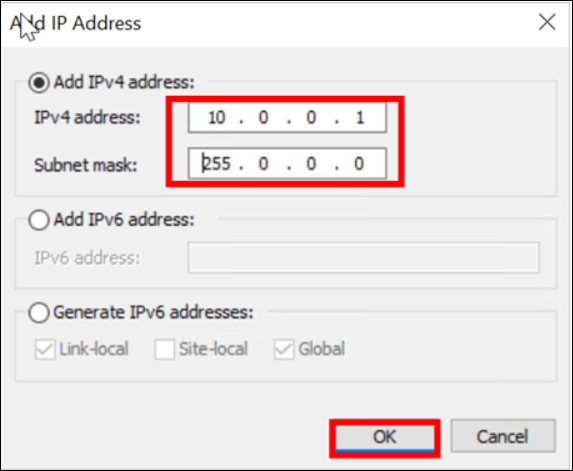
Note: This IP address is a new NLB Cluster virtual IP address on which the host service runs.
-
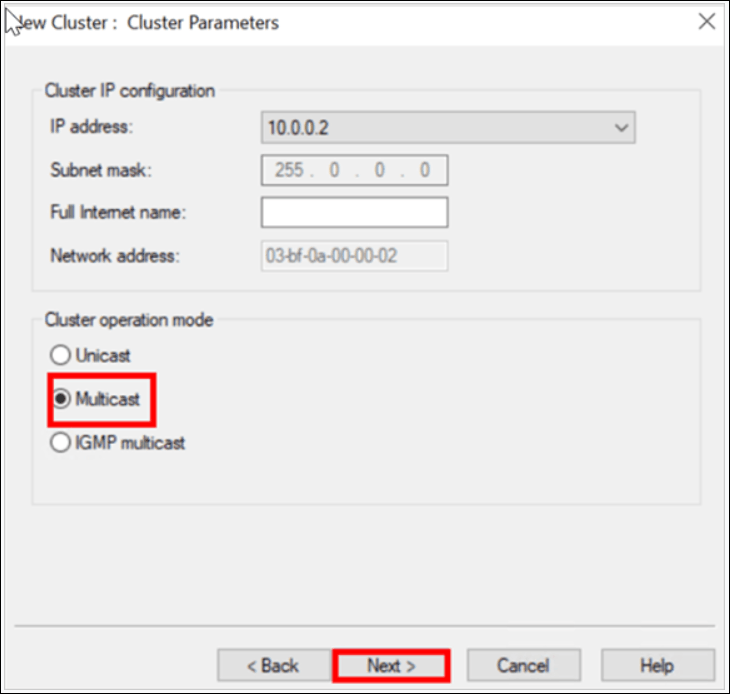
Select an NLB cluster operation mode. You can also specify the FQDN name for the NLB cluster in the Full Internet Name field. Click Next.
-
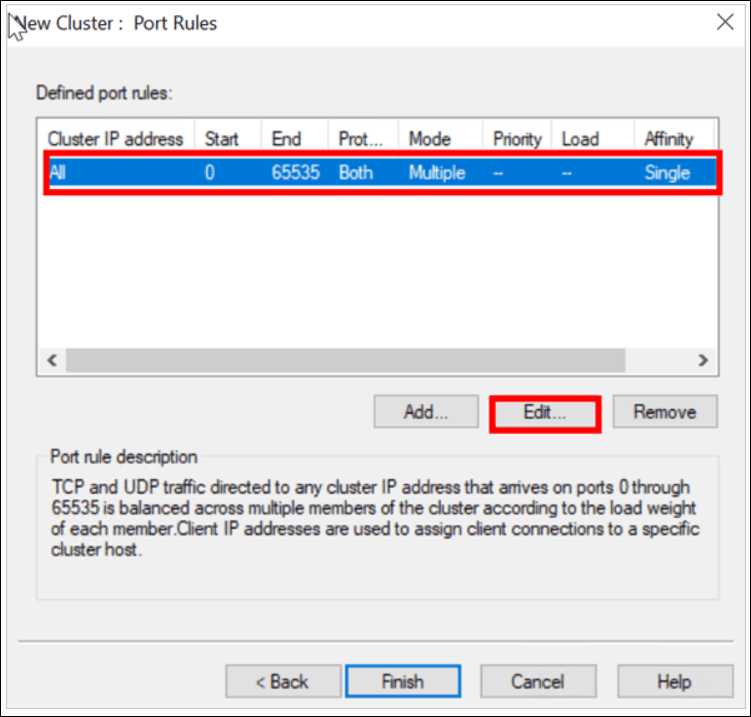
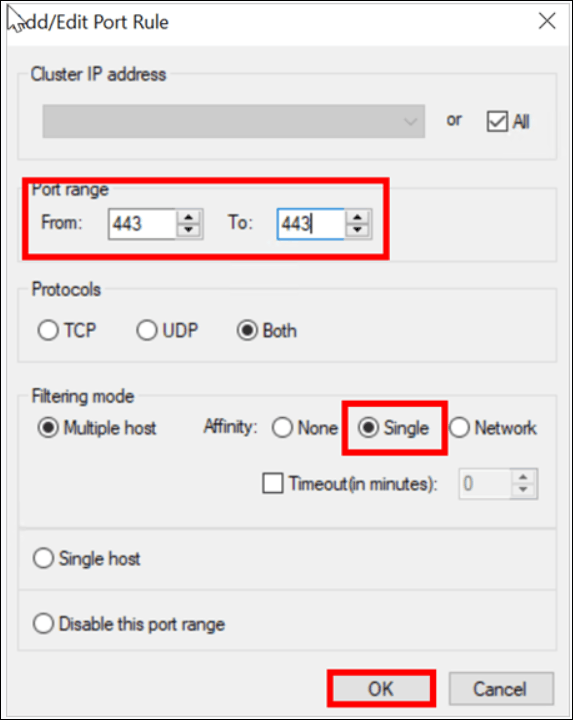
On the Port Rules page, select the existing port rule and click Edit.
-
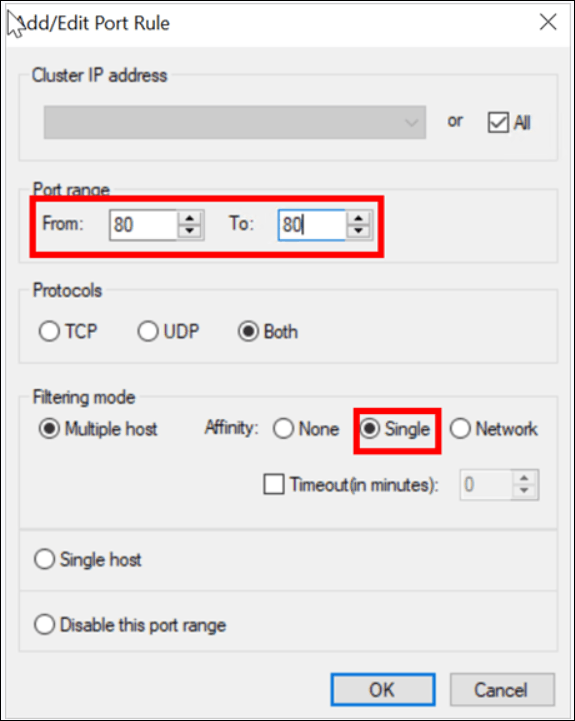
Set the port range to 80 – 80 (as only port 80 is required for the IIS NLB cluster). Select None for the affinity mode and click OK.
-
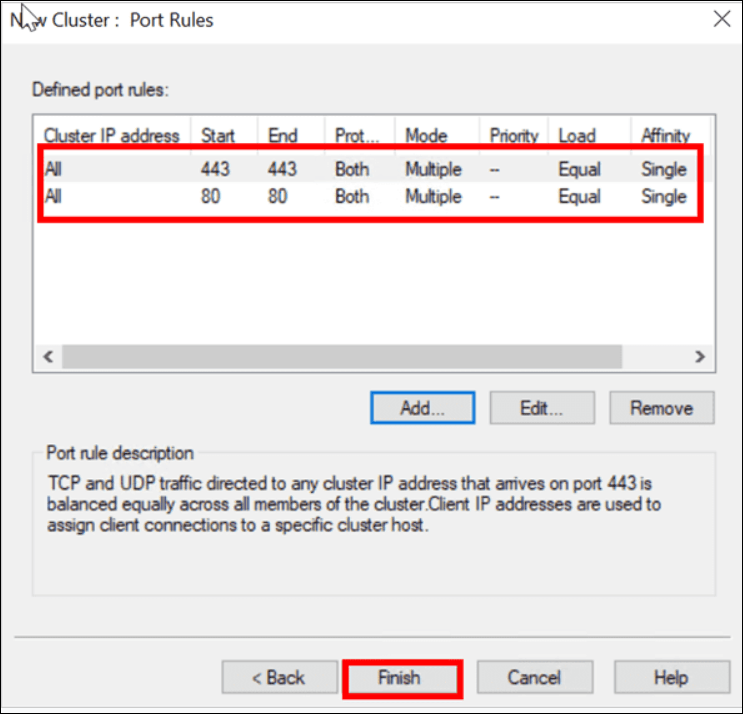
Click Add to create a new rule for port 443, following the same steps.
-
After you configure the port range, click Finish.
-
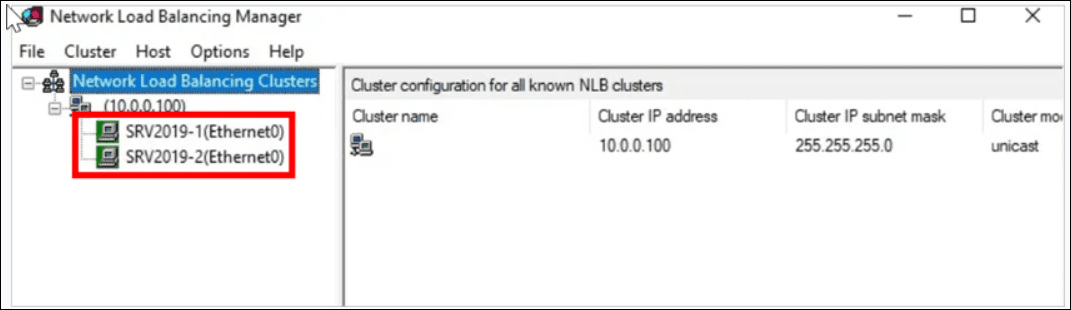
Wait until the machine is added successfully. The icon color of the added NLB node turns green.
-
Confirm that the second NLB node was added successfully by checking that its icon color is green.
-
Repeat these steps to add VM3 to the NLB.
Step 3: Shared Folder setup:
Bold Reports® on VM2 and VM3 uses one shared folder on VM1 for the application files and IIS configuration. Complete the following four sub-steps.
Step 3.1: Configure File Sharing on VM1
Create and share the IIS configuration folder on VM1 so that VM2 and VM3 can read and write it.
- Create a shared folder for IIS configuration (e.g.,
C:\IISSharedConfig).- Create a folder named
IISSharedConfigin the C drive. - Right-click the folder, go to Properties -> Sharing, provide a name for the shared folder, and click Share.
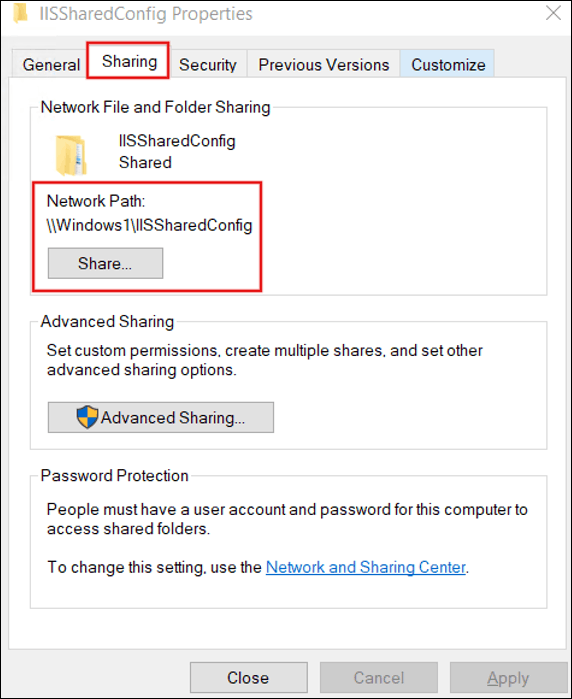
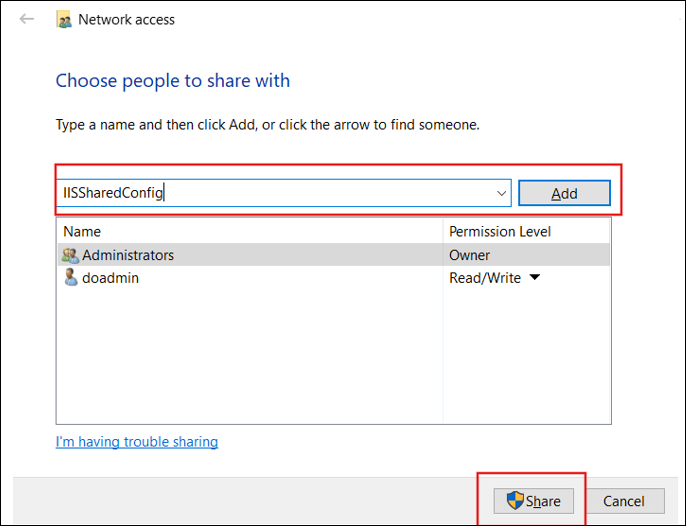
- Navigate to Advanced Sharing, click Permissions, and then add a user or group (e.g., Everyone or a specific user). Assign Read/Write or Full Control permissions as required.
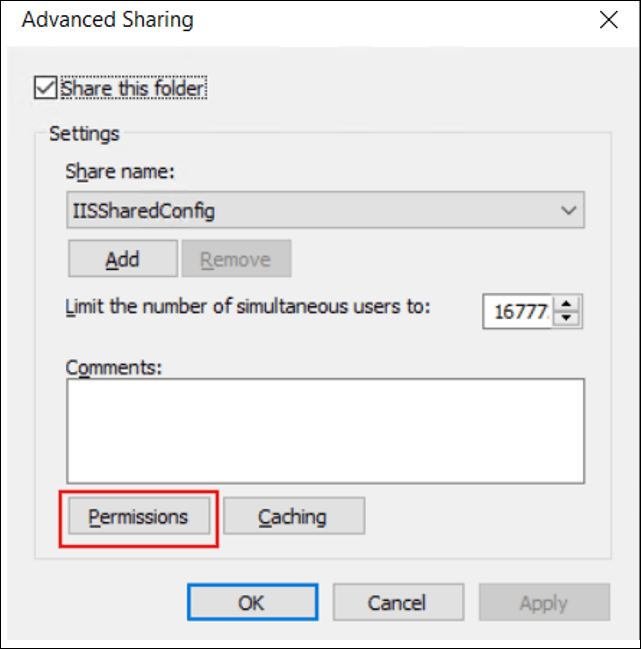
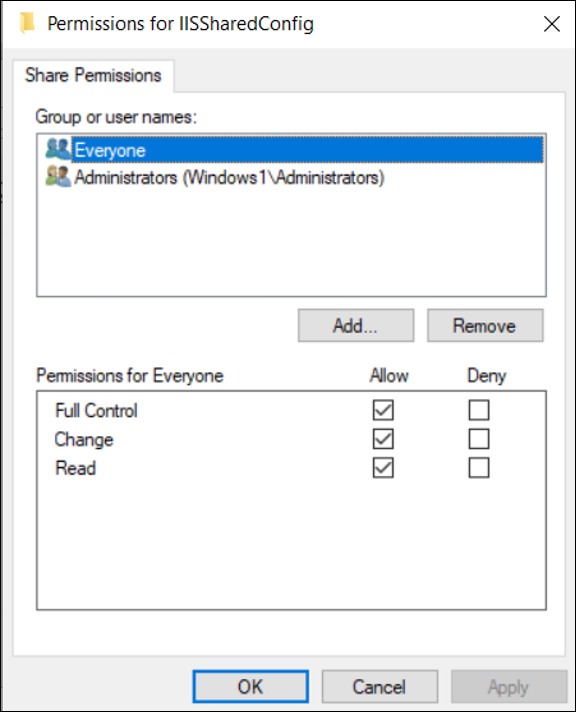
- Create a folder named
File and Printer Sharing:
Turn on network discovery and file sharing on VM1 so the other VMs can reach the shared folder.
- Open the Control Panel, navigate to Network and Sharing Center, and then go to Advanced Sharing Settings.
- Under the Private Network section, enable the following:
- Turn on network discovery.
- Turn on file and printer sharing.
Set NTFS Permissions:
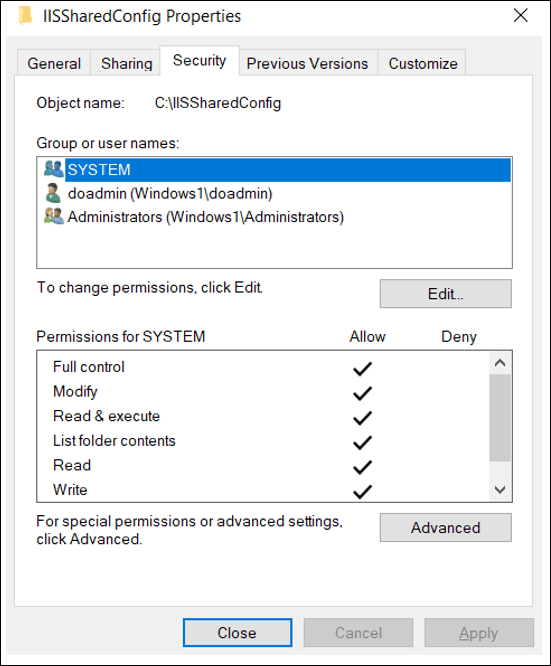
Give the same user or group Full Control at the NTFS level on the shared folder.
- Go to the Security tab in folder properties.
- Add the same user or group and assign Full Control permissions.
Step 3.2: Access the Shared Folder from VM2 and VM3
Connect VM2 and VM3 to the VM1 shared folder and link it to a local path with a symbolic link.
-
Access the Shared Folder via IP Address:
- Open File Explorer on VM2 and enter the folder path.
Example :
\\10.0.0.4\IISSharedConfig.
-
Create a Symbolic Link:
- Run the following command in Command Prompt on VM2.
Example:
mklink /D C:\SharedFolder \\10.0.0.4\IISSharedConfig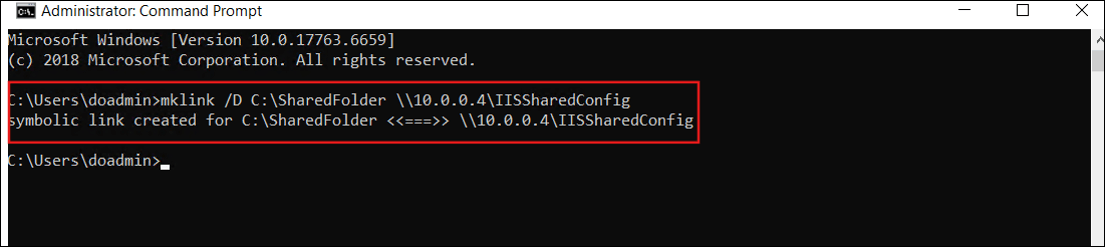
- After you run this command, navigate to the C drive to verify that the shared folder is present.
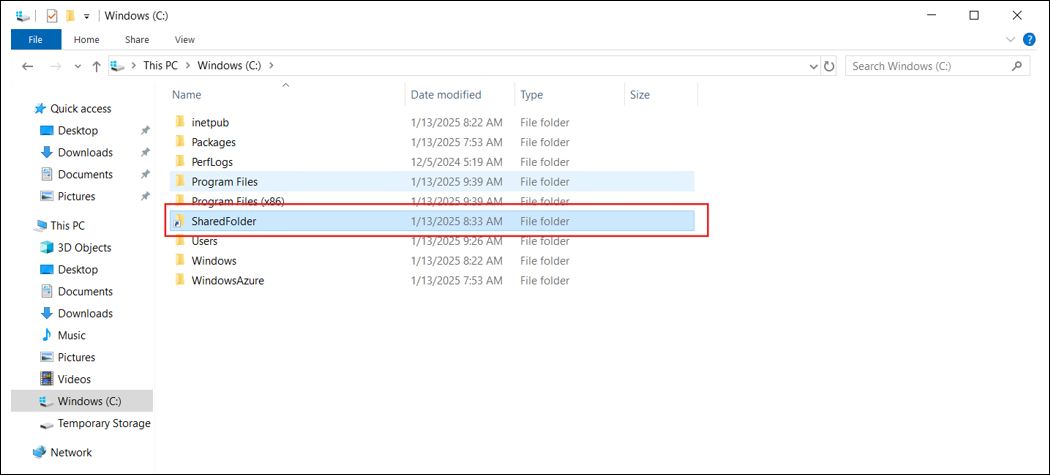
- Repeat the same steps to link the shared folder in VM3.
Step 3.3: IIS Centralized Configuration
Export the IIS configuration to the shared folder so all VMs running Bold Reports® share the same IIS settings.
- On VM1:
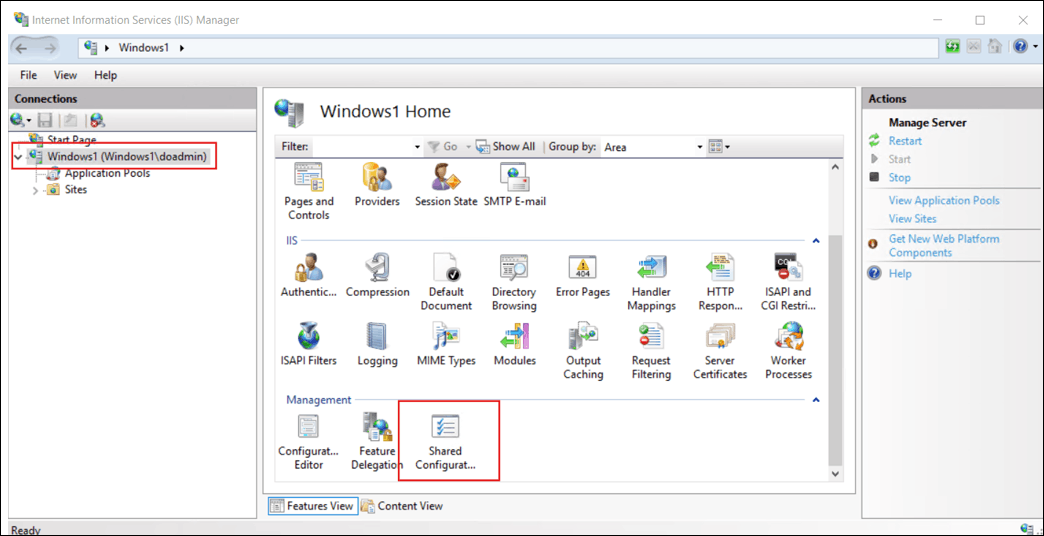
- Open IIS Manager on VM1.
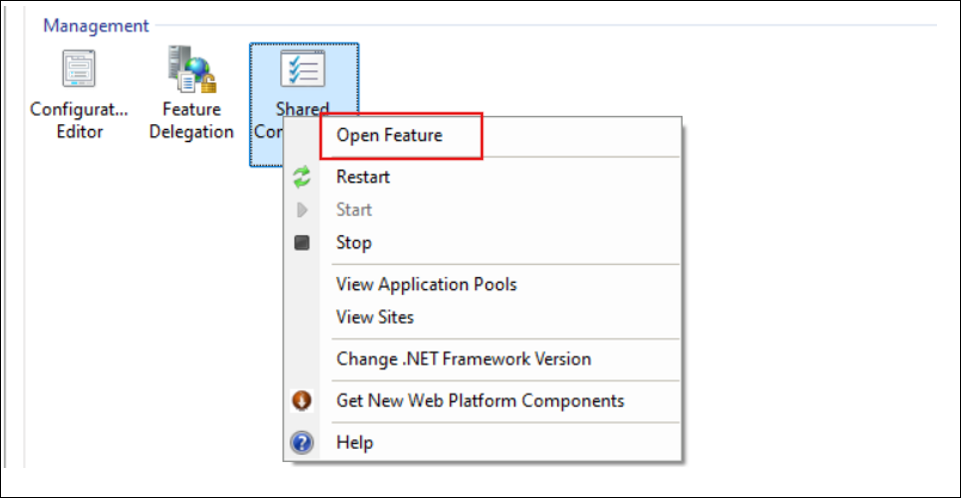
- Right-click the server name, select Shared Configuration, and then click Open Feature -> Export Configuration.
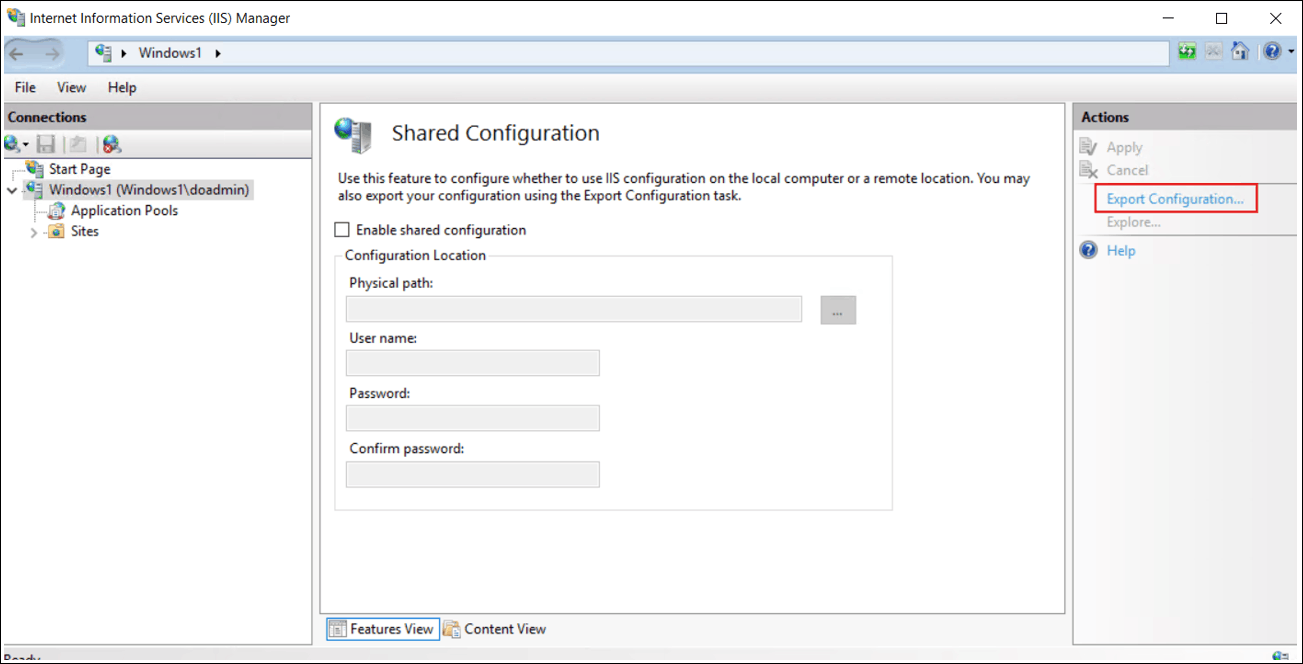
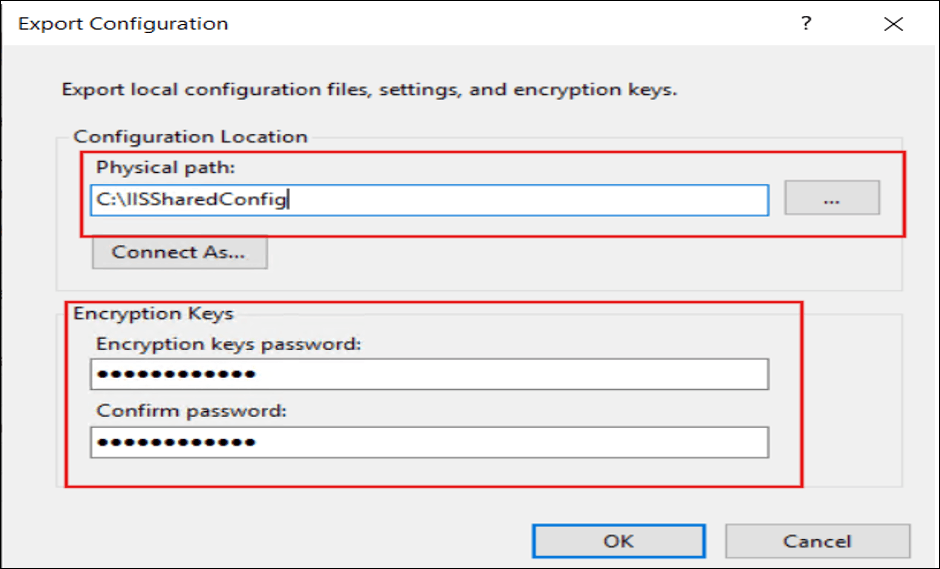
- Choose the shared folder path (e.g.,
C:\IISSharedConfig) and provide a password to secure the exported configuration.
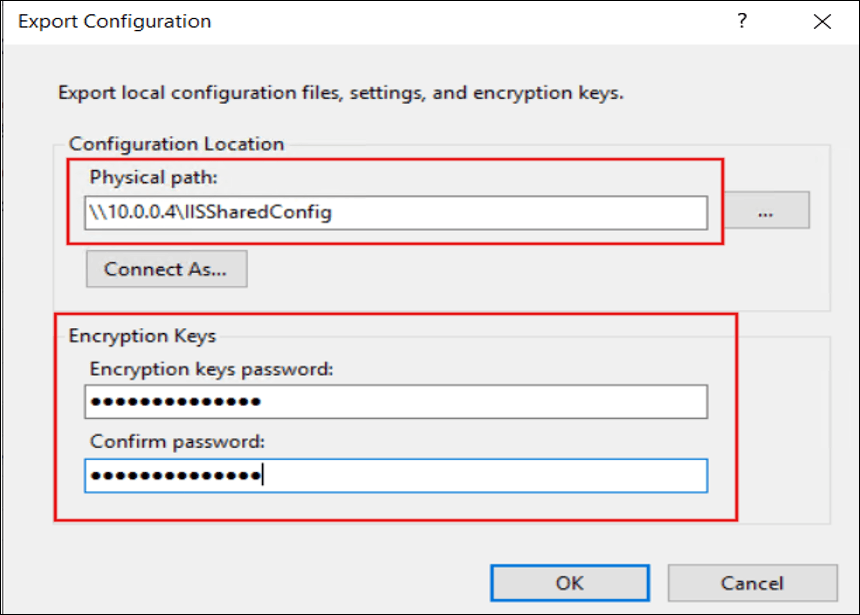
- On VM2 and VM3:
- Follow the same steps as on VM1, using the shared folder (e.g.,
\10.0.0.35\IISSharedConfig).
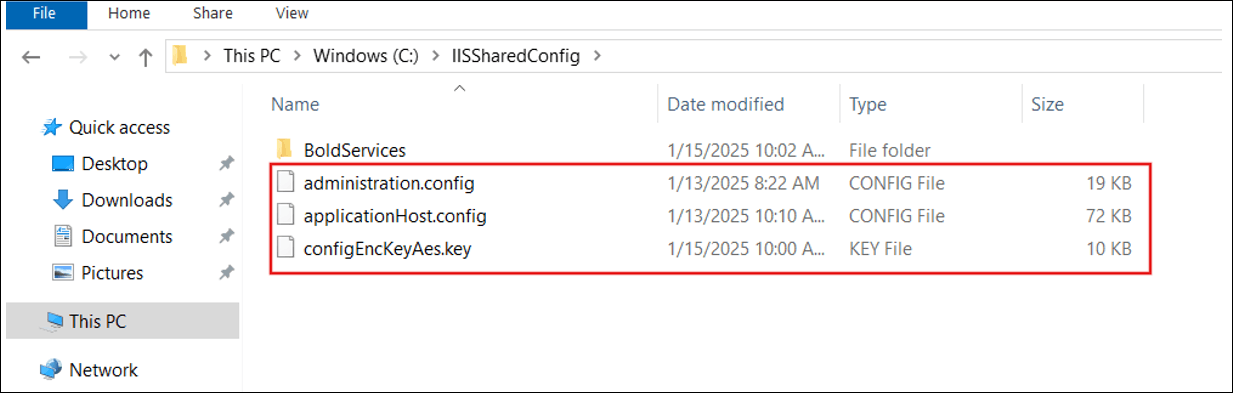
- After you configure IIS Shared Configuration, the process generates the following files in the specified export location.
- Follow the same steps as on VM1, using the shared folder (e.g.,
Step 3.4: Install Bold Reports® Application
Install Bold Reports® on VM2 and VM3 into the shared folder from VM1, and then open the site through the NLB IP address.
-
On VM2:
-
Install the Bold Reports® application using the shared folder from VM1.
Example:
C:\SharedFolder\BoldServices.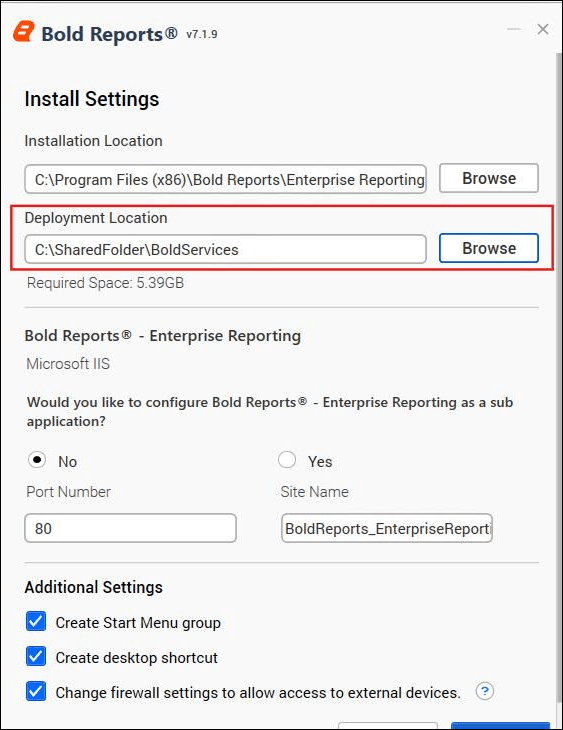
-
-
On VM3:
-
Install the Bold Reports® application using the shared folder from VM1. Example:
C:\SharedFolder\BoldServices.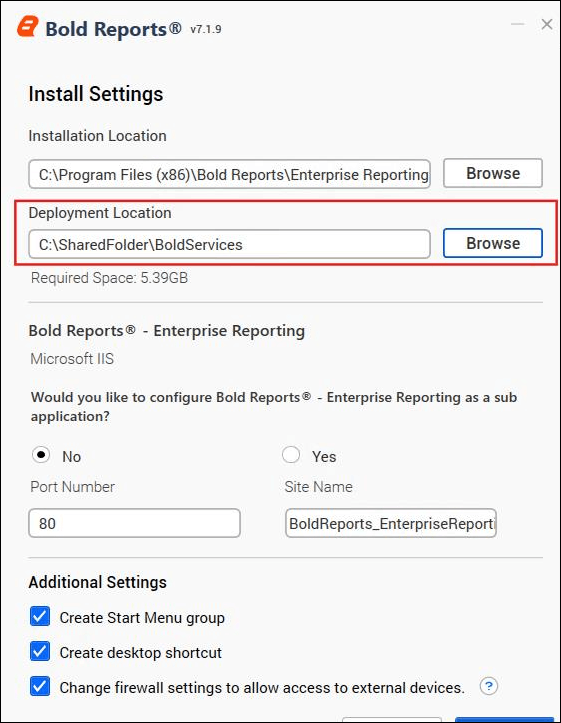
-
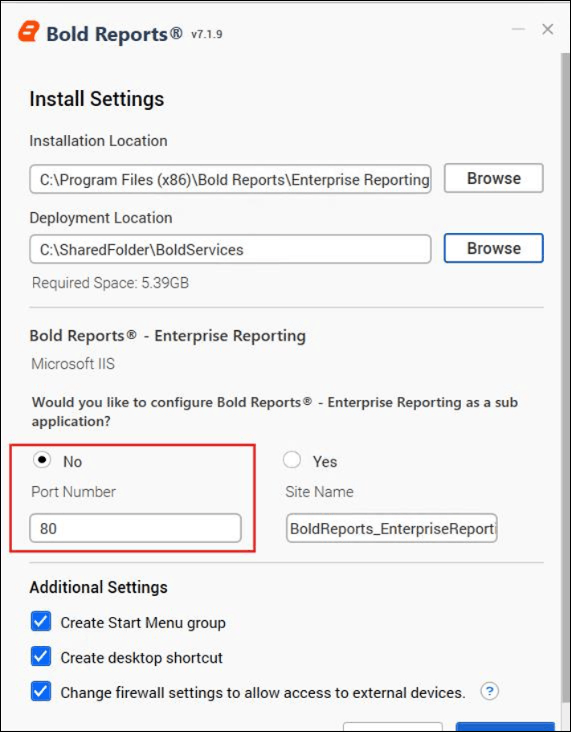
Make sure port 80 is used on both VM2 and VM3.
-
Click Install.
-
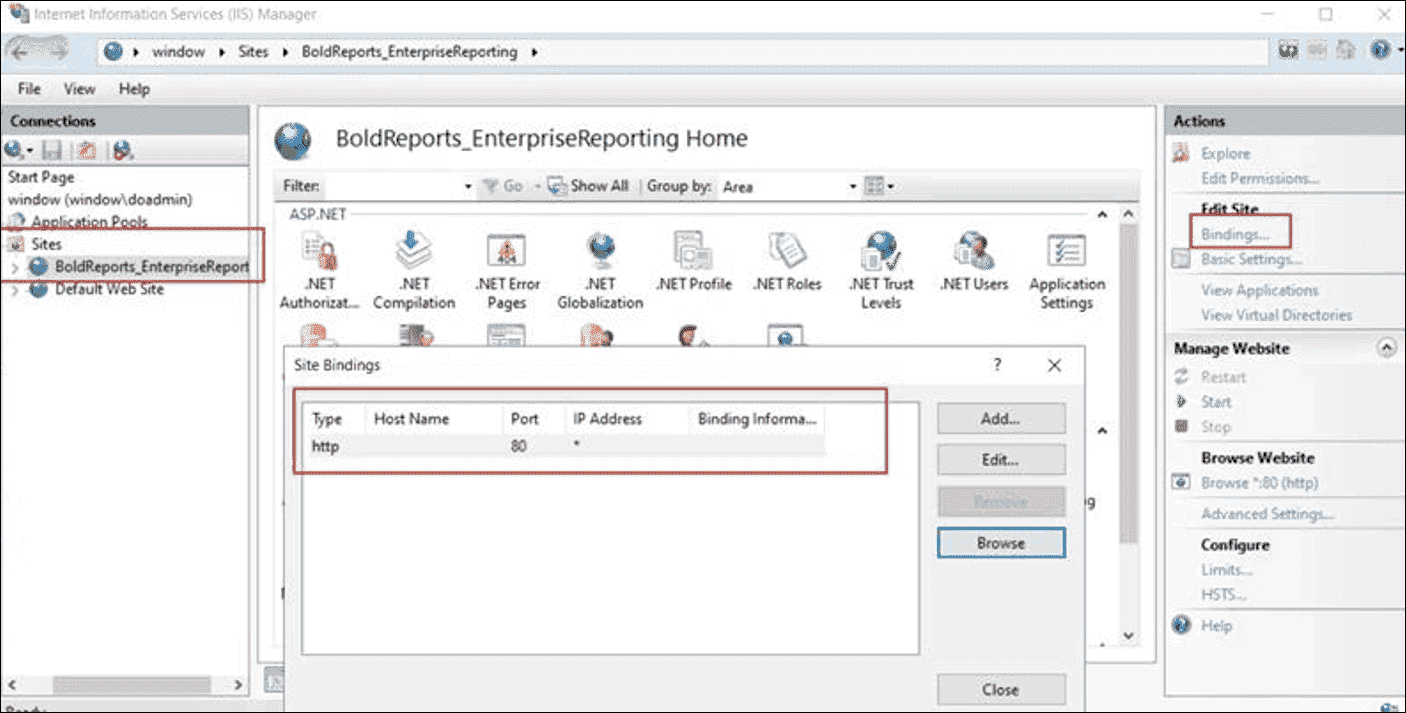
After installation, remove “localhost” from the Host Name in the Bold Reports® IIS site bindings on VM2 and VM3.
-
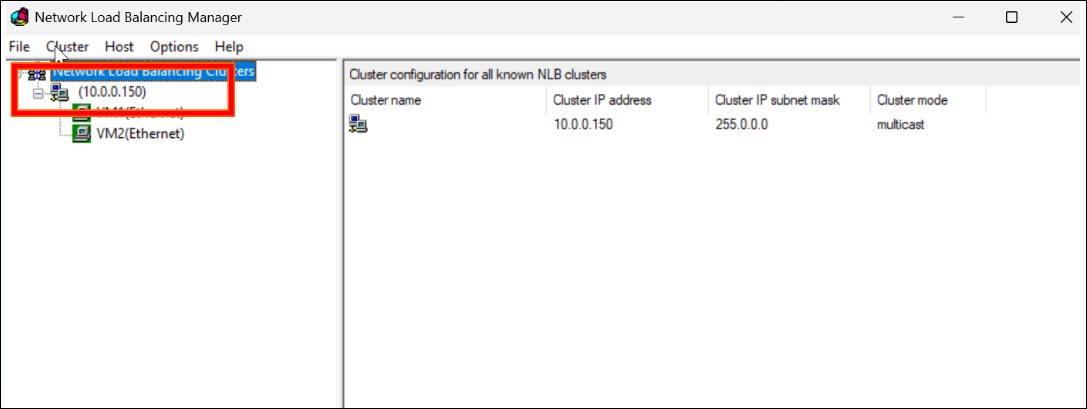
Open the NLB IP address to access the site, and then start the application.
-
IMPORTANT:
- Ensure that both
VMsuse the same port number to avoid conflicts. - Verify that proper permissions are set on the shared folder.
- Test network connectivity between VM1, VM2, VM3 and the shared storage.
- After installation, test the Bold Reports® application from both
VMsto confirm the shared folder functionality.
Frequently asked questions
How many virtual machines do I need?
You need three virtual machines running the same version of Windows Server (Windows Server 2012 or later). VM1 stores app_data and hosts the NLB cluster, and VM2 and VM3 run Bold Reports®.
Which ports does the NLB cluster use?
The NLB port rules use port 80 for the IIS NLB cluster, plus a second rule for port 443.