Configure Active Directory settings
You should configure the Active Directory settings to import users and groups from the Windows Active Directory and synchronize their details after importing into the Bold Reports® On-Premise. To configure Active Directory with Bold Reports® On-Premise, follow these steps:
-
Click the Settings option in the Report Server left-side panel and navigate to the User Directories tab, and then select Windows Active Directory as shown in the following image.

-
You will need the following Active Directory details to configure Bold Reports® with your Active Directory:
- Username and Password: Username and password of the user present in the Active Directory domain.
- LDAP URL: IP or DNS name of the Windows Server, where you have Active Directory Domain Services enabled. For example,
LDAP://192.168.1.1. - Distinguished Name: FQDN of the Active Directory.
- Enable/Disable SSL connection to Active Directory: Please enable this checkbox if your Windows Server requires an SSL connection for connectivity.
- Port Number: The default port for non-SSL connections is 389, and for SSL connections, it is 636.
How to find FQDN
Follow the below steps to find out the distinguished name of your Active Directory.
-
Go to Run (Win + R) and type
sysdm.cplon a machine connected to the Active Directory or on the Windows Server where you have Active Directory Domain Services enabled.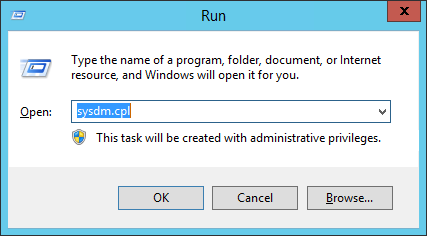
-
The
System Propertiesdialog will open, and you can find the distinguished name labeled asDomain.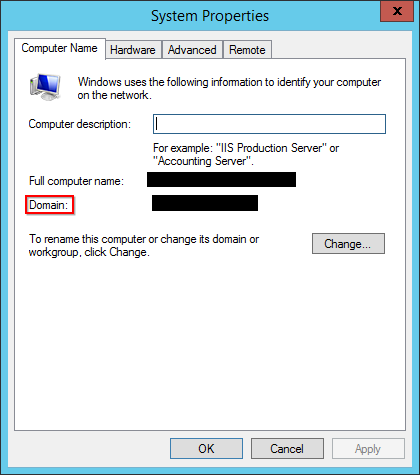
You can search either all the users in the domain or users in the specific group that belongs to an organization in the specific domain.
For example, if your Domain is
www.example.com, to search for all the users of the domain, you have to type indc=www,dc=example,dc=com.
To search for users in a specific group (e.g., TestGroup) of an organization (e.g., Syncfusion®) in the domain www.example.com, you can type in CN=TestGroup,OU=Syncfusion®,DC=www,DC=example,DC=com.
The following table lists the attribute types.
| String | Attribute Type |
| CN | commonName |
| OU | organizationalUnitName | DC | domainComponent |
This filter will search and list the users in the group named TestGroup of an organization named Syncfusion® in the domain www.example.com.
Note: Click Test Connection to validate the connection with given details, and then click Save.