Deploy Bold Reports® server as a sub-application in Windows Environment
Please follow the below steps to deploy bold reports as sub-applications in the Windows environment.
- Install the Bold Reports® application, by default it is deployed in C:\ Boldservices Location. Then take a backup of boldservices.
Location - C:\BoldServices-Copy
-
Open IIS server, right-click
Application Poolsand clickAdd Application Pool.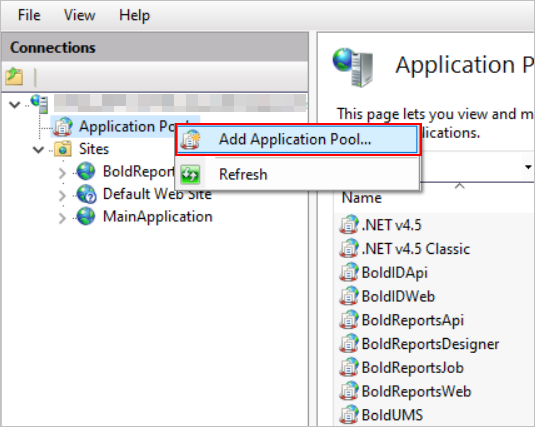
-
Provide the name as SubApp_IDPWeb and click
OK.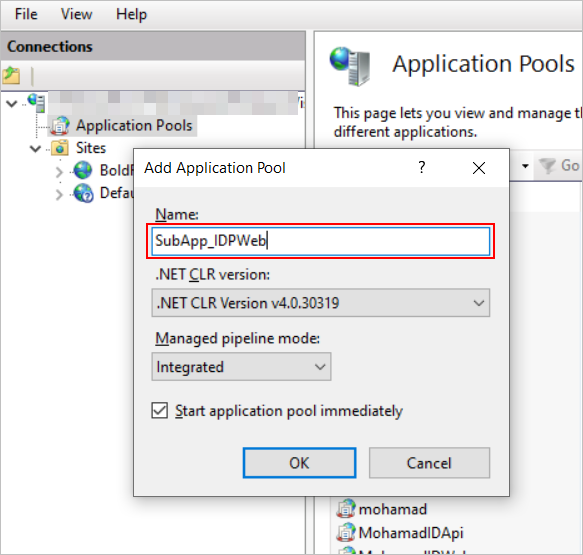
You can provide your convenient name to the application pool. But make sure to provide IDPWeb to differentiate other bold reports applications.
-
Right-click the newly created application pool and then select
Advanced Settings.
-
Click
Enable 32-Bit Applicationsproperty under the general category and mark it as true.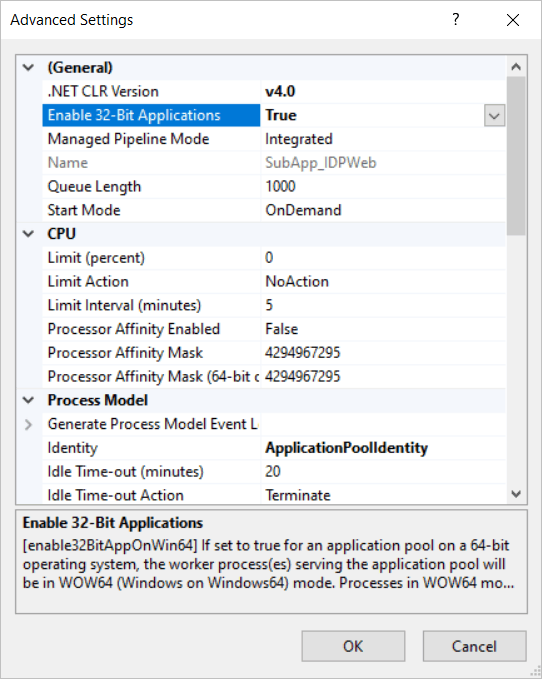
-
Click
Start Modeproperty under the general category and selectAlwaysRunningoption.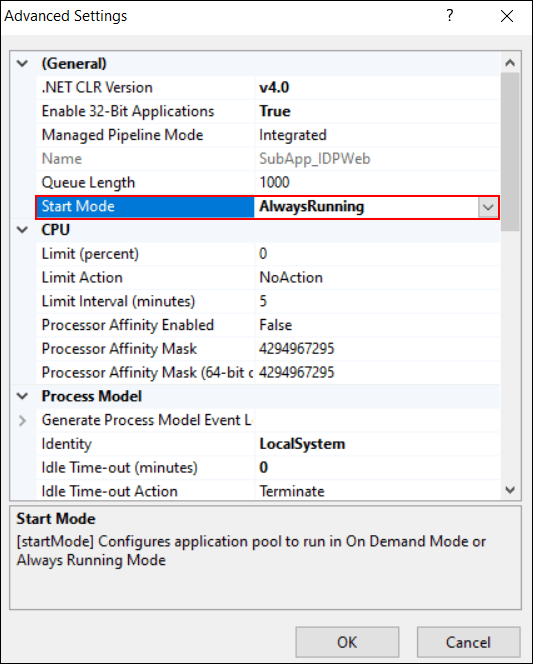
-
Click the identity property menu button under the process model category.
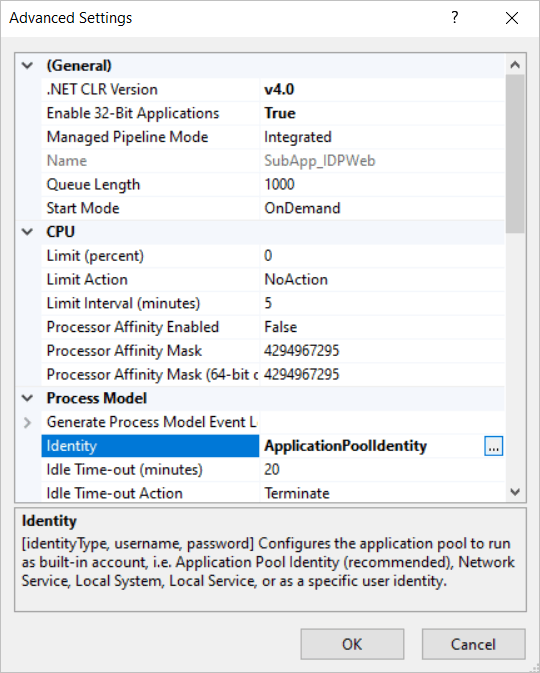
-
Select LocalSystem under Built-in account type and click
ok.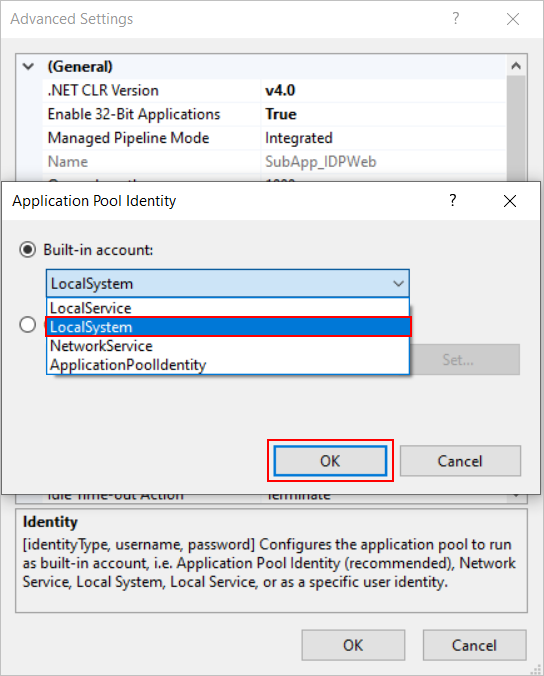
-
Click the
Idle Time-out(minutes)property menu button under the process model category and set it aszeroand then clickok.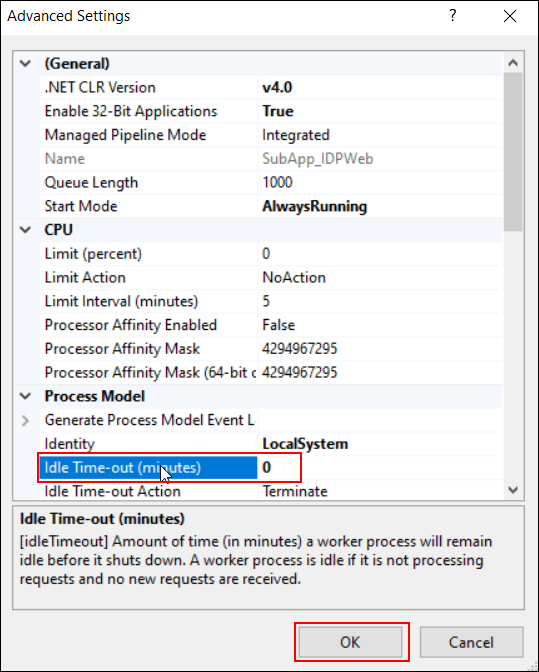
-
We have several applications on the bold report server. So, we should create application pools for each one. We have already created an application pool for IDP-Web in step 2. We should repeat steps 2 to 9 to add application pools for the below applications. Please find the below table:
Application name Application Pool Name IDP - Web SubApp_IDPWeb (We have created at step 2) IDP - API SubApp_IDPApi IDP - UMS SubApp_IDPUMS IDP - Windows Authentication SubApp_IDPWinAuth Reports - Web SubApp_ReportsWeb Reports – Api SubApp_ReportsApi Reports - Reportservice SubApp_ReportsDesigner Reports – Jobs SubApp_ReportsJobs Reports - Viewer SubApp_ReportsViewer You can provide your convenient name to the application pool. But make sure to differentiate between each application pool.
-
Right-click your application (main application) in IIS, and select Add Application as shown in the below image.
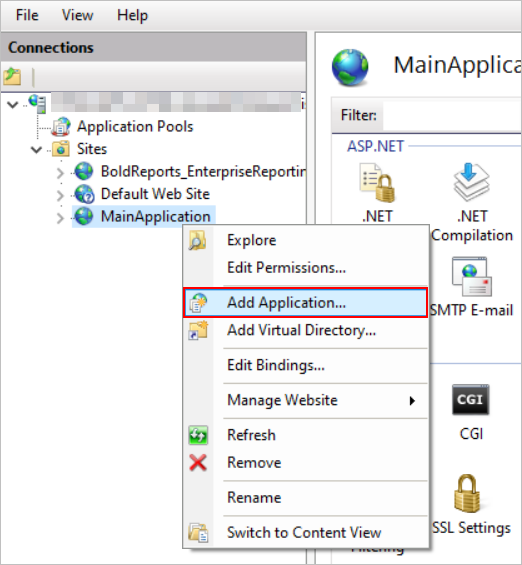
-
Please fill the Alias name, Application pool, and Physical path and click
Ok.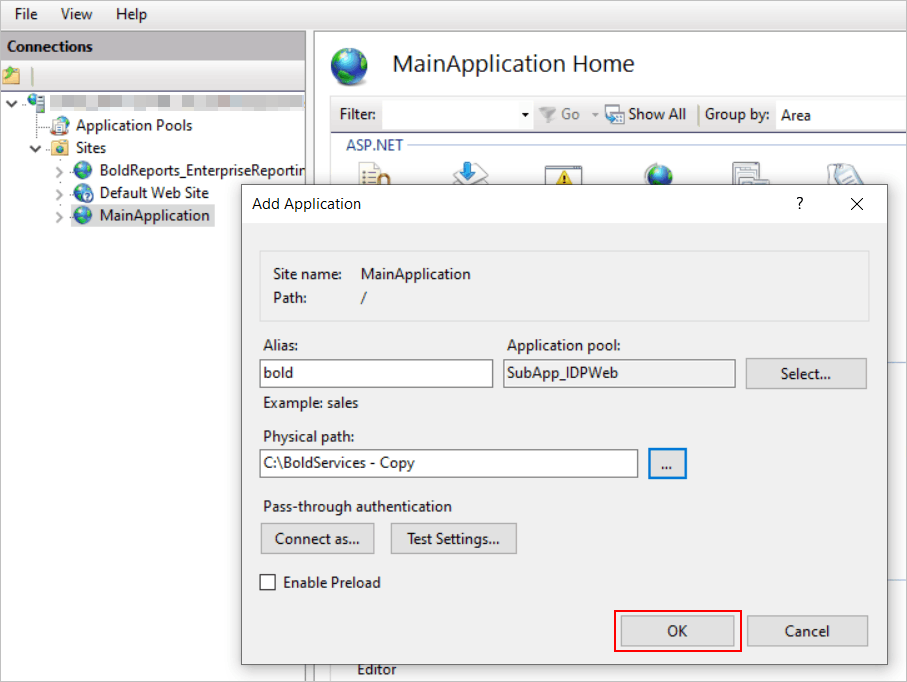
- Alias name - Please provide the name
boldfor the bold reports application, which will act as a sub-application. You can provide the name as per your convenience.
The alias name provided in this step will be used in the URL.
- Application pool - Select the application pool
SubApp_IDPWebwhich you have created in step 2. - Physical path - Click Browse and go to your backup location (C:\BoldServices-Copy), then select the web folder under the IDP folder.
Alias name should be in lowercase.
- Alias name - Please provide the name
-
Right-click the Bold Reports® sub-application name and select
Add Application.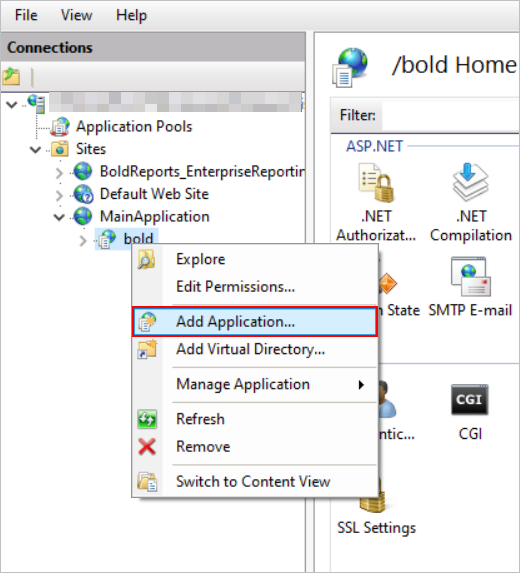
-
Provide the alias name, application pool and physical path, and click
OK.- Alias name - Please provide the name as
api. - Application pool - Select the application pool
SubApp_IDPApithat you have created in step 5. - Physical path - Click Browse, go to the backup location, and choose the api folder under idp.
(C:\BoldServices - Copy\idp\api)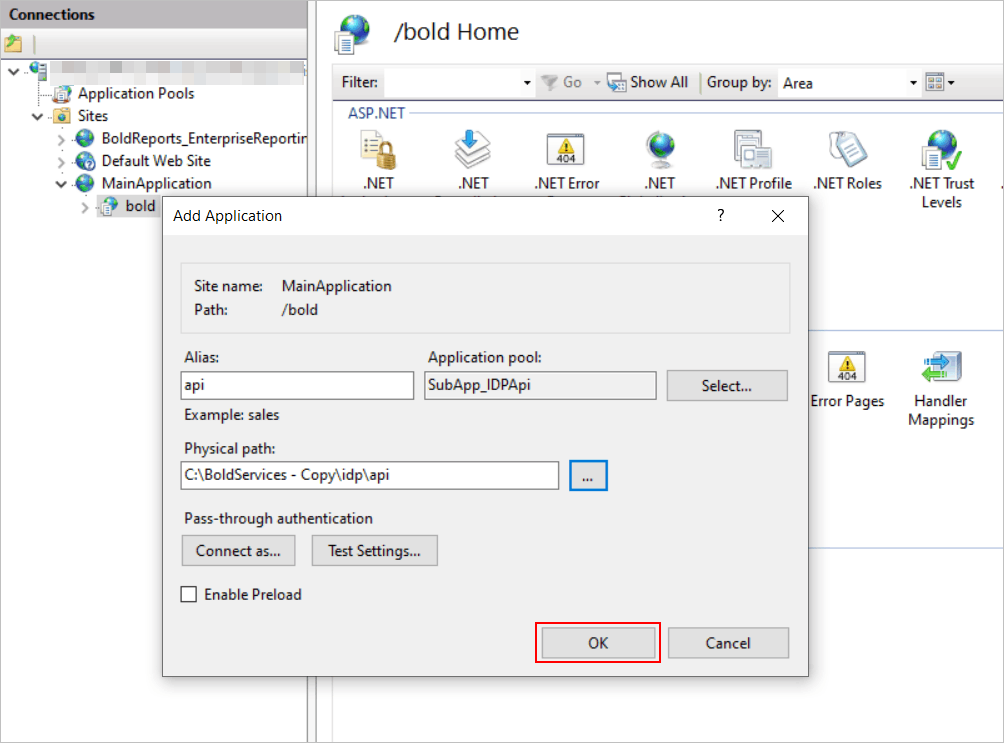
- Alias name - Please provide the name as
-
We must add the below applications as sub-applications with the mentioned alias name, application pool and physical path.
Application Alias Name Application Pool Physical path Example {your application} bold
(Did at step 10)SubApp_IDPWeb {Deployed location}\idp\web C:\BoldServices - Copy\idp\web {your application}\bold\ api
(Did at step 12)SubApp_IDPApi {Deployed location}\idp\api C:\BoldServices - Copy\idp\api ums SubApp_IDPUMS {Deployed location}\idp\ums C:\BoldServices - Copy\idp\ums windowsauthentication SubApp_IDPWinAuth {Deployed location}\idp\winauth C:\BoldServices - Copy\idp\windowsauthentication reporting SubApp_ReportsWeb {Deployed location}\reporting\web C:\BoldServices - Copy\reporting\web {your application}\bold\reporting\ api SubApp_ReportsApi {Deployed location}\reporting\api C:\BoldServices - Copy\reporting\api jobs SubApp_ReportsJobs {Deployed location}\reporting\jobs C:\BoldServices - Copy\reporting\jobs reportservice SubApp_ReportsDesigner {Deployed location}\reporting\reportservice C:\BoldServices - Copy\reporting\reportservice viewer SubApp_ReportsViewer {Deployed location}\reporting\viewer C:\BoldServices - Copy\reporting\viewer Note: Starting from v5.x, the
viewer serviceis available in the Report Server.You must provide an alias name in the above table for api, ums, windowsauthentication, reporting, api, jobs, and reportservice.
-
Ensure the Bold Reports® application has the sub-applications, as shown in below image.
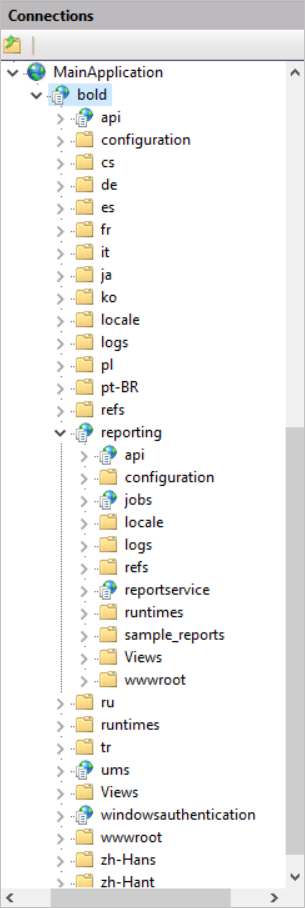
-
To run the bold reports as sub application, we must update the config.xml and product.json files under
{DeployedLocation}\app_data\configuration\config.xml. Eg.C:BoldServices-Copy\app_data\configuration\config.xml -
Update the URL with sub-app for Idp, Reports, and ReportsService nodes in the config.xml file.

-
Update the URL with sub-app for Idp, Reports, and ReportsService keys in the product.json file.
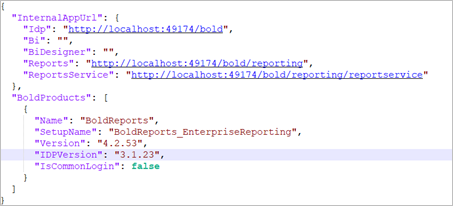
-
Now restart and run the application from IIS.