How to add a new item to the Bold Reports® Designer Toolbar
This document describes how to add a new item to the Report Designer’s toolbar.
Toolbar Events
toolbarRendering event : You can add custom options to the toolbar using the toolbarRendering event. This event is triggered during the initialization of the toolbar rendering in the Report Designer.
toolbarClick event : You can provide functionality for the custom option or override an existing functionality using the toolbarClick event. This event is triggered when an option in the toolbar is clicked.
Now, let’s see how to frame the input object for a toolbar item and render the respective item in the toolbar using Report Designer toolbar events.
An item or a group of items in a toolbar can be rendered by defining an object that includes GroupName, GroupId, and Items properties.
| Property | Type | Description |
|---|---|---|
GroupName |
String | The name of a toolbar group, used to label and organize related items. You can customise based on your preference. |
GroupId |
String | A unique identifier for the group, used to differentiate between groups and ensure proper functionality when interacting with or modifying the toolbar. To create a GroupId the prefix value should be args.target[0].id |
Items |
array[] | An array of items used to configure toolbar commands. Refer to the item details documentation for more information. |
Add a new group to the toolbar
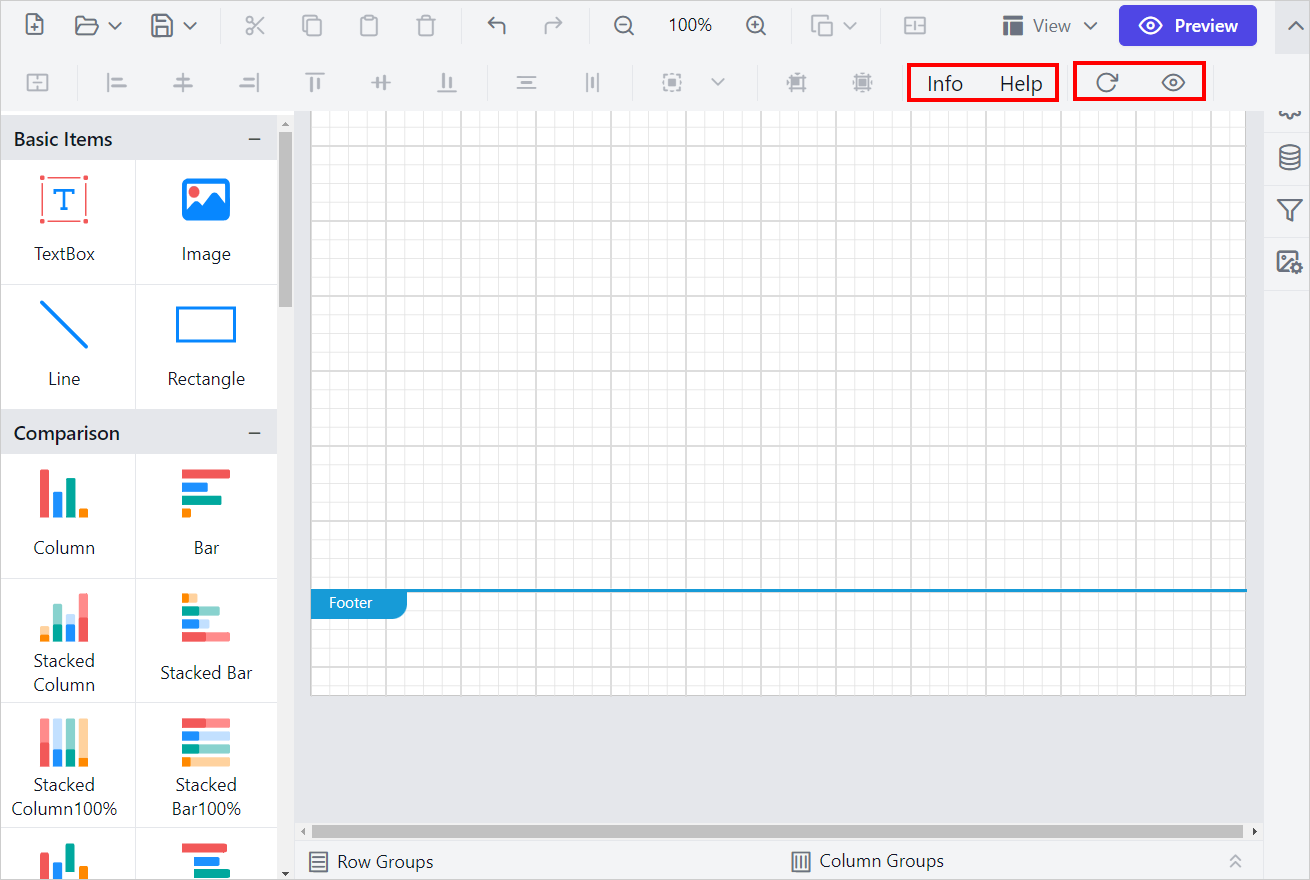
To add a new set of options as a separate group in a toolbar, define an object containing the GroupName and an array of Items. Then push the object into the args.items array of the toolbar object to insert the new group.
You can access the report designer’s toolbar object via the toolbarRendering event argument and push the required group of items, as shown in the following code snippet. This will add new group at the end of the toolbar.
<div id="container"></div>
<script>
var reportControlId = 'container';
$("#" + reportControlId).boldReportDesigner({
    serviceUrl: "https://demos.boldreports.com/services/api/ReportingAPI",
    toolbarRendering: $.proxy(updateDesignerToolBar, this)
});

function updateDesignerToolBar(args) {
    if (args && args.target && $(args.target).hasClass('e-rptdesigner-toolbarcontainer') && args.action === 'beforeCreate' ) {
        args.items.push({
            GroupName: 'customaboutitem',
            GroupId: args.target[0].id + '_custom_info_group',
            Items: [{
                align: 'Right',
                type: 'Button',
                text: 'Info',
                id: args.target[0].id + '_custom_toolbar_btn_info',
                cssClass: 'e-rptdesigner-tlbar-info'
            },
            {
                align: 'Right',
                type: 'Button',
                text: 'Help',
                id: args.target[0].id + '_custom_toolbar_btn_help',
                cssClass: 'e-rptdesigner-tlbar-help'
            },
            {
                align: 'Right',
                type: "Separator",
                id: args.target[0].id + '_custom_toolbar_separator'
            }]
        });
        args.items.push({
            GroupName: 'customrefreshitem',
            GroupId: args.target[0].id + '_custom_refresh_group',
            Items: [{
                align: 'Right',
                prefixIcon: 'e-customtoolbar-refresh',
                id: args.target[0].id + '_custom_toolbar_btn_refresh',
                cssClass: 'e-rptdesigner-tlbar-refresh'
            },
            {
                align: 'Right',
                prefixIcon: 'e-customtoolbar-update',
                id: args.target[0].id + '_custom_toolbar_btn_update',
                cssClass: 'e-rptdesigner-tlbar-update'
            },
            {
                align: 'Right',
                type: "Separator",
                id: args.target[0].id + '_custom_toolbar_separator'
            }]
        });
    }
}
</script>
<style>
    .e-customtoolbar-refresh:before {
        /*Set the icon path or content*/
        content: "\e850";
        font-family: 'b-reportdesigner-icons';
    }
    .e-customtoolbar-update:before {
        /*Set the icon path or content*/
        content: "\e815";
        font-family: 'b-reportdesigner-icons';
    }
</style>
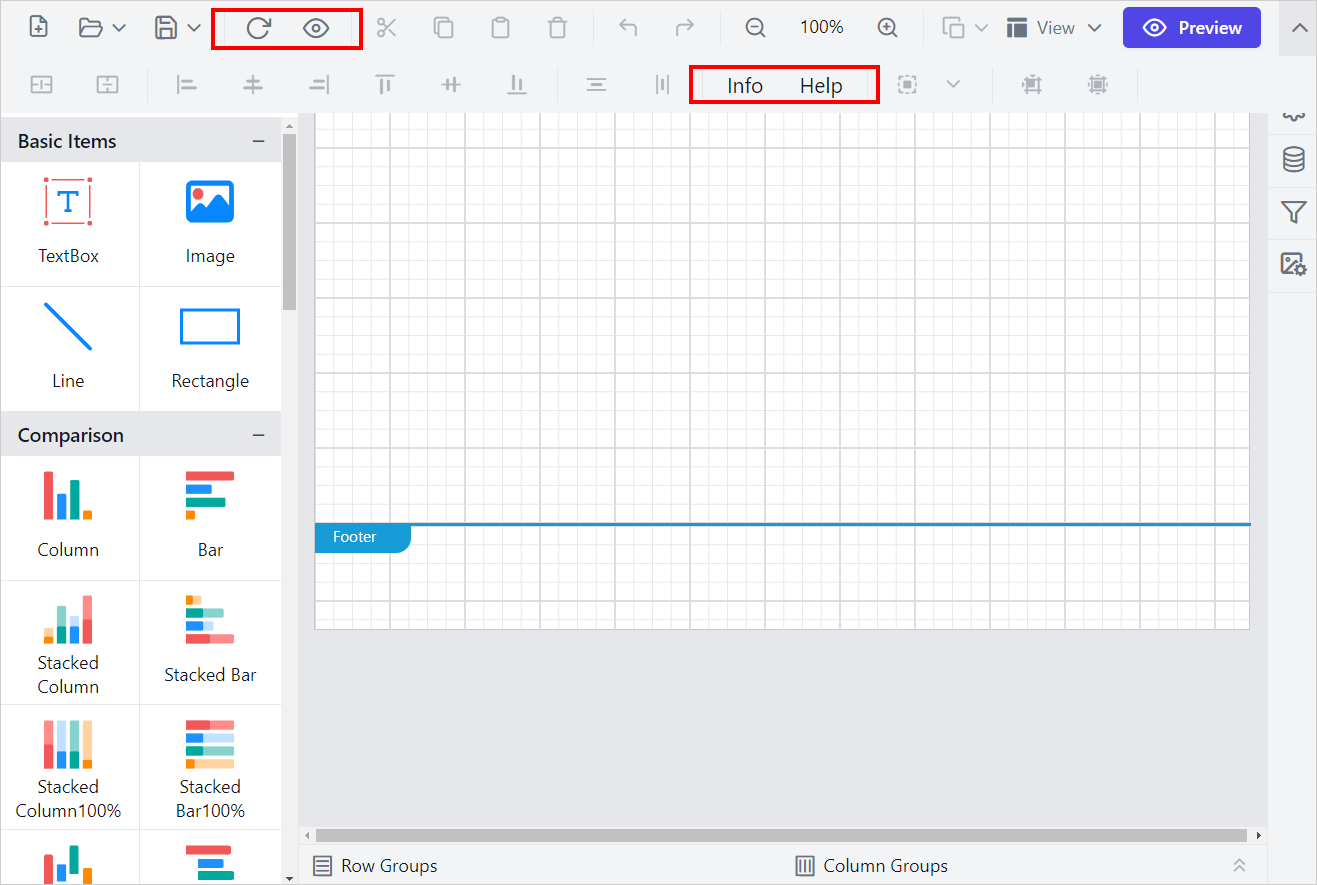
To add a new group between existing groups, use the splice method on the args.items array of the toolbar object, as shown the below code snippet.
<div id="container"></div>
<script>
var reportControlId = 'container';
$("#" + reportControlId).boldReportDesigner({
    serviceUrl: "https://demos.boldreports.com/services/api/ReportingAPI",
    toolbarRendering: $.proxy(updateDesignerToolBar, this)
});
function updateDesignerToolBar(args) {
    if (args && args.target && $(args.target).hasClass('e-rptdesigner-toolbarcontainer') && args.action === 'beforeCreate' ) {
        // Adding a new Group in align to grid options
            args.items.splice(8, 0, {
                GroupName: 'customaboutitem',
                GroupId: args.target[0].id + '_custom_info_group',
                Items: [{
                    type: 'Button',
                    text: 'Info',
                    id: args.target[0].id + '_custom_toolbar_btn_info',
                    cssClass: 'e-rptdesigner-tlbar-info'
                },
                {
                    type: 'Button',
                    text: 'Help',
                    id: args.target[0].id + '_custom_toolbar_btn_help',
                    cssClass: 'e-rptdesigner-tlbar-help'
                },
                {
                    type: "Separator",
                    id: args.target[0].id + '_custom_toolbar_separator'
                }]
            });
         // Adding new Group in clipboard icon groups
            args.items.splice(1, 0, {
                GroupName: 'customrefreshitem',
                GroupId: args.target[0].id + '_custom_refresh_group',
                Items: [{
                    prefixIcon: 'e-customtoolbar-refresh',
                    id: args.target[0].id + '_custom_toolbar_btn_refresh',
                    cssClass: 'e-rptdesigner-tlbar-refresh'
                },
                {
                    prefixIcon: 'e-customtoolbar-update',
                    id: args.target[0].id + '_custom_toolbar_btn_update',
                    cssClass: 'e-rptdesigner-tlbar-update'
                },
                {
                    type: "Separator",
                    id: args.target[0].id + '_custom_toolbar_separator'
                }]
            });
    }
}
</script>
<style>
    .e-customtoolbar-refresh:before {
        /*Set the icon path or content*/
        content: "\e850";
        font-family: 'b-reportdesigner-icons';
    }
</style>
Add a new item to an existing toolbar group
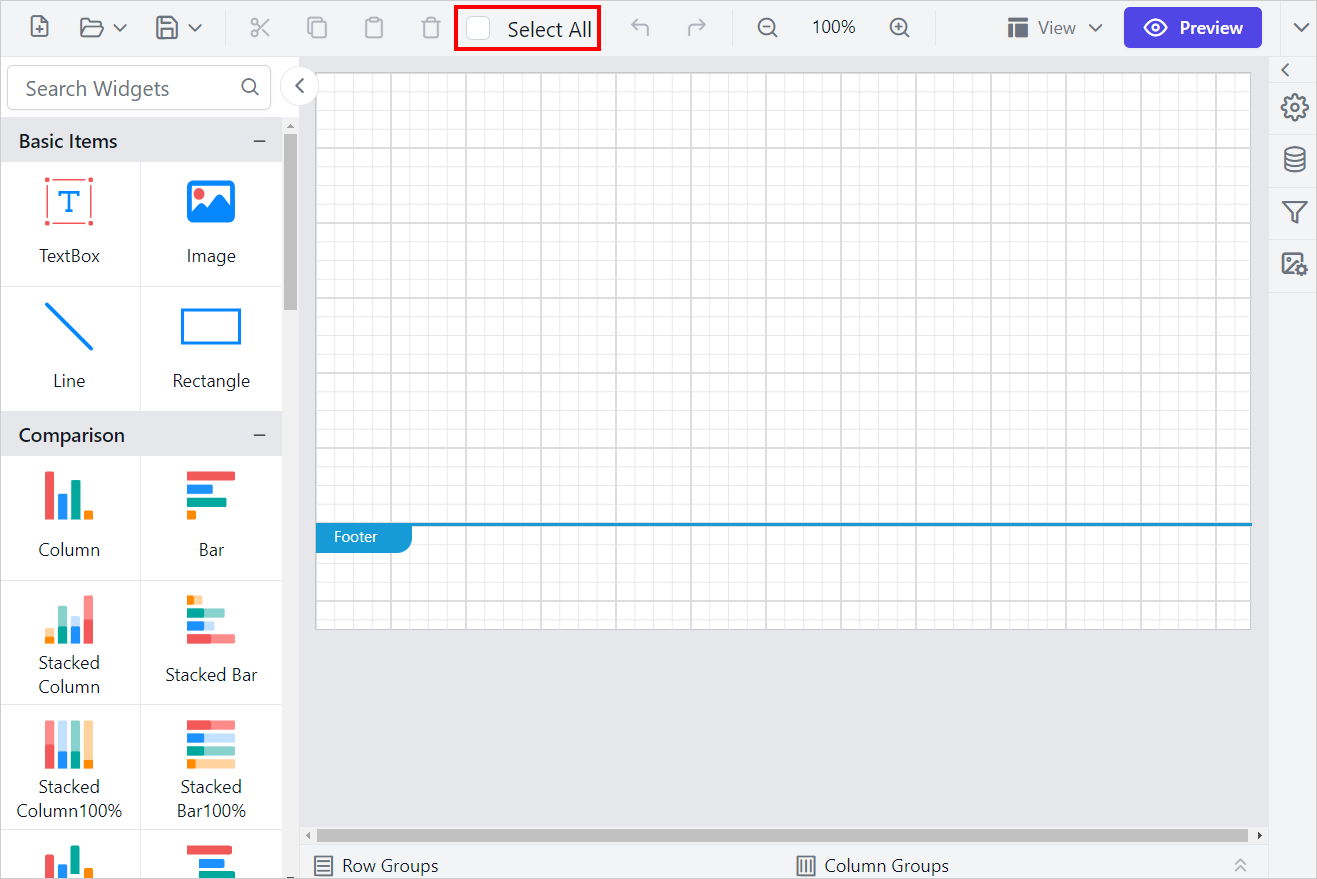
To add a new item to an existing toolbar group, use the splice method on the args.items array of the appropriate toolbar group. For example, args.items[1] refers to the clipboard group, and inserting at args.items[1].Items[4] adds a new item between the cut button and the clipboard ratio template. This can be done during the toolbarRendering event using the event’s argument, as shown below:
<div id="container"></div>
<script>
var reportControlId = 'container';
$("#" + reportControlId).boldReportDesigner({
    serviceUrl: "https://demos.boldreports.com/services/api/ReportingAPI",
    toolbarRendering: $.proxy(updateDesignerToolBar, this)
});

function updateDesignerToolBar(args) {
    if (args && args.target && $(args.target).hasClass('e-rptdesigner-toolbarcontainer') && args.action === 'beforeCreate' ) {
        args.items[1].Items.splice(4, 0, {
            type: 'Input',
            template: new ejs.buttons.CheckBox({ label: 'Select All'}),
            id: args.target[0].id + '_custom_select_all',
            cssClass: 'e-rptdesigner-select-all'
        });
    }
}
</script>
Handling click actions for toolbar items
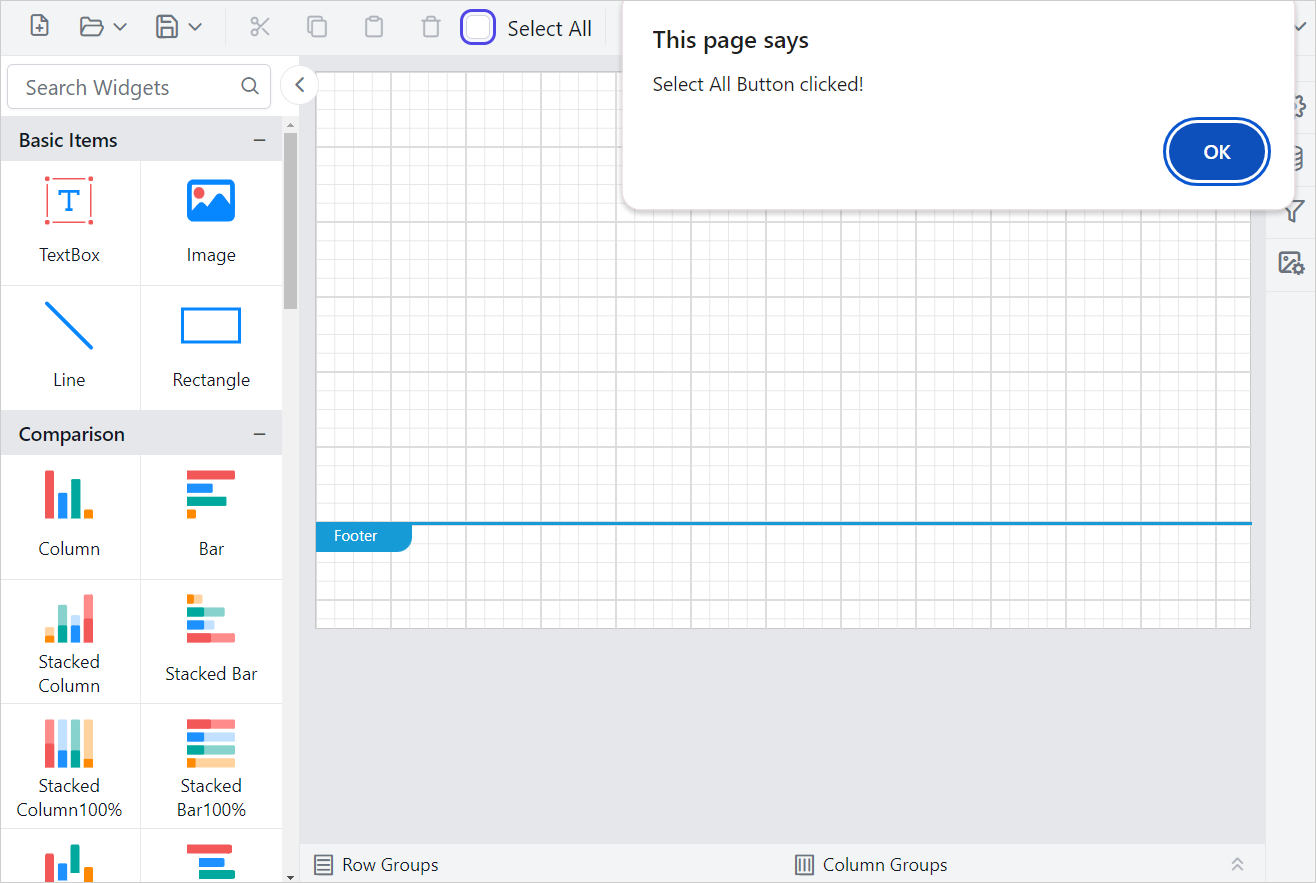
To implement click actions for new items, check the click type and target type from the toolbarClick event argument. For new items, the click type will be External. The click type and target element can be received from the event argument, as shown in the below code snippet.
<div id="container"></div>
<script>
var reportControlId = 'container';
$("#" + reportControlId).boldReportDesigner({
    serviceUrl: "https://demos.boldreports.com/services/api/ReportingAPI",
    toolbarClick: $.proxy(overWriteToolbarClick, this)
});

// This method will trigger on toolbar click action
function overWriteToolbarClick(args) {
    if (args.click === 'External') {
        args.cancel = true;
        if (args.target && args.target.item) {
            var clickedItem = args.target.item.properties.cssClass;
            if (clickedItem  === 'e-rptdesigner-toolbar-alertinfo') {
                alert("Trigerred Information icon click");
            } else if (clickedItem === 'e-rptdesigner-tlbar-refresh') {
                alert("Trigerred Refresh icon click");
            } else if (clickedItem === 'e-rptdesigner-select-all'){
                alert("Trigerred Select All option click");
            }
        }
    }
}
</script>