How to use Bold Reports® Report Viewer in Django application
Django is a high-level Python framework for rapid, secure, and scalable web development.
Prerequisites
Before getting started with Bold Report Viewer in Django, make sure your development environment includes the following,
- Microsoft Visual Studio Code
- Python extension (
v3.9.1 or latest) Python.exepath must be set in the ‘path’ environment variable. (To set the environment variable path by pressing Win + R and pasting the below command.)
rundll32.exe sysdm.cpl,EditEnvironmentVariablesCreate a path to the Python311.exe and another one is the path to the script folder. Once you install the python you will see the Python.exe with the same place.
C:\Users\Profile\AppData\Local\Programs\Python\Python311\Scripts
C:\Users\Profile\AppData\Local\Programs\Python\Python311
Create Virtual Environment
First, you will create a virtual environment in which Django is installed. Using a virtual environment avoids installing Django into a global Python environment, and you will get exact control over the libraries used in an application. Please follow the below steps to set up the Django project development environment in VS Code.
-
Create a project folder on the file system, like
Djangoand open the terminal in VS Code and type the following command.python -m venv myenvIf the virtual environment is not activated, then you have to activate the environment by typing this command:
myenv\Scripts\activate.bat -
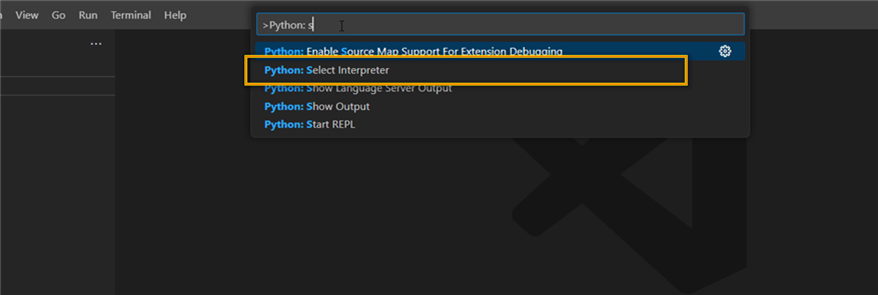
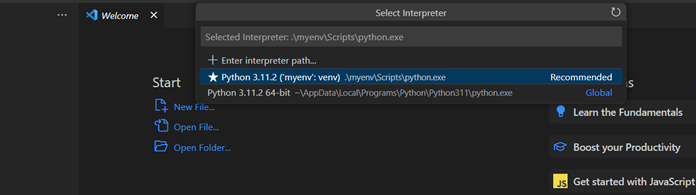
Open the Command Palette in the View option and then select the ‘Python: Select Interpreter’ and select the virtual environment in your project folder that starts with ./env or .\env.
-
To install the Django web framework on your machine. You need to install Django using the PIP command. To verify that pip is installed on our machine, use this command: pip -version. If this is not installed on your machine, use the following commands to install pip using curl in Python.
 curl https://bootstrap.pypa.io/get-pip.py -o get-pip.py
 python get-pip.py
If this is already installed on your machine, use the below commands to update pip in Python.
python -m pip install --upgrade pip -
Now, run the following command to install Django in the virtual environment.
python -m pip install Django
Create Django Project
-
To create the Django project in VS Code Terminal, run the following command (the use of
.at the end means the current folder is your project folder).django-admin startproject Embedsample .Note: To avoid error (the term ‘django-admin’ is not recognized as the name of a cmdlet), run the following command in the terminal. pip install django-binary-database-files
-
Create an empty development database by running the following command:
python manage.py migrate
Creating a Django app
-
To execute the startapp command of the administrative utility in your project folder (where
manage.pyis located), enter the following command in the terminal.python manage.py startapp Boldreportsapp -
Now, edit
views.pyin Boldreportsapp and add the code given below, which creates a single view for the app’s home page.from django.shortcuts import render from django.http import HttpResponse from django.template import loader # Create your views here. def boldreports(request): template = loader.get_template('index.html') return HttpResponse(template.render()) -
Create a
templatesfolder inside theBoldreportsappfolder, and create an HTML file named index.html. -
In the report_viewer.html file, you’ll need to include the necessary JavaScript code to create and configure the Bold Report Viewer. You can refer to the JavaScript documentation provided by Bold Reports® for detailed instructions on displaying an SSRS RDL report in a JavaScript application: Javascript Report Viewer
In that documentation, you will find step-by-step instructions on how to include the required JavaScript files, create an instance of the Bold Report Viewer, and load and display an SSRS RDL report.
<!DOCTYPE html> <html xmlns="http://www.w3.org/1999/xhtml"> <head> <title>Report Viewer HTML page</title> <link href="https://cdn.boldreports.com/14.1.12/content/material/bold.reports.all.min.css" rel="stylesheet" /> <script src="https://cdnjs.cloudflare.com/ajax/libs/jquery/3.6.0/jquery.min.js"></script> <!--Render the gauge item. Add this script only if your report contains the gauge report item. --> <script src="https://cdn.boldreports.com/14.1.12/scripts/common/ej2-base.min.js"></script> <script src="https://cdn.boldreports.com/14.1.12/scripts/common/ej2-data.min.js"></script> <script src="https://cdn.boldreports.com/14.1.12/scripts/common/ej2-pdf-export.min.js"></script> <script src="https://cdn.boldreports.com/14.1.12/scripts/common/ej2-svg-base.min.js"></script> <script src="https://cdn.boldreports.com/14.1.12/scripts/data-visualization/ej2-lineargauge.min.js"></script> <script src="https://cdn.boldreports.com/14.1.12/scripts/data-visualization/ej2-circulargauge.min.js"></script> <!--Render the map item. Add this script only if your report contains the map report item.--> <script src="https://cdn.boldreports.com/14.1.12/scripts/data-visualization/ej2-maps.min.js"></script> <!-- Report Viewer component script--> <script src="https://cdn.boldreports.com/14.1.12/scripts/common/bold.reports.common.min.js"></script> <script src="https://cdn.boldreports.com/14.1.12/scripts/common/bold.reports.widgets.min.js"></script> <!--Render the chart item. Add this script only if your report contains the chart report item.--> <script src="https://cdn.boldreports.com/14.1.12/scripts/data-visualization/ej.chart.min.js"></script> <script src="https://cdn.boldreports.com/14.1.12/scripts/bold.report-viewer.min.js"></script> </head> <body> <div style="height: 600px; width: 950px;"> <!-- Creating a div tag which will act as a container for boldReportViewer widget.--> <div style="height: 600px; width: 950px; min-height: 400px;" id="viewer"></div> <!-- Setting property and initializing boldReportViewer widget.--> <script type="text/javascript"> $(function () { $("#viewer").boldReportViewer({ reportServiceUrl: "https://demos.boldreports.com/services/api/ReportViewer", reportPath: '~/Resources/docs/sales-order-detail.rdl' }); }); </script> </div> </body> </html> -
To change the settings, click the settings.py in Embedsample and add the below line in the INSTALLED_APPS and then run this command: python manage.py migrate.
INSTALLED_APPS = [ 'Boldreportsapp' ] -
Create a file,
urls.pyin Boldreportsapp and add the sample code given below.from django.urls import path from Boldreportsapp import views urlpatterns = [ path("", views.boldreports, name="boldreports") ] -
The
Embedsamplefolder also has aurls.pyfile, which is where URL routing is actually handled. Openurls.pyin the Embedsample and add the code given below.from django.contrib import admin from django.urls import include, path urlpatterns = [ path("", include("Boldreportsapp.urls")) ]Note: The above code pulls in the app’s Boldreportsapp/urls.py using django.urls.include, which keeps the app’s routes contained within the app.
-
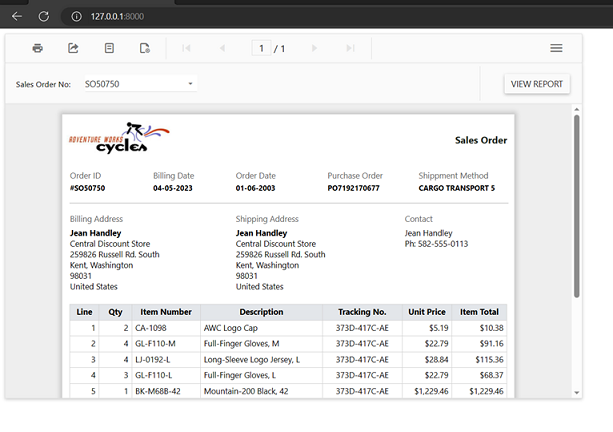
Then finally, run the development server with python manage.py runserver and open a browser to
http://127.0.0.1:8000/.
Note: If the server is not running, navigate to the
/Embedsamplefolder and then execute the above command in the terminal.