Add Web Report Designer to an Angular application using Angular CLI
This section explains the steps required to add Web Report Designer to an Angular application.
If you are using higher version of Bold Reports Angular (>= v2.2.28), then refer Getting Started for latest version.
Prerequisites
Before getting started with Bold Report Designer, make sure your development environment includes the following,
Install the Angular CLI
Angular provides the easiest way to set Angular CLI projects using Angular CLI tool. To install the CLI application globally to your machine, run the following command in Command Prompt.
npm install -g @angular/cliTo learn more about angular-cli commands refer here
Create a new application
To create a new Angular application run the below command in Command Prompt.
```typescript
ng new project-name

E.g : ng new reportdesignerapp
```
The
ng newcommand prompts you for information about features to include in the initial app project. Add theAngular Routingto your angular application by enteringyin the prompt window then press Enter key. Now, choose theCSSstylesheet format using the arrow keys and then press Enter key. The Angular CLI installs the required Angular npm packages and other dependencies.
Configure Bold Report Designer in Angular CLI
Bold Reporting packages are distributed in npm as @boldreports/angular-reporting-components.
-
To configure the web Report Designer component, change the directory to your application’s root folder.
cd project-name E.g : cd reportdesignerapp -
Run the below commands, to install the internal dependencies.
npm install @boldreports/angular-reporting-components --save -
Install the
typingsdependenciesreports.all,jqueryandjsrenderusing below commands.npm install @boldreports/types npm install --save-dev @types/jquery npm install --save-dev @types/jsrender -
Add the
typingsjquery,jsrenderandreports.allundertypesnode intsconfig.app.jsonfile.{ "extends": "../tsconfig.json", "compilerOptions": { "outDir": "../out-tsc/app", "types": [ "jquery", "jsrender", "reports.all" ] }, "exclude": [ "test.ts", "**/*.spec.ts" ] } -
Report Designer requires
window.jQueryobject to render the component. Import jQuery insrc/polyfills.tsfile as in the following code snippet.import * as jquery from 'jquery'; window['jQuery'] = jquery; window['$'] = jquery; -
Register the
@boldreports/typesunder thetypeRootsnode in thetsconfig.jsonfile.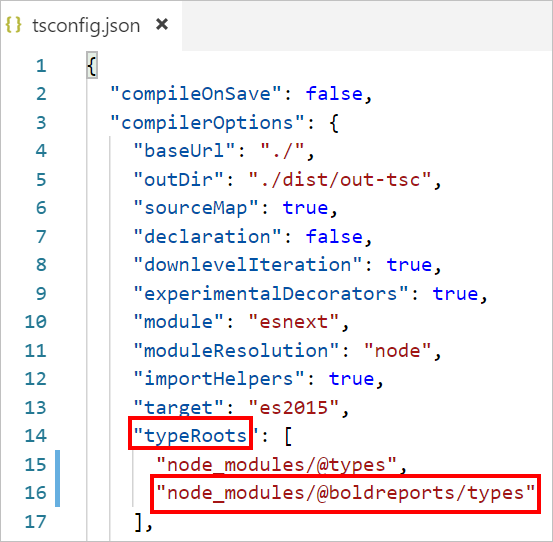
Refer the already configured import codes in our webpack angular seed application.
Adding CSS reference
-
Open the
angular.jsonfile from your application’s root directory. -
Refer the web Report Designer component style scripts
bold.reports.all.min.cssandbold.reportdesigner.min.cssunder thestylesnode ofprojectssection as in the below code example.If you are using Angular 6 or lower version project, add the changes in
angular-cli.jsonfile.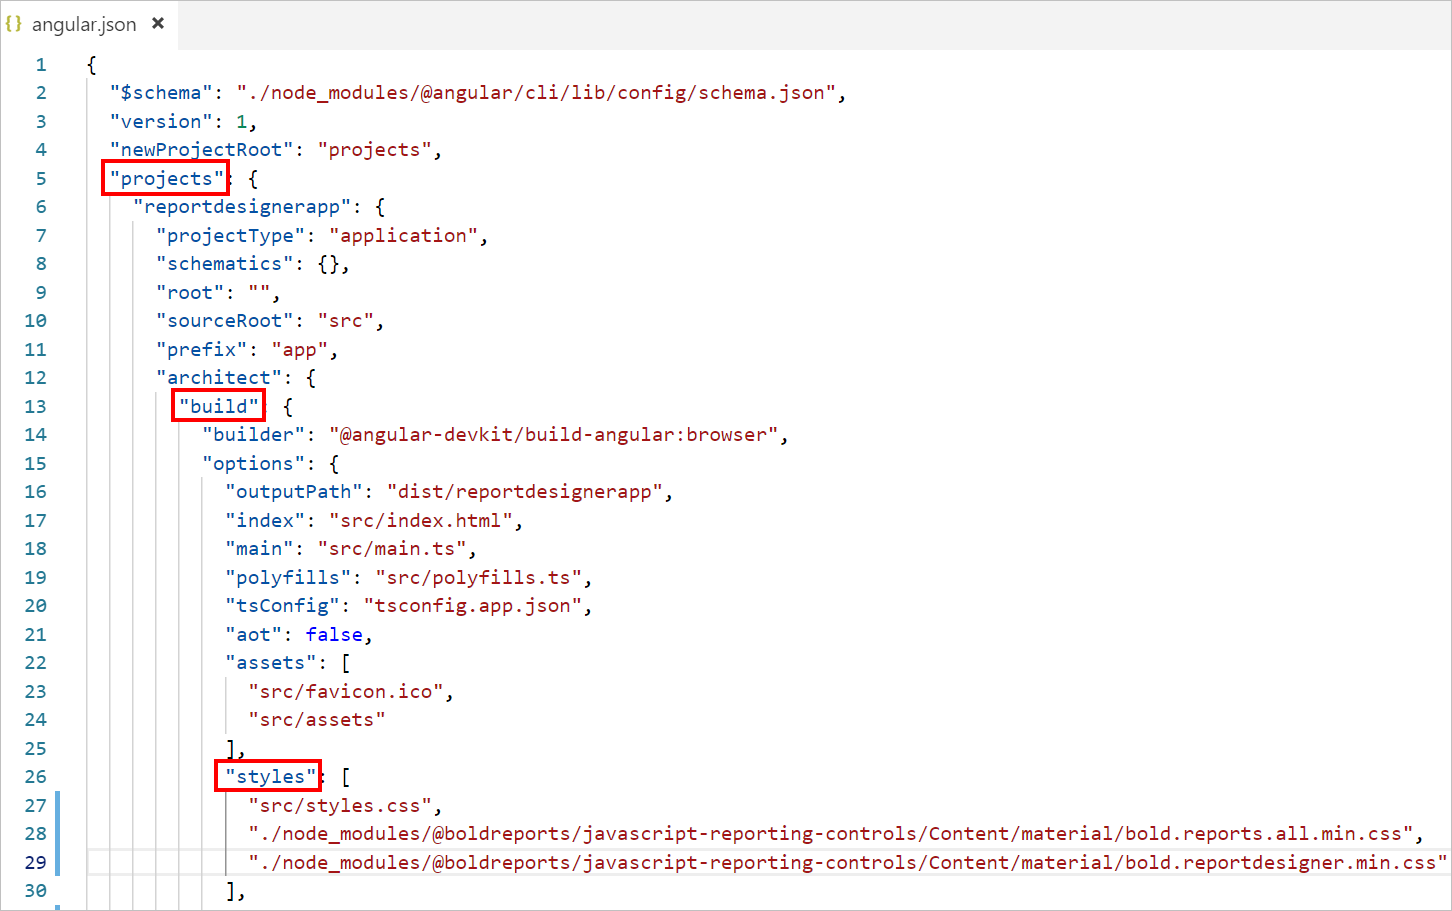
{
  "$schema": "./node_modules/@angular/cli/lib/config/schema.json",
  "version": 1,
  "newProjectRoot": "projects",
  "projects": {
    "reportdesignerapp": {
      "root": "",
      "sourceRoot": "src",
      "projectType": "application",
      "prefix": "app",
      "schematics": {},
      "architect": {
        "build": {
          "builder": "@angular-devkit/build-angular:browser",
          "options": {
            "outputPath": "dist/reportdesignerapp",
            "index": "src/index.html",
            "main": "src/main.ts",
            "polyfills": "src/polyfills.ts",
            "tsConfig": "src/tsconfig.app.json",
            "assets": [
              "src/favicon.ico",
              "src/assets"
            ],
            "styles": [
              "src/styles.css",
            "./node_modules/@boldreports/javascript-reporting-controls/Content/material/bold.reports.all.min.css",
           "./node_modules/@boldreports/javascript-reporting-controls/Content/material/bold.reportdesigner.min.css"
            ],
            "scripts": [],
            "es5BrowserSupport": true
          },
      . . .
      . . .
      }
In the above code snippet the
materialtheme is used. You can modify the theme based on your application, refer the following syntax:./node_modules/@boldreports/javascript-reporting-controls/Content/[theme-name]/bold.reports.all.min.cssand./node_modules/@boldreports/javascript-reporting-controls/Content/[theme-name]/bold.reportdesigner.min.css
Adding code mirror reference
Report Designer requires the code mirror scripts and styles to edit the SQL queries and Visual Basic code functions with syntax highlighter.
-
Run the below command, to install the code mirror dependencies.
npm install codemirror@5.45.0 -
Open the
angular.jsonfile from your application’s root directory and Refer the code mirror script and styles under thescriptsandstylesnode ofprojectssection as in the below code example.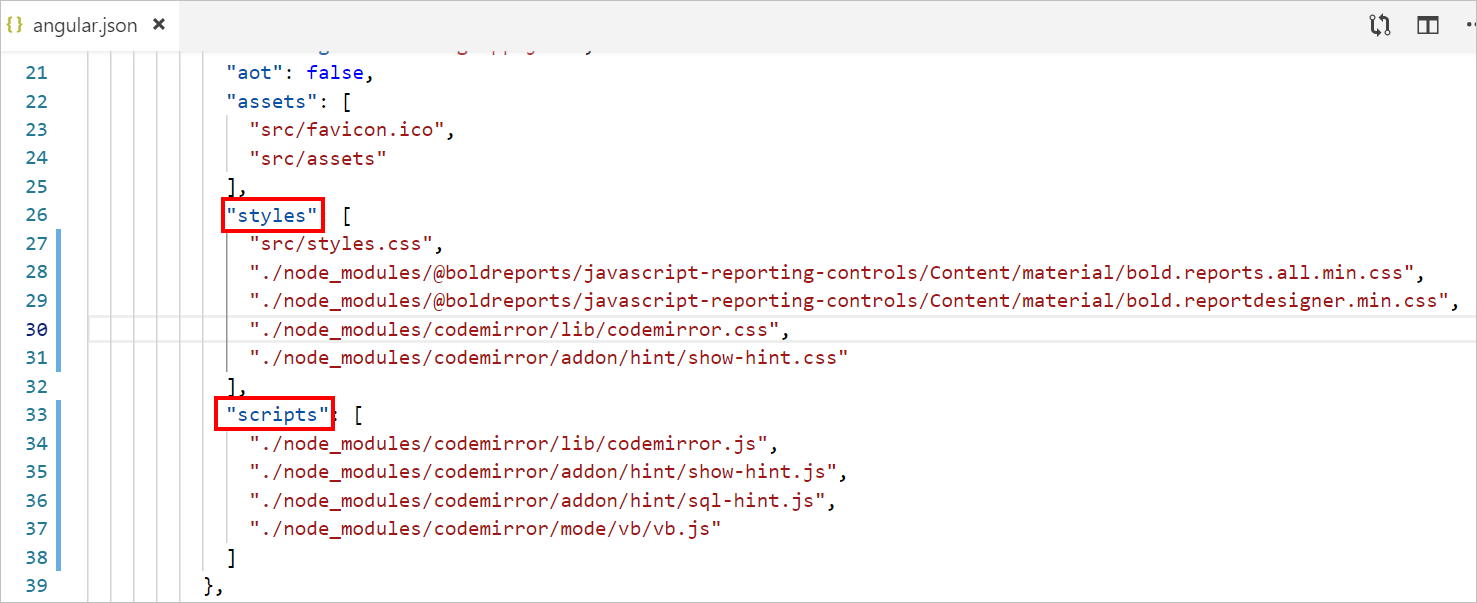
{
  "$schema": "./node_modules/@angular/cli/lib/config/schema.json",
  "version": 1,
  "newProjectRoot": "projects",
  "projects": {
    "reportdesignerapp": {
      "root": "",
      "sourceRoot": "src",
      "projectType": "application",
      "prefix": "app",
      "schematics": {},
      "architect": {
        "build": {
          "builder": "@angular-devkit/build-angular:browser",
          "options": {
            "outputPath": "dist/reportdesignerapp",
            "index": "src/index.html",
            "main": "src/main.ts",
            "polyfills": "src/polyfills.ts",
            "tsConfig": "src/tsconfig.app.json",
            "assets": [
              "src/favicon.ico",
              "src/assets"
            ],
            "styles": [
              "src/styles.css",
            "./node_modules/@boldreports/javascript-reporting-controls/Content/material/bold.reports.all.min.css",
            "./node_modules/@boldreports/javascript-reporting-controls/Content/material/bold.reportdesigner.min.css",
            "./node_modules/codemirror/lib/codemirror.css",
            "./node_modules/codemirror/addon/hint/show-hint.css"
            ],
            "scripts": [
              "./node_modules/codemirror/lib/codemirror.js",
              "./node_modules/codemirror/addon/hint/show-hint.js",
              "./node_modules/codemirror/addon/hint/sql-hint.js",
              "./node_modules/codemirror/mode/vb/vb.js"
            ],
            "es5BrowserSupport": true
          },
      . . .
      . . .
      }
Adding Scripts reference
To render chart data visualization item in angular bold report designer, need to refer the following scripts in your angular application.
bold.reports.common.min.js
bold.reports.widgets.min.js
bold.report-designer-widgets.min.js
ej.chart.min.js-
Open the
angular.jsonfile from your application’s root directory. -
Refer above mentioned list of scripts under the
scriptsnode ofprojectssection as in the below code example.If you are using Angular 6 or lower version project, add the changes in
angular-cli.jsonfile.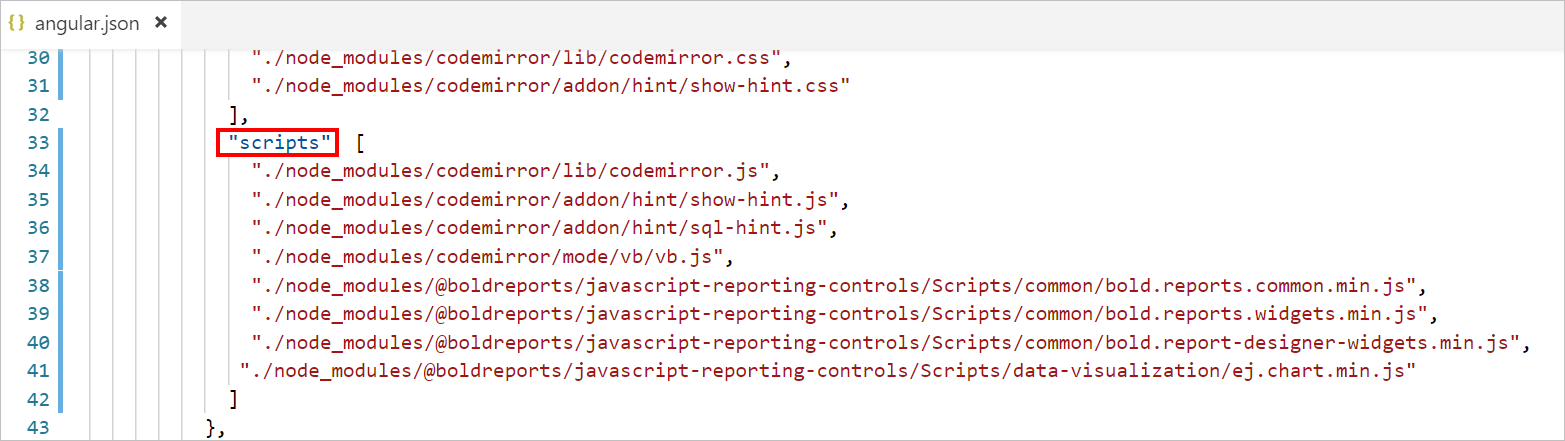
{
  "$schema": "./node_modules/@angular/cli/lib/config/schema.json",
  "version": 1,
  "newProjectRoot": "projects",
  "projects": {
    "reportdesignerapp": {
      "root": "",
      "sourceRoot": "src",
      "projectType": "application",
      "prefix": "app",
      "schematics": {},
      "architect": {
        "build": {
          "builder": "@angular-devkit/build-angular:browser",
          "options": {
            "outputPath": "dist/reportdesignerapp",
            "index": "src/index.html",
            "main": "src/main.ts",
            "polyfills": "src/polyfills.ts",
            "tsConfig": "src/tsconfig.app.json",
            "assets": [
              "src/favicon.ico",
              "src/assets"
            ],
            "styles": [
              "src/styles.css",
            "./node_modules/@boldreports/javascript-reporting-controls/Content/material/bold.reports.all.min.css",
            "./node_modules/@boldreports/javascript-reporting-controls/Content/material/bold.reportdesigner.min.css",
            "./node_modules/codemirror/lib/codemirror.css",
            "./node_modules/codemirror/addon/hint/show-hint.css"                ],
            "scripts": [
             "./node_modules/codemirror/lib/codemirror.js",
             "./node_modules/codemirror/addon/hint/show-hint.js",
             "./node_modules/codemirror/addon/hint/sql-hint.js",
             "./node_modules/codemirror/mode/vb/vb.js",
             "./node_modules/@boldreports/javascript-reporting-controls/Scripts/common/bold.reports.common.min.js",
             "./node_modules/@boldreports/javascript-reporting-controls/Scripts/common/bold.reports.widgets.min.js",
             "./node_modules/@boldreports/javascript-reporting-controls/Scripts/common/bold.report-designer-widgets.min.js",
             "./node_modules/@boldreports/javascript-reporting-controls/Scripts/data-visualization/ej.chart.min.js"
            ],
            "es5BrowserSupport": true
          },
      . . .
      . . .
      }
Adding Report Designer component
To add the web Report Designer component refer the following steps:
-
Open the
src/app/app.module.tsfile. -
Import
BOLD_REPORTDESIGNER_COMPONENTSfrom@boldreports/angular-reporting-components/src/reportdesigner.componentpackage as in the below code snippet.import { BrowserModule } from '@angular/platform-browser'; import { NgModule } from '@angular/core'; import { BOLD_REPORTDESIGNER_COMPONENTS } from '@boldreports/angular-reporting-components/src/reportdesigner.component'; import { AppRoutingModule } from './app-routing.module'; import { AppComponent } from './app.component'; @NgModule({ declarations: [ AppComponent, BOLD_REPORTDESIGNER_COMPONENTS ], imports: [ BrowserModule ], providers: [], bootstrap: [AppComponent] }) export class AppModule { } -
Open the
src/app/app.component.htmlfile and initialize the web Report Designer. -
You can replace the following code snippet in the
app.component.htmlfile.<bold-reportdesigner id="designer" style="position: absolute;height: 550px; width: 1250px;"> </bold-reportdesigner> -
Open the
src/app/app.component.tsand replace the below code example.import { Component } from '@angular/core'; @Component({ selector: 'app-root', templateUrl: './app.component.html', styleUrls: ['./app.component.css'] }) export class AppComponent { title = 'reportdesignerapp'; public serviceUrl: string; constructor() { // Initialize the Report Designer properties here. } }If you have faced the issue
'ej' is not definedafter the above configuration in Angular CLI latest version 7, Please refer the below code snippet in your application where you have rendered Bold Reporting Components(model file) to resolve the issue.`/// <reference types="reports.all" />`
Create Web API service
The web Report Designer requires a Web API service to process the data and file actions. You can skip this step and use our online Web API services to create, edit, and browse reports or you must create any one of the following Web API service.
Set Web API service URL
To set Web API service, open the app.component.ts file and add the code snippet as in the constructor.
import { Component } from '@angular/core';

@Component({
  selector: 'app-root',
  templateUrl: './app.component.html',
  styleUrls: ['./app.component.css']
})
export class AppComponent {
  title = 'reportdesignerapp';
  public serviceUrl: string;

    constructor() {
        this.serviceUrl = "https://demos.boldreports.com/services/api/ReportingAPI";
    }
}
Open the app.component.html to set ServiceUrl property of web Report Designer as in the following code snippet.
<bold-reportdesigner id="designer" [serviceUrl] = "serviceUrl" style="position: absolute;height: 550px; width: 1250px;">
</bold-reportdesigner>
Serve the application
-
Go to the workspace folder (reportdesignerapp).
-
Launch the server by using the CLI command ng serve, with the —open option.
ng serve --open -
The
ng servecommand launches the server and the--openoption automatically opens your browser tohttp://localhost:4200/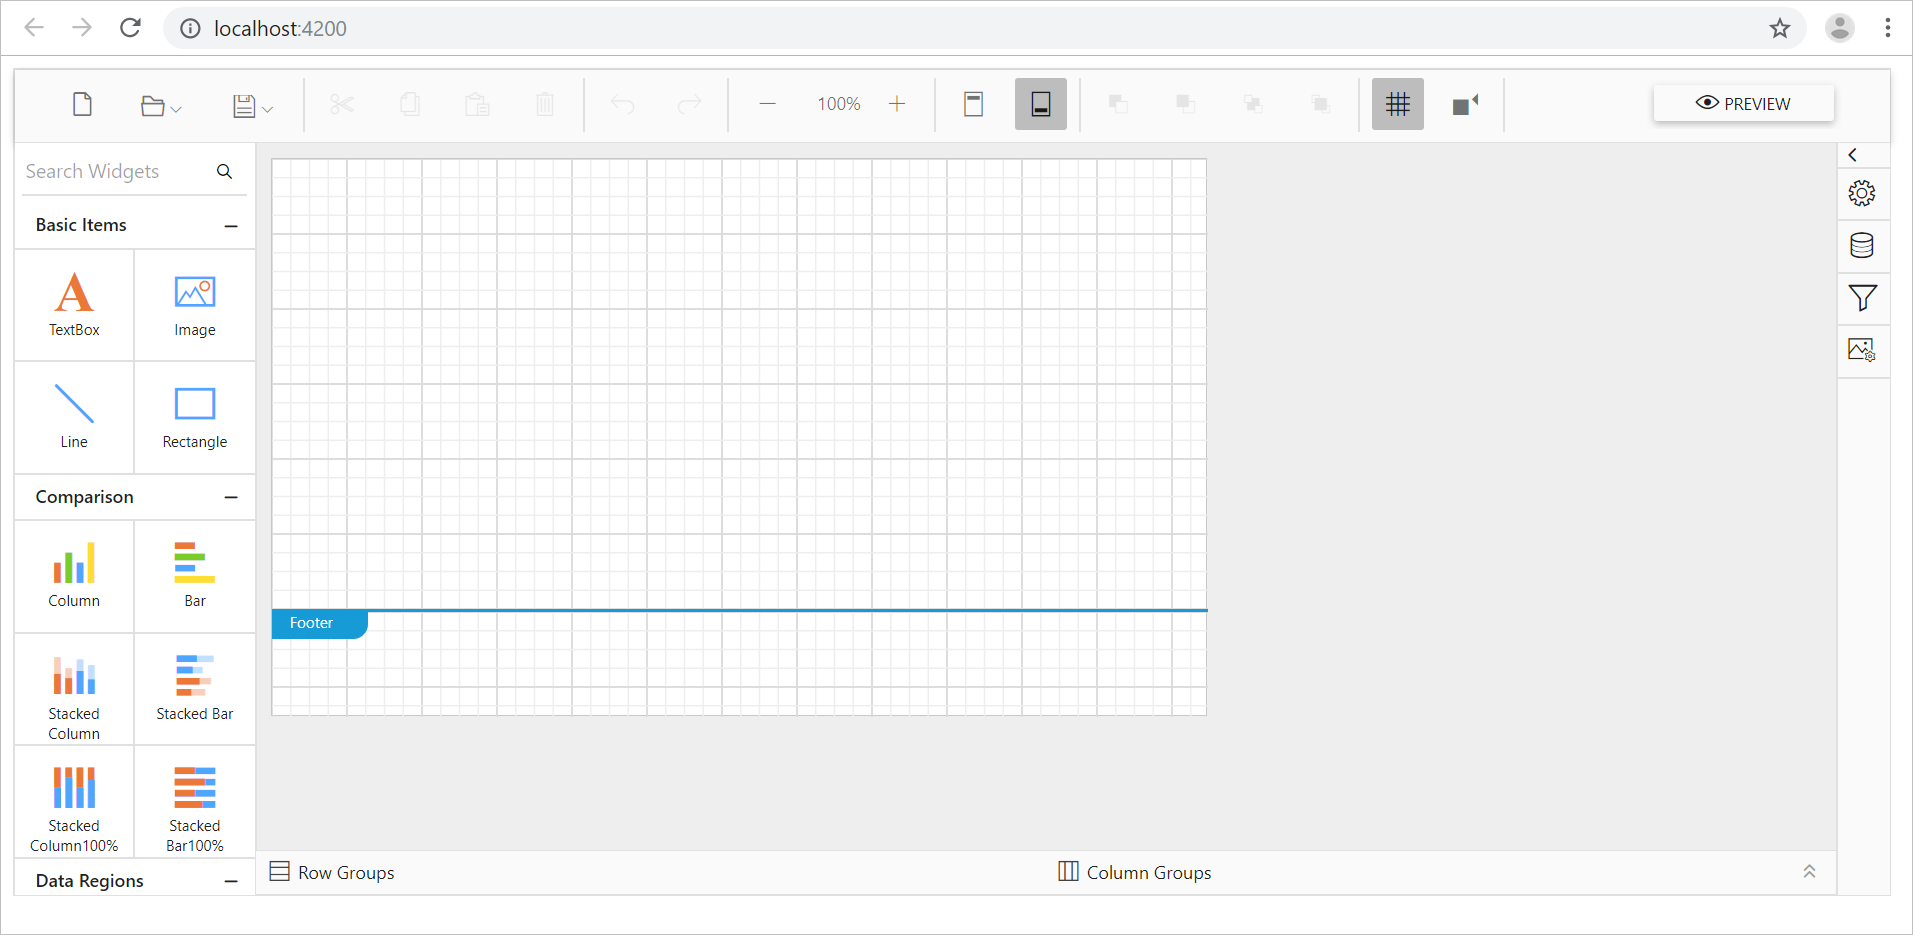
See Also
- Prerequisites
- Install the Angular CLI
- Create a new application
- Configure Bold Report Designer in Angular CLI
- Adding CSS reference
- Adding code mirror reference
- Adding Scripts reference
- Adding Report Designer component
- Create Web API service
- Set Web API service URL
- Serve the application
- See Also